Scan OS packages automatically
Learn how to enable automatic scanning, push a container image on Artifact Registry, and see a list of any vulnerabilities found in the image.
Artifact Analysis scans for vulnerabilities each time an image is pushed to Artifact Registry. Platform administrators and application developers can use this automatic scanning feature to help identify risks in their software delivery pipeline.
This quickstart uses a simple publicly available package to demonstrate one type of package scanning. By default, Artifact Analysis scans for vulnerabilities in multiple package types once you enable the scanning API. Supported package types include: OS, Go, Java (Maven), Python and Node.js (npm).
Before you begin
- Sign in to your Google Cloud account. If you're new to Google Cloud, create an account to evaluate how our products perform in real-world scenarios. New customers also get $300 in free credits to run, test, and deploy workloads.
- Install the Google Cloud CLI.
-
To initialize the gcloud CLI, run the following command:
gcloud init
-
Create or select a Google Cloud project.
-
Create a Google Cloud project:
gcloud projects create PROJECT_ID
Replace
PROJECT_IDwith a name for the Google Cloud project you are creating. -
Select the Google Cloud project that you created:
gcloud config set project PROJECT_ID
Replace
PROJECT_IDwith your Google Cloud project name.
-
-
Make sure that billing is enabled for your Google Cloud project.
-
Enable the Artifact Registry and Container Scanning APIs:
gcloud services enable containerscanning.googleapis.com
artifactregistry.googleapis.com - Install the Google Cloud CLI.
-
To initialize the gcloud CLI, run the following command:
gcloud init
-
Create or select a Google Cloud project.
-
Create a Google Cloud project:
gcloud projects create PROJECT_ID
Replace
PROJECT_IDwith a name for the Google Cloud project you are creating. -
Select the Google Cloud project that you created:
gcloud config set project PROJECT_ID
Replace
PROJECT_IDwith your Google Cloud project name.
-
-
Make sure that billing is enabled for your Google Cloud project.
-
Enable the Artifact Registry and Container Scanning APIs:
gcloud services enable containerscanning.googleapis.com
artifactregistry.googleapis.com
Create a Docker repository in Artifact Registry
Create a Docker repository to store the sample image for this quickstart.
Open the Repositories page in the Google Cloud console.
Click Create Repository.
On the Create Repository page, input the following settings:
- Name:
quickstart-docker-repo - Format: Docker
- Mode: Standard
- Location type: Region
- Region:
us-central1
- Name:
Click Create.
You see the Repositories page. Your quickstart-docker-repo repository is added to the repository list.
Configure authentication
Before you can push or pull images with Artifact Registry, you must configure Docker to use the Google Cloud CLI to authenticate requests to Artifact Registry.
In the Cloud Shell or your local shell, set up authentication for Docker repositories in the region us-central1:
gcloud auth configure-docker us-central1-docker.pkg.dev
Obtain a package
Change to a directory where you want to save your container image.
Copy your image into your local directory. For example, you can use docker to pull the latest Ubuntu image from Docker Hub.
docker pull ubuntu:latest
Tag your package with a repository name
When you want to push a package to Artifact Registry, you need to configure the docker push command to push the image to a specific location.
Run the following command to tag the image as quickstart-image:tag1:
docker tag ubuntu:latest \
us-central1-docker.pkg.dev/PROJECT/quickstart-docker-repo/quickstart-image:tag1
Where
- PROJECT is your Google Cloud
project ID.
If your project ID contains a colon (
:), see Domain-scoped projects. us-central1is the Artifact Registry repository region.docker.pkg.devis the hostname for Docker repositories.quickstart-imageis the image name you want to use in the repository. The image name can be different than the local image name.tag1is a tag you're adding to the Docker image. If you didn't specify a tag, Docker will apply the default taglatest.
Push the image to Artifact Registry
Artifact Analysis automatically scans new images when they're uploaded to Artifact Registry.
To push the image to your Docker repository in Artifact Registry, run the following command:
docker push us-central1-docker.pkg.dev/PROJECT/quickstart-docker-repo/quickstart-image:tag1
Replace PROJECT with your Google Cloud
project ID.
If your project ID contains a colon (:), see
Domain-scoped projects.
View vulnerability scanning results
To see the vulnerabilities in an image:
Open the list of your Artifact Registry repositories in the Artifact Analysis console.
In the repositories list, click a repository.
Click an image name.
You see a list of digests for your image.
The vulnerability total for each image digest is displayed in the Vulnerabilities column.

Click the linked vulnerability total number in the Vulnerabilities column.
You see a list of vulnerabilities.
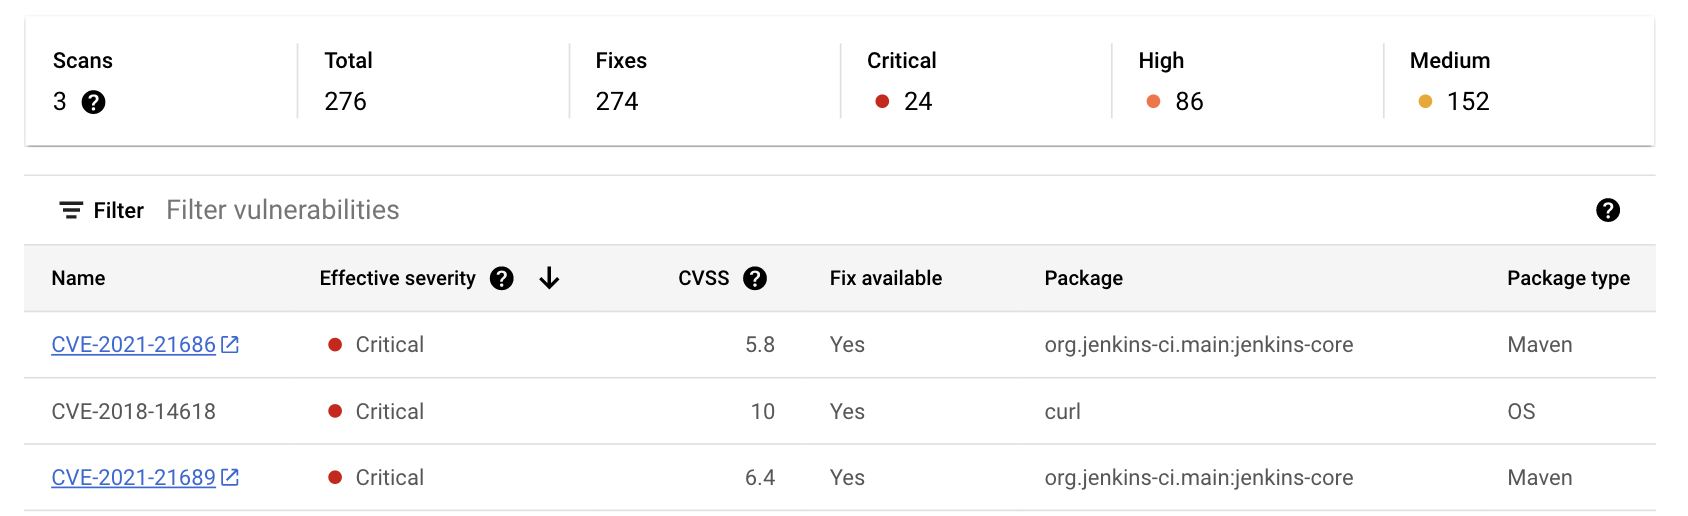
The vulnerability list shows the number of times that this image has been scanned, the vulnerability severity levels, availability of a fix, the name of the package that contains the vulnerability and the package type.
To learn more about a specific vulnerability from the vulnerability source, click the linked CVE identifier in the Name column.
Other ways to view results
The Google Cloud console displays up to 1200 vulnerabilities. If your image has more than 1200 vulnerabilities, use gcloud or the API to view the full list.
Clean up
To avoid incurring charges to your Google Cloud account for the resources used on this page, delete the Google Cloud project with the resources.
If you created a new project for this guide, you can now delete the project.- In the Google Cloud console, go to the Manage resources page.
- In the project list, select the project that you want to delete, and then click Delete.
- In the dialog, type the project ID, and then click Shut down to delete the project.