This document describes the methods and tools available to resolve the following Compute Engine Windows virtual machine (VM) instance boot issues:
You can't connect to the VM using RDP, and troubleshooting is unsuccessful in resolving your connection.
The login screen has not appeared in a VM screenshot, and the VM does not appear to be making progress or performing an update.
You have encountered a blue screen error, frozen or erratically behaving VM under normal operation.
If you are experiencing issues connecting to Windows VMs, see Troubleshooting RDP.
Before you begin
- Review the Microsoft Advanced troubleshooting for Windows boot problems for information about troubleshooting the Windows boot process.
-
If you haven't already, set up authentication.
Authentication is
the process by which your identity is verified for access to Google Cloud services and APIs.
To run code or samples from a local development environment, you can authenticate to
Compute Engine as follows.
Select the tab for how you plan to use the samples on this page:
Console
When you use the Google Cloud console to access Google Cloud services and APIs, you don't need to set up authentication.
gcloud
-
Install the Google Cloud CLI, then initialize it by running the following command:
gcloud init
- Set a default region and zone.
-
Using the Advanced Boot Options menu
If Windows doesn't start correctly, use the Advanced Boot Options menu to access safe mode or complete an online repair of the operating system. For more information, see Advanced startup options.
To enter the Advanced Boot Options menu on your Windows VM, complete the following procedure:
- Enable a display device for the VM if you haven't already.
Restart the VM using one of the following methods:
Console
In the Google Cloud console, go to the VM instances page.
Click the name of the VM you want to restart. The VM instance details page opens.
Click the Reset button to reboot the VM.
gcloud
Use the
gcloud compute instances resetcommand to reset the VM:gcloud compute instances reset VM_NAME --zone=ZONE --project=PROJECT_IDReplace the following:
PROJECT_ID: the ID of the project that contains the VMZONE: the name of the zone in which the VM is locatedVM_NAME: the name of the VM
Command Prompt
While connected to the interactive serial console, open a Command Prompt session and run the following command. For more information about opening a Command Prompt session, see Opening Command Prompt in Windows SAC.
shutdown /r /t 0
The Windows Boot Manager menu opens:
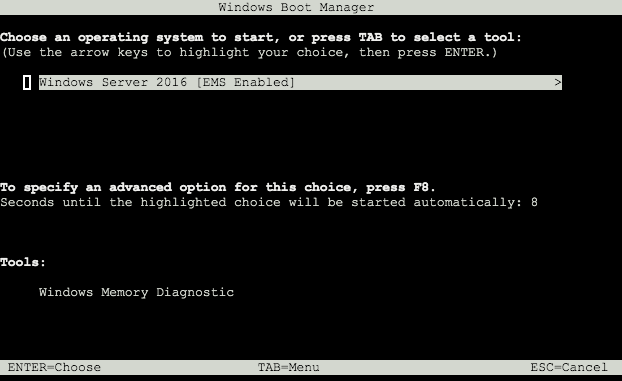
Before the countdown expires, complete these steps:
Ensure the interactive serial console is your active window.
Press the
Esckey on your keyboard.Press the number
8key on your keyboard.
The Advanced Boot Options menu opens:
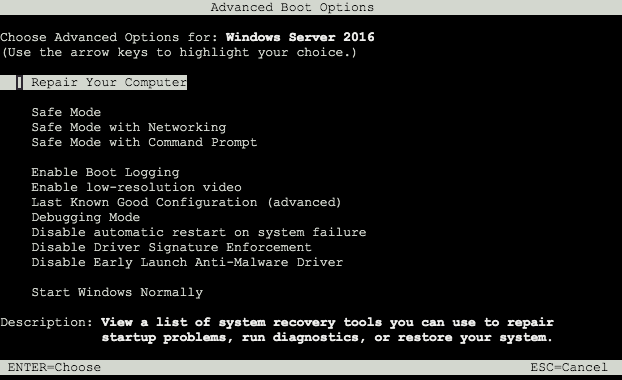
Use the arrow keys on your keyboard to select an option, then open it by pressing the Enter key.
Enabling the Windows Boot Manager menu
You can configure the Windows Boot Manager menu to display when a Windows VM instance is being rebooted. To enable the Windows boot manager menu, do the following:
Connect to the VM and
open a Command Prompt with administrative
access.
If you cannot connect to the VM, add the
subsequent steps as values to a windows-startup-script-cmd or
windows-startup-script-ps1 startup script
instead of running them directly
Command Prompt
To enable the Windows Boot Manager menu at startup and add a 15 second timeout, run the following commands:
bcdedit /set {bootmgr} displaybootmenu yesbcdedit /set {bootmgr} timeout 15To reboot the VM and display the Windows boot manager menu in the serial console using the following command:
shutdown -r -t 0
PowerShell
To enable the Windows Boot Manager menu at startup and add a 15 second timeout, run the following commands:
bcdedit /set '{bootmgr}' displaybootmenu yesbcdedit /set '{bootmgr}' timeout 15To reboot the VM and display the Windows boot manager menu in the serial console using the following command:
shutdown -r -t 0
Completing an offline repair
If your VM doesn't start correctly and using the advanced boot menu has failed to resolve the issue, try performing an offline repair using a functional Windows VM instance for recovery with a snapshot of the troubled VM's boot disk. Using a snapshot gives you a backup copy that can be modified without changing the state of the original VM.
Create a snapshot of the troubled VM's boot disk.
Create a disk using that snapshot.
Create a VM with an additional non-boot disk, using the newly created disk. Your recovery VM should meet these criteria:
- The recovery VM must be in the same zone as the disk that was created.
- The recovery VM should also be using a Windows Server image.
- The source image of the recovery VM's boot disk should be different to the source image of troubled VM's boot disk.
You can now use Windows tools and utilities to attempt an offline repair of on the additional attached disk. Refer to the following documentation for details about completing an offline repair of your VM:
If the offline repair has completed successfully, update the boot disk of the troubled VM to be the newly repaired boot disk.
Optional: Delete the additional resources after you no longer need them:
- Delete the recovery VM
- Delete the original corrupted boot disk
- Delete the original corrupted boot disk snapshot
Troubleshooting blue screen errors
The Windows operating system may experience a stop code or blue screen error, also know as a Blue Screen of Death. If a VM experiences a blue screen error, the VM stops running and needs to perform a restart before resuming normal operations.
If you believe a blue screen error may have occurred, confirm this by identifying presence of errors using one or more of the following methods:
Serial port 1
In the Google Cloud console, go to the VM instances page.
Click the name of the VM you want to view logs for. The VM instance details page opens.
Under Logs, click Serial port 1.
A stack trace dump similar to the following confirms a blue screen error:
ntoskrnl.exe [0xFFFFF802C9606000, 0xFFFFF802C9E23000]
netbios.sys [0xFFFFF80E98430000, 0xFFFFF80E98442000]
volmgr.sys [0xFFFFF80E97E40000, 0xFFFFF80E97E58000]
NTFS.sys [0xFFFFF80E98060000, 0xFFFFF80E98293000]
crashdmp.sys [0xFFFFF80E986C0000, 0xFFFFF80E986D9000]
pvpanic.sys [0xFFFFF80E99030000, 0xFFFFF80E9903C000]
myfault.sys [0xFFFFF80E9A570000, 0xFFFFF80E9A578000]
Dumping stack trace:
0xFFFFF80E990317C7 (pvpanic.sys+0x17C7)
0xFFFFF80E990316D3 (pvpanic.sys+0x16D3)
0xFFFFF802C97D9681 (ntoskrnl.exe+0x1D3681)
0xFFFFF802C97D8A1F (ntoskrnl.exe+0x1D2A1F)
0xFFFFF802C97633F4 (ntoskrnl.exe+0x15D3F4)
0xFFFFF802C9773329 (ntoskrnl.exe+0x16D329)
0xFFFFF802C976F152 (ntoskrnl.exe+0x169152)
0xFFFFF80E9A572794 (myfault.sys+0x2794)
Current Process: notmyfault64.e
Serial port 2
In the Google Cloud console, go to the VM instances page.
Click the name of the VM you want to view logs for. The VM instance details page opens.
Under Logs, expand More, then click Serial port 2 (console).
Review the serial port of the instance, and look for this output similar to the following:
!SAC>
Your PC ran into a problem and needs to restart.
If you call a support person, give them this info:
UNEXPECTED_KERNEL_MODE_TRAP

myfault.sys

0x0000000000000008
0xFFFFC6812AB94F70
0xFFFFC6812E38EFF0
0xFFFFF80E9A572794

We're just collecting some error info, and then we'll restart for you.
100% complete
Command Prompt
Connect to the instance and open a Command Prompt with administrative access.
To display the most recent blue screen event, run the following command:
wevtutil qe System "/q:*[System [(EventID=1001)]]" /rd:True /c:1 /f:Text
Review the output, which looks similar to the following:
Event[0]:
  Log Name: System
  Source: Microsoft-Windows-WER-SystemErrorReporting
  Date: 2021-04-14T08:53:52.933
  Event ID: 1001
  Task: N/A
  Level: Error
  Opcode: N/A
  Keyword: Classic
  User: N/A
  User Name: N/A
  Computer: WINDOWS
  Description:
The computer has rebooted from a bugcheck.  The bugcheck was: 0x1000007f (0x
0000000000000008, 0xffffc6812ab94f70, 0xffffc6812e38eff0, 0xfffff80e9a572794
). A dump was saved in: C:\Windows\Minidump\041421-12656-01.dmp. Report Id:
a5710c98-a577-4b3e-a3c9-2fc0aa4e5d83.
For information about customizing wetutil queries, see
wevtutil.
Disk Snapshot
If the VM is no longer operational, or the other methods have proven unsuccessful. You can inspect the boot disk of the suspected blue screen VM with a secondary VM. Using a snapshot gives you a backup copy that can be modified without changing the state of the original VM.
Create a snapshot of the suspected blue screen VM's boot disk.
Create a disk using that snapshot.
Create a VM with an additional non-boot disk , using the newly created disk of the suspected VM. Your recovery VM should meet these criteria:
- The recovery VM must be in the same zone as the disk that was created.
- The recovery VM should also be using a Windows Server image.
- The source image of the recovery VM's boot disk should be different to the source image of troubled VM's boot disk.
Browse the additional disk and locate for the following files:
%SystemRoot%\Memory.dmp
%SystemRoot%\Minidump\DATE-TIME-NUM.dmp
The date and time of the file can help you correlate if the suspected instance experienced a blue screen error. These files can also be used for analysis and diagnosis.
Optional: Delete the additional resources after you no longer need them:
After you obtain the blue screen error information and optionally obtained access to the memory dump file, follow the diagnostic steps and recommendations as provided by Microsoft:
Licensing issues
Windows operating systems renew their licenses every seven days by connecting to the Key Management Service (KMS) server. If you receive messages about license expiration or any other issues related to licenses on your Windows VMs, do the following:
Confirm that your Windows VM's VPC network is configured to allow communication with KMS.
Confirm that the Windows Firewall permits outbound connections to the KMS server:
- IP address:
35.190.247.13 - Port:
1688 - Protocol:
TCP
For more information about configuring Windows Advanced Firewall rules, see Create an Outbound Port Rule.
- IP address:
Test the connection to the KMS server is successful by running the following command:
powershell.exe Test-NetConnection 35.190.247.13 -Port 1688
Run the following commands to confirm the current state of your license, set the server IP address of the KMS and force an activation:
cscript \windows\system32\slmgr.vbs /dlv
cscript \windows\system32\slmgr.vbs /skms 35.190.247.13:1688
cscript \windows\system32\slmgr.vbs /ato
Troubleshooting Interactive Serial Console
Ensure that you meet the prerequsiste to access serial console.
Enable Emergency Management Services. If EMS is turned off, the serial console won't take any keyboard inputs but present only a blank screen with a blinking cursor.
Command Prompt
Connect to the VM using RDP and open
Command Promptas an Administrator. If you cannot RDP, add the subsequent steps as values to thewindows-startup-script-cmdstartup key.Set the global EMS redirection settings to use COM2, a baud rate of 115200, and enable EMS.
bcdedit /emssettings EMSPORT:2 EMSBAUDRATE:115200
bcdedit /ems on
Reboot the VM to apply the updated configuration. If you're using a metadata script don't add the shutdown command.
shutdown -r -t 0
PowerShell
Connect through RDP and open
Powershellas Administrator. If you cannot RDP, add the subsequent steps as values to thewindows-startup-script-ps1startup key.Set the global EMS redirection settings to use COM2, a baud rate of 115200, and enable EMS.
bcdedit /emssettings EMSPORT:2 EMSBAUDRATE:115200
bcdedit /ems on
Reboot the VM to apply the updated configuration. If you're using a metadata script don't add the shutdown command.
shutdown -r -t 0
What's next
Learn how to collect diagnostic information from a VM.
Learn how to capture screenshots from VMs.
Learn about licensing for Windows Server and SQL Server images.
Learn more about interacting with the serial console.
Learn how to Troubleshoot RDP connections.