Crea una instancia de VM con un nombre de host personalizado


Cuando creas una instancia de máquina virtual (VM), Google Cloud crea un nombre de DNS interno a partir del nombre de la VM. A menos que especifiques un nombre de host personalizado, Google Cloud usa el nombre de DNS interno que se creó de forma automática como el nombre de host que proporciona a la VM.

Puedes crear una VM con un nombre de host personalizado y especificar cualquier nombre DNS completamente calificado. Los nombres de host personalizados son útiles a fin de mantener las convenciones o admitir requisitos para las aplicaciones que esperan un nombre de host en particular.

Incluso cuando especificas un nombre de host personalizado, Google Cloud creará el nombre de DNS interno de Compute Engine. Puedes conectarte a tu VM con este registro DNS interno creado automáticamente. El registro DNS interno se resuelve en el nombre de DNS interno y no en el nombre de host personalizado. Con los nombres de host personalizados, aún es necesario crear un registro DNS correspondiente en la zona adecuada, por ejemplo, mediante Cloud DNS.

Antes de comenzar

  • Configura la autenticación si aún no lo hiciste. La autenticación es el proceso mediante el cual se verifica tu identidad para acceder a los servicios y las API de Google Cloud. Para ejecutar un código o muestras desde un entorno de desarrollo local, puedes autenticarte en Compute Engine de la siguiente manera.

    Selecciona la pestaña para saber cómo planeas usar las muestras en esta página:

    Consola

    Cuando usas la consola de Google Cloud para acceder a los servicios y las APIs de Google Cloud, no necesitas configurar la autenticación.

    gcloud

    1. Instala Google Cloud CLI y, luego, inicializa la ejecución del siguiente comando:

      gcloud init
    2. Configura una región y una zona predeterminadas.

    Terraform

    Para usar las muestras de Terraform de esta página desde un entorno de desarrollo local, instala e inicializa la CLI de gcloud y, luego, configura las credenciales predeterminadas de la aplicación con tus credenciales de usuario.

    1. Instala Google Cloud CLI.
    2. Para inicializar la CLI de gcloud, ejecuta el siguiente comando:

      gcloud init
    3. Crea credenciales de autenticación locales para tu Cuenta de Google:

      gcloud auth application-default login

    Para obtener más información, consulta Configura la autenticación para un entorno de desarrollo local.

    Go

    Para usar las muestras de Go de esta página desde un entorno de desarrollo local, instala e inicializa la CLI de gcloud y, luego, configura las credenciales predeterminadas de la aplicación con tus credenciales de usuario.

    1. Instala Google Cloud CLI.
    2. Para inicializar la CLI de gcloud, ejecuta el siguiente comando:

      gcloud init
    3. Crea credenciales de autenticación locales para tu Cuenta de Google:

      gcloud auth application-default login

    Para obtener más información, consulta Configura la autenticación para un entorno de desarrollo local.

    Java

    Para usar las muestras de Java de esta página desde un entorno de desarrollo local, instala e inicializa la CLI de gcloud y, luego, configura las credenciales predeterminadas de la aplicación con tus credenciales de usuario.

    1. Instala Google Cloud CLI.
    2. Para inicializar la CLI de gcloud, ejecuta el siguiente comando:

      gcloud init
    3. Crea credenciales de autenticación locales para tu Cuenta de Google:

      gcloud auth application-default login

    Para obtener más información, consulta Configura la autenticación para un entorno de desarrollo local.

    Node.js

    Para usar las muestras de Node.js de esta página desde un entorno de desarrollo local, instala e inicializa la CLI de gcloud y, luego, configura las credenciales predeterminadas de la aplicación con tus credenciales de usuario.

    1. Instala Google Cloud CLI.
    2. Para inicializar la CLI de gcloud, ejecuta el siguiente comando:

      gcloud init
    3. Crea credenciales de autenticación locales para tu Cuenta de Google:

      gcloud auth application-default login

    Para obtener más información, consulta Configura la autenticación para un entorno de desarrollo local.

    Python

    Para usar las muestras de Python de esta página desde un entorno de desarrollo local, instala e inicializa la CLI de gcloud y, luego, configura las credenciales predeterminadas de la aplicación con tus credenciales de usuario.

    1. Instala Google Cloud CLI.
    2. Para inicializar la CLI de gcloud, ejecuta el siguiente comando:

      gcloud init
    3. Crea credenciales de autenticación locales para tu Cuenta de Google:

      gcloud auth application-default login

    Para obtener más información, consulta Configura la autenticación para un entorno de desarrollo local.

    REST

    Para usar las muestras de la API de REST en esta página en un entorno de desarrollo local, debes usar las credenciales que proporcionas a la CLI de gcloud.

      Instala Google Cloud CLI y, luego, inicializa la ejecución del siguiente comando:

      gcloud init

Roles obligatorios

Para obtener los permisos que necesitas para crear VM con un nombre de host personalizado, pídele a tu administrador que te otorgue el rol de Administrador de instancias de Compute (v1) (roles/compute.instanceAdmin.v1) de IAM en el proyecto. Para obtener más información sobre cómo otorgar roles, consulta Administra el acceso.

Este rol predefinido contiene los permisos necesarios para crear VM con un nombre de host personalizado. Para ver los permisos exactos que son necesarios, expande la sección Permisos requeridos:

Permisos necesarios

Se requieren los siguientes permisos para crear una VM con un nombre de host personalizado:

  • compute.instances.create en el proyecto
  • Si deseas usar una imagen personalizada para crear la VM, sigue estos pasos: compute.images.useReadOnly en la imagen
  • Para usar una instantánea a fin de crear la VM, haz lo siguiente: compute.snapshots.useReadOnly en la instantánea
  • Si quieres usar una plantilla de instancias para crear la VM, sigue estos pasos: compute.instanceTemplates.useReadOnly en la plantilla de instancias
  • Para asignar una red heredada a la VM, ejecuta compute.networks.use en el proyecto.
  • Si deseas especificar una dirección IP estática para la VM: compute.addresses.use en el proyecto
  • Para asignar una dirección IP externa a la VM cuando se usa una red heredada, ejecuta compute.networks.useExternalIp en el proyecto
  • A fin de especificar una subred para tu VM: compute.subnetworks.use en el proyecto o en la subred elegida
  • Para asignar una dirección IP externa a la VM cuando se usa una red de VPC, compute.subnetworks.useExternalIp en el proyecto o en la subred elegida.
  • Para configurar los metadatos de la instancia de VM para la VM, compute.instances.setMetadata en el proyecto.
  • Para configurar etiquetas en la VM, haz lo siguiente: compute.instances.setTags en la VM
  • Para configurar etiquetas en la VM, haz lo siguiente: compute.instances.setLabels en la VM
  • A fin de configurar una cuenta de servicio para que la VM use: compute.instances.setServiceAccount en la VM
  • Crear un disco nuevo para la VM: compute.disks.create en el proyecto
  • Para conectar un disco existente en modo de solo lectura o de lectura y escritura, usa compute.disks.use en el disco.
  • Para conectar un disco existente en modo de solo lectura, haz lo siguiente: compute.disks.useReadOnly en el disco

También puedes obtener estos permisos con funciones personalizadas o con otras funciones predefinidas

Limitaciones

  • Debes configurar manualmente el registro DNS para tu nombre de host personalizado. Los nombres de host personalizados no se resuelven mediante los registros creados automáticamente que proporciona el DNS interno de Compute Engine. Puedes usar cualquiera de los siguientes a fin de alojar el registro DNS para el nombre de host personalizado:

  • No puedes cambiar un nombre de host personalizado después de crear la VM.

Convención de nombres

Los nombres de host personalizados deben cumplir con los requisitos de RFC 1035 para nombres de host válidos. Para cumplir con estos requisitos, los nombres de host personalizados deben cumplir con las siguientes especificaciones de formato:

  • El nombre de host contiene al menos dos etiquetas que se describen de la siguiente manera:
    • Cada etiqueta contiene expresiones regulares que incluyen solo estos caracteres: [a-z]([-a-z0-9]*[a-z0-9])?.
    • Las etiquetas se concatenan con un punto.
    • Cada etiqueta tiene entre 1 y 63 caracteres.
  • El nombre de host no supera los 253 caracteres.

No válido: Contiene una sola etiqueta.

my-host1234

Válido: Contiene tres etiquetas concatenadas con puntos.

my-host1234.example.com

Crea una VM con un nombre de host personalizado

Console

  1. En la consola de Google Cloud, ve a la página Crea una instancia.

    Ir a Crear una instancia

  2. Especifica un Nombre para la VM. Para obtener más información, consulta Convención de asignación de nombres de recursos.

  3. Expande la sección Opciones avanzadas y sigue estos pasos:

    1. Expande la sección Herramientas de redes.
    2. En el campo Nombre de host, especifica el nombre de host personalizado.
  4. Realiza personalizaciones de VM adicionales, según sea necesario.

  5. Para crear y, también, iniciar la VM, haz clic en Crear.

Paso siguiente: Configura tus registros DNS. Para obtener más información, consulta Administra registros.

gcloud

Con Google Cloud CLI, sigue las instrucciones para crear una instancia a partir de una imagen o una instantánea, agrega --hostname y usa el comando gcloud compute instances create de la siguiente manera:

gcloud compute instances create VM_NAME \
    --hostname=HOST_NAME

Reemplaza lo siguiente:

  • VM_NAMEEl nombre de la VM
  • HOST_NAME: El nombre de host del dominio completamente calificado que deseas asignar

Por ejemplo, para crear una VM myinstance con el nombre de host personalizado test.example.com, ejecuta el siguiente comando:

gcloud compute instances create myinstance \
    --hostname=test.example.com

Paso siguiente: Configura tus registros DNS. Para obtener más información, consulta Administra registros.

Terraform

Puedes usar un recurso de Terraform para crear una instancia con un nombre de host personalizado con el argumento hostname.


resource "google_compute_instance" "custom_hostname_instance" {
  name         = "custom-hostname-instance-name"
  machine_type = "f1-micro"
  zone         = "us-central1-c"

  # Set a custom hostname below
  hostname = "hashicorptest.com"

  boot_disk {
    initialize_params {
      image = "debian-cloud/debian-11"
    }
  }
  network_interface {
    # A default network is created for all GCP projects
    network = "default"
    access_config {
    }
  }
}
Para generar el código de Terraform, puedes usar el componente Código equivalente en la consola de Google Cloud.
  1. En la consola de Google Cloud, ve a la página Instancias de VM.

    Ir a Instancias de VM

  2. Haz clic en Crear instancia.
  3. Especifica los parámetros que desees.
  4. En la parte superior o inferior de la página, haz clic en Código equivalente y, luego, en la pestaña Terraform para ver el código de Terraform.

Paso siguiente: Configura tus registros DNS. Para obtener más información, consulta Administra registros.

Go

import (
	"context"
	"fmt"
	"io"

	compute "cloud.google.com/go/compute/apiv1"
	computepb "cloud.google.com/go/compute/apiv1/computepb"
	"google.golang.org/protobuf/proto"
)

// createInstanceWithCustomHostname creates an instance with custom hostname.
func createInstanceWithCustomHostname(w io.Writer, projectID, zone, instanceName, hostname, machineType, sourceImage, networkName string) error {
	// projectID := "your_project_id"
	// zone := "europe-central2-b"
	// instanceName := "your_instance_name"
	// hostname := "host.example.com" // Custom hostnames must conform to RFC 1035 requirements for valid hostnames.
	// machineType := "n1-standard-1"
	// sourceImage := "projects/debian-cloud/global/images/family/debian-10"
	// networkName := "global/networks/default"

	ctx := context.Background()
	instancesClient, err := compute.NewInstancesRESTClient(ctx)
	if err != nil {
		return fmt.Errorf("NewInstancesRESTClient: %w", err)
	}
	defer instancesClient.Close()

	req := &computepb.InsertInstanceRequest{
		Project: projectID,
		Zone:    zone,
		InstanceResource: &computepb.Instance{
			Name: proto.String(instanceName),
			// Custom hostnames are not resolved by the automatically created records
			// provided by Compute Engine internal DNS.
			// You must manually configure the DNS record for your custom hostname.
			Hostname: proto.String(hostname),
			Disks: []*computepb.AttachedDisk{
				{
					// Describe the size and source image of the boot disk to attach to the instance.
					InitializeParams: &computepb.AttachedDiskInitializeParams{
						DiskSizeGb:  proto.Int64(10),
						SourceImage: proto.String(sourceImage),
					},
					AutoDelete: proto.Bool(true),
					Boot:       proto.Bool(true),
					Type:       proto.String(computepb.AttachedDisk_PERSISTENT.String()),
				},
			},
			MachineType: proto.String(fmt.Sprintf("zones/%s/machineTypes/%s", zone, machineType)),
			NetworkInterfaces: []*computepb.NetworkInterface{
				{
					// Use the network interface provided in the networkName argument.
					Name: proto.String(networkName),
				},
			},
		},
	}

	op, err := instancesClient.Insert(ctx, req)
	if err != nil {
		return fmt.Errorf("unable to create instance: %w", err)
	}

	if err = op.Wait(ctx); err != nil {
		return fmt.Errorf("unable to wait for the operation: %w", err)
	}

	fmt.Fprintf(w, "Instance created\n")

	return nil
}

Java


import com.google.cloud.compute.v1.AttachedDisk;
import com.google.cloud.compute.v1.AttachedDiskInitializeParams;
import com.google.cloud.compute.v1.InsertInstanceRequest;
import com.google.cloud.compute.v1.Instance;
import com.google.cloud.compute.v1.InstancesClient;
import com.google.cloud.compute.v1.NetworkInterface;
import com.google.cloud.compute.v1.Operation;
import java.io.IOException;
import java.util.concurrent.ExecutionException;
import java.util.concurrent.TimeUnit;
import java.util.concurrent.TimeoutException;

public class CreateInstanceWithCustomHostname {

  public static void main(String[] args)
      throws IOException, ExecutionException, InterruptedException, TimeoutException {
    // TODO(developer): Replace these variables before running the sample.
    // hostName: Custom hostname of the new VM instance.
    // *    Custom hostnames must conform to RFC 1035 requirements for valid hostnames.
    String project = "your-project-id";
    String zone = "zone-name"; // eg: "us-central1-a"
    String instanceName = "instance-name";
    String hostName = "host.example.com";
    createInstanceWithCustomHostname(project, zone, instanceName, hostName);
  }

  // Creates an instance with custom hostname.
  public static void createInstanceWithCustomHostname(String projectId, String zone,
      String instanceName, String hostName)
      throws IOException, ExecutionException, InterruptedException, TimeoutException {
    //  machineType - Machine type for the VM instance specified in the following format:
    //  *    "zones/{zone}/machineTypes/{type_name}". For example:
    //  *    "zones/europe-west3-c/machineTypes/f1-micro"
    //  *    You can find the list of available machine types by using this gcloud command:
    //  *    $ gcloud compute machine-types list
    //  sourceImage - Path of the disk image you want to use for your boot
    //  *    disk. This image can be one of the public images
    //  *    eg: "projects/...
    //  *    or a private image you have access to.
    //  *    You can check the list of available public images using:
    //  *    $ gcloud compute images list
    //  networkName - Name of the network you want the new instance to use.
    //  *    For example: global/networks/default - if you want to use the default network.
    String machineType = "n1-standard-1";
    String sourceImage = String.format("projects/%s/global/images/family/%s", "debian-cloud",
        "debian-11");
    String networkName = "global/networks/default";

    try (InstancesClient instancesClient = InstancesClient.create()) {
      System.out.printf("Creating the %s instance in %s with hostname %s...", instanceName, zone,
          hostName);

      AttachedDisk disk =
          AttachedDisk.newBuilder()
              .setBoot(true)
              .setAutoDelete(true)
              .setType(AttachedDisk.Type.PERSISTENT.toString())
              .setInitializeParams(
                  // Describe the size and source image of the boot disk to attach to the instance.
                  AttachedDiskInitializeParams.newBuilder()
                      .setSourceImage(sourceImage)
                      .setDiskSizeGb(10).build())
              .build();

      // Use the network interface provided in the networkName argument.
      NetworkInterface networkInterface = NetworkInterface.newBuilder()
          .setName(networkName)
          .build();

      Instance instanceResource = Instance.newBuilder()
          // Custom hostnames are not resolved by the automatically created records
          // provided by Compute Engine internal DNS.
          // You must manually configure the DNS record for your custom hostname.
          .setName(instanceName)
          .setHostname(hostName)
          .addDisks(disk)
          .setMachineType(String.format("zones/%s/machineTypes/%s", zone, machineType))
          .addNetworkInterfaces(networkInterface).build();

      InsertInstanceRequest request = InsertInstanceRequest.newBuilder()
          .setProject(projectId)
          .setZone(zone)
          .setInstanceResource(instanceResource).build();

      // Wait for the create operation to complete.
      Operation response = instancesClient.insertAsync(request).get(3, TimeUnit.MINUTES);
      ;

      if (response.hasError()) {
        System.out.printf("Instance creation failed for instance: %s ; Response: %s ! ! ",
            instanceName, response);
        return;
      }
      System.out.printf("Instance created : %s", instanceName);
      System.out.printf("Operation Status for instance %s is %s: ", instanceName,
          response.getStatus());
    }

  }

}

Node.js

/**
 * TODO(developer): Uncomment and replace these variables before running the sample.
 */
// const projectId = 'YOUR_PROJECT_ID';
// const zone = 'europe-central2-b'
// const instanceName = 'YOUR_INSTANCE_NAME'
// const hostname = 'host.example.com'
// const machineType = 'n1-standard-1';
// const sourceImage = 'projects/debian-cloud/global/images/family/debian-10';
// const networkName = 'global/networks/default';

const compute = require('@google-cloud/compute');

// Create a new instance with the values provided above in the specified project and zone.
async function createInstanceWithCustomHostname() {
  const instancesClient = new compute.InstancesClient();

  console.log(
    `Creating the ${instanceName} instance in ${zone} with hostname ${hostname}...`
  );

  const [response] = await instancesClient.insert({
    instanceResource: {
      name: instanceName,
      // Custom hostnames are not resolved by the automatically created records
      // provided by Compute Engine internal DNS.
      // You must manually configure the DNS record for your custom hostname.
      hostname,
      disks: [
        {
          // Describe the size and source image of the boot disk to attach to the instance.
          initializeParams: {
            diskSizeGb: '10',
            sourceImage,
          },
          autoDelete: true,
          boot: true,
          type: 'PERSISTENT',
        },
      ],
      machineType: `zones/${zone}/machineTypes/${machineType}`,
      networkInterfaces: [
        {
          // Use the network interface provided in the networkName argument.
          name: networkName,
        },
      ],
    },
    project: projectId,
    zone,
  });
  let operation = response.latestResponse;
  const operationsClient = new compute.ZoneOperationsClient();

  // Wait for the create operation to complete.
  while (operation.status !== 'DONE') {
    [operation] = await operationsClient.wait({
      operation: operation.name,
      project: projectId,
      zone: operation.zone.split('/').pop(),
    });
  }

  console.log('Instance created.');
}

createInstanceWithCustomHostname();

Python

from __future__ import annotations

import re
import sys
from typing import Any
import warnings

from google.api_core.extended_operation import ExtendedOperation
from google.cloud import compute_v1


def get_image_from_family(project: str, family: str) -> compute_v1.Image:
    """
    Retrieve the newest image that is part of a given family in a project.

    Args:
        project: project ID or project number of the Cloud project you want to get image from.
        family: name of the image family you want to get image from.

    Returns:
        An Image object.
    """
    image_client = compute_v1.ImagesClient()
    # List of public operating system (OS) images: https://cloud.google.com/compute/docs/images/os-details
    newest_image = image_client.get_from_family(project=project, family=family)
    return newest_image


def disk_from_image(
    disk_type: str,
    disk_size_gb: int,
    boot: bool,
    source_image: str,
    auto_delete: bool = True,
) -> compute_v1.AttachedDisk:
    """
    Create an AttachedDisk object to be used in VM instance creation. Uses an image as the
    source for the new disk.

    Args:
         disk_type: the type of disk you want to create. This value uses the following format:
            "zones/{zone}/diskTypes/(pd-standard|pd-ssd|pd-balanced|pd-extreme)".
            For example: "zones/us-west3-b/diskTypes/pd-ssd"
        disk_size_gb: size of the new disk in gigabytes
        boot: boolean flag indicating whether this disk should be used as a boot disk of an instance
        source_image: source image to use when creating this disk. You must have read access to this disk. This can be one
            of the publicly available images or an image from one of your projects.
            This value uses the following format: "projects/{project_name}/global/images/{image_name}"
        auto_delete: boolean flag indicating whether this disk should be deleted with the VM that uses it

    Returns:
        AttachedDisk object configured to be created using the specified image.
    """
    boot_disk = compute_v1.AttachedDisk()
    initialize_params = compute_v1.AttachedDiskInitializeParams()
    initialize_params.source_image = source_image
    initialize_params.disk_size_gb = disk_size_gb
    initialize_params.disk_type = disk_type
    boot_disk.initialize_params = initialize_params
    # Remember to set auto_delete to True if you want the disk to be deleted when you delete
    # your VM instance.
    boot_disk.auto_delete = auto_delete
    boot_disk.boot = boot
    return boot_disk


def wait_for_extended_operation(
    operation: ExtendedOperation, verbose_name: str = "operation", timeout: int = 300
) -> Any:
    """
    Waits for the extended (long-running) operation to complete.

    If the operation is successful, it will return its result.
    If the operation ends with an error, an exception will be raised.
    If there were any warnings during the execution of the operation
    they will be printed to sys.stderr.

    Args:
        operation: a long-running operation you want to wait on.
        verbose_name: (optional) a more verbose name of the operation,
            used only during error and warning reporting.
        timeout: how long (in seconds) to wait for operation to finish.
            If None, wait indefinitely.

    Returns:
        Whatever the operation.result() returns.

    Raises:
        This method will raise the exception received from `operation.exception()`
        or RuntimeError if there is no exception set, but there is an `error_code`
        set for the `operation`.

        In case of an operation taking longer than `timeout` seconds to complete,
        a `concurrent.futures.TimeoutError` will be raised.
    """
    result = operation.result(timeout=timeout)

    if operation.error_code:
        print(
            f"Error during {verbose_name}: [Code: {operation.error_code}]: {operation.error_message}",
            file=sys.stderr,
            flush=True,
        )
        print(f"Operation ID: {operation.name}", file=sys.stderr, flush=True)
        raise operation.exception() or RuntimeError(operation.error_message)

    if operation.warnings:
        print(f"Warnings during {verbose_name}:\n", file=sys.stderr, flush=True)
        for warning in operation.warnings:
            print(f" - {warning.code}: {warning.message}", file=sys.stderr, flush=True)

    return result


def create_instance(
    project_id: str,
    zone: str,
    instance_name: str,
    disks: list[compute_v1.AttachedDisk],
    machine_type: str = "n1-standard-1",
    network_link: str = "global/networks/default",
    subnetwork_link: str = None,
    internal_ip: str = None,
    external_access: bool = False,
    external_ipv4: str = None,
    accelerators: list[compute_v1.AcceleratorConfig] = None,
    preemptible: bool = False,
    spot: bool = False,
    instance_termination_action: str = "STOP",
    custom_hostname: str = None,
    delete_protection: bool = False,
) -> compute_v1.Instance:
    """
    Send an instance creation request to the Compute Engine API and wait for it to complete.

    Args:
        project_id: project ID or project number of the Cloud project you want to use.
        zone: name of the zone to create the instance in. For example: "us-west3-b"
        instance_name: name of the new virtual machine (VM) instance.
        disks: a list of compute_v1.AttachedDisk objects describing the disks
            you want to attach to your new instance.
        machine_type: machine type of the VM being created. This value uses the
            following format: "zones/{zone}/machineTypes/{type_name}".
            For example: "zones/europe-west3-c/machineTypes/f1-micro"
        network_link: name of the network you want the new instance to use.
            For example: "global/networks/default" represents the network
            named "default", which is created automatically for each project.
        subnetwork_link: name of the subnetwork you want the new instance to use.
            This value uses the following format:
            "regions/{region}/subnetworks/{subnetwork_name}"
        internal_ip: internal IP address you want to assign to the new instance.
            By default, a free address from the pool of available internal IP addresses of
            used subnet will be used.
        external_access: boolean flag indicating if the instance should have an external IPv4
            address assigned.
        external_ipv4: external IPv4 address to be assigned to this instance. If you specify
            an external IP address, it must live in the same region as the zone of the instance.
            This setting requires `external_access` to be set to True to work.
        accelerators: a list of AcceleratorConfig objects describing the accelerators that will
            be attached to the new instance.
        preemptible: boolean value indicating if the new instance should be preemptible
            or not. Preemptible VMs have been deprecated and you should now use Spot VMs.
        spot: boolean value indicating if the new instance should be a Spot VM or not.
        instance_termination_action: What action should be taken once a Spot VM is terminated.
            Possible values: "STOP", "DELETE"
        custom_hostname: Custom hostname of the new VM instance.
            Custom hostnames must conform to RFC 1035 requirements for valid hostnames.
        delete_protection: boolean value indicating if the new virtual machine should be
            protected against deletion or not.
    Returns:
        Instance object.
    """
    instance_client = compute_v1.InstancesClient()

    # Use the network interface provided in the network_link argument.
    network_interface = compute_v1.NetworkInterface()
    network_interface.network = network_link
    if subnetwork_link:
        network_interface.subnetwork = subnetwork_link

    if internal_ip:
        network_interface.network_i_p = internal_ip

    if external_access:
        access = compute_v1.AccessConfig()
        access.type_ = compute_v1.AccessConfig.Type.ONE_TO_ONE_NAT.name
        access.name = "External NAT"
        access.network_tier = access.NetworkTier.PREMIUM.name
        if external_ipv4:
            access.nat_i_p = external_ipv4
        network_interface.access_configs = [access]

    # Collect information into the Instance object.
    instance = compute_v1.Instance()
    instance.network_interfaces = [network_interface]
    instance.name = instance_name
    instance.disks = disks
    if re.match(r"^zones/[a-z\d\-]+/machineTypes/[a-z\d\-]+$", machine_type):
        instance.machine_type = machine_type
    else:
        instance.machine_type = f"zones/{zone}/machineTypes/{machine_type}"

    instance.scheduling = compute_v1.Scheduling()
    if accelerators:
        instance.guest_accelerators = accelerators
        instance.scheduling.on_host_maintenance = (
            compute_v1.Scheduling.OnHostMaintenance.TERMINATE.name
        )

    if preemptible:
        # Set the preemptible setting
        warnings.warn(
            "Preemptible VMs are being replaced by Spot VMs.", DeprecationWarning
        )
        instance.scheduling = compute_v1.Scheduling()
        instance.scheduling.preemptible = True

    if spot:
        # Set the Spot VM setting
        instance.scheduling.provisioning_model = (
            compute_v1.Scheduling.ProvisioningModel.SPOT.name
        )
        instance.scheduling.instance_termination_action = instance_termination_action

    if custom_hostname is not None:
        # Set the custom hostname for the instance
        instance.hostname = custom_hostname

    if delete_protection:
        # Set the delete protection bit
        instance.deletion_protection = True

    # Prepare the request to insert an instance.
    request = compute_v1.InsertInstanceRequest()
    request.zone = zone
    request.project = project_id
    request.instance_resource = instance

    # Wait for the create operation to complete.
    print(f"Creating the {instance_name} instance in {zone}...")

    operation = instance_client.insert(request=request)

    wait_for_extended_operation(operation, "instance creation")

    print(f"Instance {instance_name} created.")
    return instance_client.get(project=project_id, zone=zone, instance=instance_name)


def create_instance_custom_hostname(
    project_id: str, zone: str, instance_name: str, hostname: str
) -> compute_v1.Instance:
    """
    Create a new VM instance with Debian 10 operating system and a custom hostname.

    Args:
        project_id: project ID or project number of the Cloud project you want to use.
        zone: name of the zone to create the instance in. For example: "us-west3-b"
        instance_name: name of the new virtual machine (VM) instance.
        hostname: the hostname you want to use for the new instance.

    Returns:
        Instance object.
    """
    newest_debian = get_image_from_family(project="debian-cloud", family="debian-11")
    disk_type = f"zones/{zone}/diskTypes/pd-standard"
    disks = [disk_from_image(disk_type, 10, True, newest_debian.self_link)]
    instance = create_instance(
        project_id, zone, instance_name, disks, custom_hostname=hostname
    )
    return instance

REST

Sigue las instrucciones de la API para crear una instancia a partir de una imagen o una instantánea, pero especifica el campo hostname en el cuerpo de la solicitud.

POST https://compute.googleapis.com/compute/v1/projects/PROJECT_ID/zones/ZONE/instances

{
 "name": "VM_NAME",
 "hostname": "HOST_NAME",
 ...
}

Reemplaza lo siguiente:

  • PROJECT_ID: El ID de tu proyecto
  • ZONE: Zona donde deseas crear la VM.
  • VM_NAMEEl nombre de la VM
  • HOST_NAME: El nombre de host del dominio completamente calificado que deseas asignar

Verifica el nombre de host personalizado

Para las VM de Linux, puedes verificar el nombre de host con el comando de hostname -f en la VM.

También puedes verificar el nombre de host personalizado con la consola de Google Cloud o Google Cloud CLI.

Console

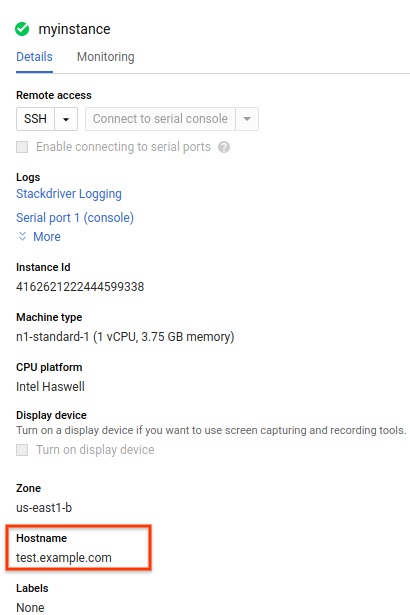
  1. A fin de ver el nombre de host personalizado de tu VM, ve a la página Instancias de VM.

    Ir a Instancias de VM

  2. Haz clic en el nombre de la instancia para abrir la página Detalles de instancia de VM.

  3. Revisa la sección Nombre de host. El campo Nombre de host solo es visible si se configura un nombre de host personalizado.

    La página de instancias de VM, en la que se muestra el nombre de host.

gcloud

A fin de ver el nombre de host personalizado para tu instancia con gcloud compute, usa el subcomando instances describe con una marca --format para filtrar el resultado. Reemplaza VM_NAME por el nombre de la VM.

gcloud compute instances describe VM_NAME \
    --format='get(hostname)'

Por ejemplo, a fin de ver el nombre de host personalizado de una VM llamada myinstance, ejecuta el siguiente comando.

gcloud compute instances describe myinstance \
    --format='get(hostname)'

El resultado podría parecerse al siguiente:

test.example.com

Si no se configura un nombre de host personalizado, el resultado de este comando aparece en blanco.

¿Qué sigue?