Dokumen ini menjelaskan cara membuat permintaan API dan menangani respons API dari Compute Engine API. Panduan ini membahas cara:
- Membuat isi permintaan.
- Menentukan URI resource yang diperlukan untuk permintaan.
- Menangani respons API.
- Menentukan apakah permintaan API berhasil.
Dokumen ini tidak membahas cara mengautentikasi ke API. Untuk mempelajari cara melakukan autentikasi ke API, baca Mengautentikasi ke Compute Engine.
Sebelum memulai
- Pahami REST API dengan lebih baik.
- Mengetahui cara melakukan autentikasi ke Compute Engine API.
Membuat permintaan API
Compute Engine API mengharapkan permintaan API dalam format JSON.
Untuk membuat permintaan API, Anda dapat membuat permintaan HTTP langsung, dengan menggunakan alat seperti curl atau httplib2, atau Anda dapat menggunakan salah satu library klien yang tersedia.
Saat Anda membuat permintaan API yang memerlukan isi permintaan, seperti permintaan POST, UPDATE, atau PATCH, isi permintaan berisi properti resource yang ingin Anda tetapkan dalam permintaan. Misalnya, perintah curl berikut membuat permintaan POST ke URI resource Instance. Permintaan tersebut akan membuat instance dengan properti yang ditentukan dalam isi permintaan. Isi permintaan ditunjukkan dengan flag -d:
curl -X POST -H "Authorization: Bearer [OAUTH_TOKEN]" -H "Content-Type: application/json"
https://compute.googleapis.com/compute/v1/projects/PROJECT_ID/zones/ZONE/instances -d
'{
  "disks":[
    {
      "boot":"true",
      "initializeParams":{
        "sourceImage":"https://www.googleapis.com/compute/v1/projects/debian-cloud/global/images/debian-10-buster-v20210122"
      }
    }
  ],
  "machineType":"https://www.googleapis.com/compute/v1/projects/PROJECT_ID/zones/ZONE/machineTypes/e2-standard-2",
  "name":"VM_NAME",
  "networkInterfaces":[
    {
      "accessConfigs":[
        {
          "name":"external-nat",
          "type":"ONE_TO_ONE_NAT"
        }
      ],
      "network":"https://www.googleapis.com/compute/v1/projects/PROJECT_ID/global/networks/default"
    }
  ]
}'
URI image memiliki project ID (debian-cloud) yang berbeda dengan project ID Anda karena image termasuk dalam project yang berbeda, bergantung pada jenis image.
Misalnya, semua image Debian yang tersedia secara publik yang ditawarkan oleh Compute Engine dihosting di project debian-cloud.
Saat merujuk ke resource lain, gunakan URI resource yang sepenuhnya memenuhi syarat.
Misalnya, properti network menggunakan URI yang sepenuhnya memenuhi syarat ke jaringan default.
Contoh permintaan API
Python
Java
Membuat URI resource
Di Compute Engine API, referensi ke resource Google Cloud lainnya diberikan sebagai URI yang sepenuhnya memenuhi syarat:
https://compute.googleapis.com/compute/v1/projects/PROJECT_ID/zones/ZONE/RESOURCE_TYPE/SPECIFIC_RESOURCE
Setiap kali menentukan image, jenis mesin, jaringan, atau resource lainnya, Anda harus menyediakan URI ke resource saat menggunakan API. Alat klien seperti Google Cloud CLI dan konsol Google Cloud menyembunyikan kerumitan ini dan menangani pembuatan URI resource ini untuk Anda. Namun, saat berinteraksi dengan API secara langsung, Anda harus membuat URI resource ini sendiri.
Ada URI resource yang sedikit berbeda untuk tipe resource yang berbeda. Misalnya, resource zona memiliki spesifikasi zone dalam URI:
https://compute.googleapis.com/compute/v1/projects/PROJECT_ID/zones/ZONE/machineTypes/e2-standard-2
Resource regional mengganti spesifikasi zone dengan spesifikasi region:
https://compute.googleapis.com/compute/v1/projects/PROJECT_ID/regions/REGION/addresses/ADDRESS_NAME
Demikian pula, resource global memiliki spesifikasi global:
https://compute.googleapis.com/compute/v1/projects/PROJECT_ID/global/images/VM_NAME
Compute Engine API juga menerima URI parsial karena layanan dapat menyimpulkan informasi seperti project ID. Jadi, versi parsial dari URI sebelumnya berikut ini juga dapat diterima:
zones/ZONE/machineTypes/e2-standard-2
regions/REGION/addresses/ADDRESS_NAME
project/PROJECT_ID/global/images/VM_NAME
Pada URI parsial, baik URI zona maupun URI regional menghilangkan project ID, tetapi URI image tidak. Hal ini karena image yang tersedia secara publik yang ditawarkan oleh Compute Engine dihosting di project lain, seperti debian-cloud untuk semua image Debian dan ubuntu-os-cloud untuk semua image Ubuntu. Sebelum dapat menggunakan image ini, Anda harus menyediakan project ID yang sesuai. Jika Anda menghapus project ID untuk image, Compute Engine akan mencoba menemukan image tersebut di project Anda, dan permintaan akan gagal karena image tidak ada.
Namun, jika menggunakan image kustom milik project Anda (project yang sama tempat Anda membuat resource ini), Anda dapat menghilangkan spesifikasi project saat memberikan URI image.
Menentukan properti yang diperlukan
Dokumentasi referensi Compute Engine API, yang tersedia untuk API v1 maupun beta, menjelaskan semua kemungkinan properti yang dapat Anda tetapkan untuk resource tertentu. Dokumentasi referensi ini membedakan antara properti yang dapat diubah dan properti yang tidak dapat diubah (ditandai dengan [Output Only] dalam deskripsi properti), tetapi untuk menentukan properti yang diperlukan untuk resource, Anda perlu meninjau dokumentasi yang khusus untuk tugas tersebut.
Misalnya, jika Anda membuat instance, baca dokumentasi Membuat instance dari image untuk melihat properti API yang diperlukan untuk permintaan tersebut. Jika Anda ingin membuat alamat IP eksternal statis di API, baca dokumentasi Alamat IP eksternal statis.
Memvalidasi permintaan API
Untuk memvalidasi permintaan API:
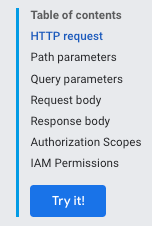
- Di referensi Compute Engine API, temukan metode yang dipanggil kode Anda. Misalnya,
v1/compute.instances.insert. Dari menu konten, klik Try It! Tindakan ini akan membuka jendela Try this API.
Di bagian Parameter permintaan, Anda tidak perlu memberikan project atau zona karena validasi tidak memerlukan pengiriman permintaan.
Di bagian Isi permintaan, tempelkan permintaan Anda.
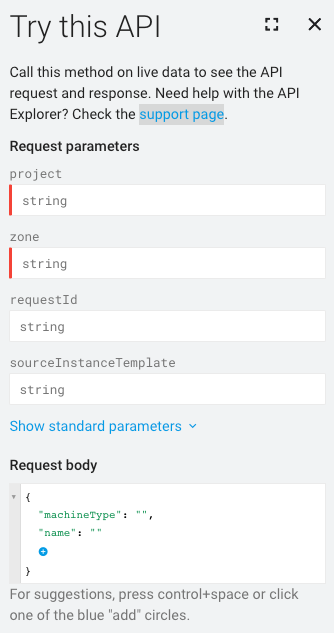
Elemen permintaan yang salah format digarisbawahi dengan warna biru. Klik setiap bagian yang digarisbawahi untuk mengetahui informasi selengkapnya tentang masalah yang akan ditangani.
Menangani respons API
Jika Anda membuat permintaan yang mengubah data, Compute Engine akan menampilkan objek Operation yang kemudian dapat Anda polling untuk mendapatkan status operasi permintaan Anda. Resource Operation terlihat seperti ini:
{
 "kind": "compute#operation",
 "id": "7127550864823803662",
 "name": "operation-1458856416788-52ed27a803e22-1c3bd86a-9e95017b",
 "zone": "https://www.googleapis.com/compute/v1/projects/PROJECT_ID/zones/ZONE",
 "operationType": "insert",
 "targetLink": "https://www.googleapis.com/compute/v1/projects/PROJECT_ID/zones/ZONE/instances/EXAMPLE_VM",
 "targetId": "4132355614508179214",
 "status": "PENDING",
 "user": "user@example.com",
 "progress": 0,
 "insertTime": "2016-03-24T14:53:37.788-07:00",
 "selfLink": "https://www.googleapis.com/compute/v1/projects/PROJECT_ID/zones/ZONE/operations/operation-1458856416788-52ed27a803e22-1c3bd86a-9e95017b"
}
Jika permintaan asli adalah untuk mengubah resource zona–misalnya, untuk mengambil snapshot disk atau menghentikan instance–Compute Engine menampilkan objek zoneOperations. Demikian pula, resource regional dan global masing-masing menampilkan objek regionOperations atau globalOperations. Anda bisa mendapatkan status operasi dengan membuat permintaan yang menggunakan metode get atau wait untuk resource Operation tertentu dan menyediakan name operasi.
Permintaan Anda belum selesai sampai status resource Operation ditampilkan sebagai DONE. Ini mungkin butuh waktu beberapa saat tergantung pada sifat permintaan Anda. Kemudian, setelah status resource Operation ditampilkan sebagai DONE, Anda dapat memeriksa apakah operasi berhasil dan apakah ada error.
Misalnya, respons berikut menunjukkan bahwa operasi sebelumnya kini selesai, yang ditentukan oleh status DONE:
endTime: '2016-03-24T14:54:07.119-07:00'
id: '7127550864823803662'
insertTime: '2016-03-24T14:53:37.788-07:00'
kind: compute#operation
name: operation-1458856416788-52ed27a803e22-1c3bd86a-9e95017b
operationType: insert
progress: 100
selfLink: https://compute.googleapis.com/compute/v1/projects/PROJECT_ID/zones/ZONE/operations/operation-1458856416788-52ed27a803e22-1c3bd86a-9e95017b
startTime: '2016-03-24T14:53:38.397-07:00'
status: DONE
targetId: '4132355614508179214'
targetLink: https://compute.googleapis.com/compute/v1/projects/PROJECT_ID/zones/ZONE/instances/EXAMPLE_VM
user: user@example.com
zone: https://compute.googleapis.com/compute/v1/projects/PROJECT_ID/zones/ZONE
Untuk mengonfirmasi, buat permintaan get ke resource untuk memeriksa bahwa resource tersebut ada dan sedang berjalan. Contoh:
GET /compute/v1/projects/PROJECT_ID/zones/ZONE/instances/EXAMPLE_VM

{
  "cpuPlatform": "Intel Haswell",
  "creationTimestamp": "2016-03-24T14:53:37.170-07:00",
  "disks": [
    ..[snip]..
  "selfLink": "https://www.googleapis.com/compute/v1/projects/PROJECT_ID/zones/ZONE/instances/EXAMPLE_VM",
  "status": "RUNNING",
  "tags": {
    "fingerprint": "42WmSpB8rSM="
  },
  "zone": "https://www.googleapis.com/compute/v1/projects/PROJECT_ID/zones/ZONE"
}
Operasi polling
Anda dapat menulis beberapa kode untuk melakukan polling operasi secara berkala dengan permintaan get atau wait yang ditampilkan saat status operasi adalah DONE.
Dengan permintaan get, operasi akan segera ditampilkan, apa pun status operasinya. Anda perlu memeriksa operasi secara berkala untuk mengetahui
kapan operasi selesai.
Jika Anda membuat permintaan wait, permintaan tersebut akan ditampilkan saat operasinya adalah DONE atau jika permintaan mendekati batas waktu 2 menit. Anda dapat memilih untuk menggunakan wait atau get guna melakukan polling pada operasi, tetapi metode wait memberikan manfaat tertentu dibandingkan metode get:
- Anda dapat menyiapkan klien agar lebih jarang melakukan polling status operasi, sehingga mengurangi penggunaan QPS Anda atas Compute Engine API.
- Latensi rata-rata antara saat operasi selesai dan saat klien diberi tahu bahwa operasi telah selesai akan berkurang secara signifikan karena server merespons segera setelah operasi selesai.
- Metode ini menyediakan waktu tunggu terbatas. Metode ini menunggu tidak lebih dari waktu tunggu HTTP default (2 menit), lalu menampilkan status operasi saat ini, yang mungkin berupa
DONEatau masih dalam proses.
Metode wait adalah API upaya terbaik. Jika server kelebihan beban, permintaan mungkin akan ditampilkan sebelum mencapai batas waktu default, atau setelah menunggu hanya nol detik. Metode ini juga tidak dijamin hanya akan ditampilkan jika operasinya adalah DONE. Misalnya, jika permintaan mendekati batas waktu 2 menit, metode akan ditampilkan meskipun operasi belum selesai. Untuk memeriksa
operasi, sebaiknya gunakan metode wait atau
get—dalam loop percobaan ulang dengan tidur di antaranya—untuk
melakukan polling status operasi secara berkala. Interval percobaan ulang maksimum tidak boleh melebihi periode retensi operasi minimum.
Contoh polling
Contoh berikut menggunakan metode get. Anda dapat mengganti metode get dengan metode wait: