| title | description | author | tags | date_published |
|---|---|---|---|---|
How to set up a VPN between strongSwan and Cloud VPN |
Learn how to build a site-to-site IPsec VPN between strongSwan and Cloud VPN. |
civil |
Compute Engine, Cloud VPN, strongSwan, firewall |
2019-01-29 |
Vladimir Smirnov and Bronislav Robenek | Technical Solutions Engineers | Google
Contributed by Google employees.
This guide walks you through how to configure strongSwan for integration with Google Cloud VPN. This information is provided as an example only. This guide is not meant to be a comprehensive overview of IPsec and assumes basic familiarity with the IPsec protocol.
The equipment used in the creation of this guide is as follows:
- Vendor: strongSwan
- Software release: 5.5.1 on Debian 9.6
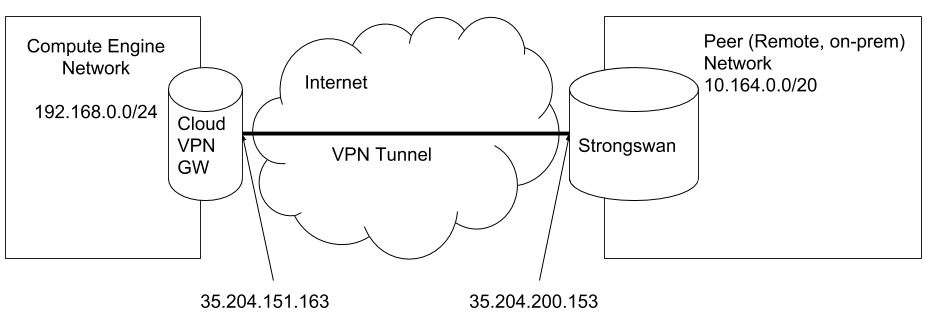
The topology outlined by this guide is a basic site-to-site IPsec VPN tunnel configuration using the referenced device:
To use a strongSwan with Cloud VPN make sure the following prerequisites have been met:
- VM or Server that runs strongSwan is healthy and has no known issues.
- There is root access to the strongSwan instance.
- Your on-premises firewall allows UDP port 500, UDP port 4500, and ESP packets.
- You should be able to configure your on-premises router to route traffic through strongSwan VPN gateway. Some environments might not give you that option.
Cloud VPN supports an extensive list of ciphers that can be used per your security policies. The following parameters and values are used in the Gateway’s IPsec configuration for the purpose of this guide.
| Parameter | Value |
|---|---|
| IPsec Mode | Tunnel mode |
| Auth protocol | Pre-shared-key |
| Key Exchange | IKEv2 |
| Start | Auto |
| Perfect Forward Secrecy (PFS) | on |
These are the Cipher configuration settings for IKE phase 1 and phase 2 that are used in this guide.
| Phase | Cipher role | Cipher |
|---|---|---|
| Phase-1 | Encryption | aes256gcm16 |
| (ike) | Integrity | sha512 |
| Diffie-Helman | modp4096 (Group 16) |
|
| Phase1 lifetime | 36,000 seconds |
|
| Phase-2 | Encryption | aes256gcm16 |
| (esp) | Integrity | sha512 |
| Diffie-Helman | modp8192 (Group 18) |
|
| Phase2 lifetime | 10,800 seconds |
Below is a sample environment to walk you through the setup of a policy-based VPN. Make sure to replace the IP addresses in the sample environment with your own IP addresses.
Cloud VPN
| Name | Value |
|---|---|
| Cloud VPN(external IP) | 35.204.151.163 |
| VPC CIDR | 192.168.0.0/24 |
strongSwan
| Name | Value |
|---|---|
| External IP | 35.204.200.153 |
| CIDR Behind strongSwan | 10.164.0.0/20 |
To configure Cloud VPN:
-
In the Cloud Console, select Networking > Create VPN connection.
-
Click CREATE VPN CONNECTION.
-
Populate the fields for the gateway and tunnel as shown in the following table, and click Create:
| Parameter | Value | Description |
|---|---|---|
| Name | gcp-to-strongswan-1 |
Name of the VPN gateway. |
| Description | VPN tunnel connection between GCP and strongSwan |
Description of the VPN connection. |
| Network | to-sw |
The Google Cloud network the VPN gateway attaches to. This network will get VPN connectivity. |
| Region | europe-west4 |
The home region of the VPN gateway. Make sure the VPN gateway is in the same region as the subnetworks it is connecting to. |
| IP address | gcp-to-strangswan(35.204.151.163) |
The VPN gateway uses the static public IP address. An existing, unused, static public IP address within the project can be assigned, or a new one created. |
| Remote peer IP address | 35.204.200.153 |
Public IP address of the on-premises VPN appliance used to connect to the Cloud VPN. |
| IKE version | IKEv2 |
The IKE protocol version. You can select IKEv1 or IKEv2. |
| Shared secret | secret |
A shared secret used for authentication by the VPN gateways. Configure the on-premises VPN gateway tunnel entry with the same shared secret. |
| Routing options | Policy-based |
Multiple routing options for the exchange of route information between the VPN gateways. This example uses static routing. |
| Remote network IP ranges | 10.164.0.0/20 |
The on-premises CIDR blocks connecting to Google Cloud from the VPN gateway. |
| Local IP ranges | 192.168.0.0/24 |
The Google Cloud IP ranges matching the selected subnet. |
To install strongSwan on Debian 9.6 or Ubuntu 18.04, use the following commands:
sudo apt update
sudo apt install strongswan strongswan-pki
To install strongSwan on RHEL 7 or CentOS 7, use the following command:
yum install strongswan
Step 1: Ensure that IP forwarding is enabled
The Server that hosts strongSwan acts as a gateway, so it's required to net.ipv4.ip_forwarding
sysctl.
To check its current status, you can use following command:
sysctl net.ipv4.ip_forward
To temporary enable it (until reboot), you can use following command:
sysctl -w net.ipv4.ip_forward=1
To make changes permanent, you should add a line to sysctl.conf:
/etc/sysctl.d/99-forwarding.conf:
net.ipv4.ip_forward = 1
Step 2: Configure IPsec credentials
Ensure that the following line present in file:
/var/lib/strongswan/ipsec.secrets.inc
35.204.151.163 : PSK "secret"
Step 3: Configure the IPSec connection
/var/lib/strongswan/ipsec.conf.inc
include /etc/ipsec.d/gcp.conf
/etc/ipsec.d/gcp.conf
conn %default
    ikelifetime=600m # 36,000 s
    keylife=180m # 10,800 s
    rekeymargin=3m
    keyingtries=3
    keyexchange=ikev2
    mobike=no
    ike=aes256gcm16-sha512-modp4096
    esp=aes256gcm16-sha512-modp8192
    authby=psk

conn net-net
    left=35.204.200.153 # In case of NAT set to internal IP, e.x. 10.164.0.6
    leftid=35.204.200.153
    leftsubnet=10.164.0.0/20
    leftauth=psk
    right=35.204.151.163
    rightid=35.204.151.163
    rightsubnet=192.168.0.0/24
    rightauth=psk
    type=tunnel
    # auto=add - means strongSwan won't try to initiate it
    # auto=start - means strongSwan will try to establish connection as well
    # Note that Google Cloud will also try to initiate the connection
    auto=start
    # dpdaction=restart - means strongSwan will try to reconnect if Dead Peer Detection spots
    #                  a problem. Change to 'clear' if needed
    dpdaction=restart
Step 4: Start strongSwan
Now you can start strongSwan:
systemctl start strongswan
After you make sure it's working as expected, you can add strongSwan to autostart:
systemctl enable strongswan
In this example, a dynamic BGP-based VPN uses a VTI interface. This guide is based on the official strongSwan wiki.
The following sample environment walks you through set up of a route-based VPN. Make sure to replace the IP addresses in the sample environment with your own IP addresses.
This guide assumes that you have BIRD 1.6.3 installed on your strongSwan server.
Cloud VPN
| Name | Value |
|---|---|
| Cloud VPN(external IP) | 35.204.151.163 |
| VPC CIDR | 192.168.0.0/24 |
| TUN-INSIDE GCP | 169.254.2.1 |
| GCP-ASN | 65000 |
strongSwan
| Name | Value |
|---|---|
| External IP | 35.204.200.153 |
| CIDR Behind strongSwan | 10.164.0.0/20 |
| TUN-INSIDE- SW | 169.254.2.2 |
| strongSwan ASN | 65002 |
With a route-based VPN, you can use both static and dynamic routing. This example uses dynamic (BGP) routing. Cloud Router is used to establish BGP sessions between the two peers.
Step 1: In the Cloud Console, select Networking > Cloud Routers > Create Router.
Step 2: Enter the following parameters, and click Create.
| Parameter | Value | Description |
|---|---|---|
| Name | gcp-to-strongswan-router-1 |
Name of the cloud router. |
| Description | Description of the cloud router. | |
| Network | to-sw |
The Google Cloud network the cloud router attaches to. This is the network that manages route information. |
| Region | europe-west4 |
The home region of the cloud router. Make sure the cloud router is in the same region as the subnetworks it is connecting to. |
| Google ASN | 65000 |
The Autonomous System Number assigned to the cloud router. Use any unused private ASN (64512 - 65534, 4200000000 – 4294967294). |
Step 1: In the Cloud Console, select Networking > Interconnect > VPN > CREATE VPN CONNECTION.
Step 2: Enter the following parameters for the Compute Engine VPN gateway:
| Parameter | Value | Description |
|---|---|---|
| Name | gcp-to-strongswan-1 |
Name of the VPN gateway. |
| Description | VPN tunnel connection between GCP and strongSwan |
Description of the VPN connection. |
| Network | to-sw |
The Google Cloud network the VPN gateway attaches to. This network will get VPN connectivity. |
| Region | europe-west4 |
The home region of the VPN gateway. Make sure the VPN gateway is in the same region as the subnetworks it is connecting to. |
| IP address | gcp-to-strangswan(35.204.151.163) |
The VPN gateway uses the static public IP address. An existing, unused, static public IP address within the project can be assigned, or a new one created. |
Step 3: Enter the following parameters for the tunnel:
| Parameter | Value | Description |
|---|---|---|
| Name | gcp-to-strongswan-1-tunnel-1 |
Name of the VPN gateway |
| Description | VPN tunnel connection between GCP and strongSwan |
Description of the VPN gateway |
| Remote peer IP address | 35.204.200.153 |
Public IP address of the on-premises VPN appliance used to connect to the Cloud VPN. |
| IKE version | IKEv2 |
The IKE protocol version. You can select IKEv1 or IKEv2. |
| Shared secret | secret |
A shared secret used for authentication by the VPN gateways. Configure the on-premises VPN gateway tunnel entry with the same shared secret. |
| Routing options | Dynamic(BGP) |
Multiple routing options for the exchange of route information between the VPN gateways. This example uses static routing. |
| Cloud Router | gcp-to-strongswan-router-1 |
Select the cloud router you created previously. |
| BGP session | BGP sessions enable your cloud network and on-premises networks to dynamically exchange routes |
Step 4: Enter the parameters as shown in the following table for the BGP peering:
| Parameter | Value | Description |
|---|---|---|
| Name | gcp-to-strongswan-bgp |
Name of the BGP session. |
| Peer ASN | 65002 |
Unique BGP ASN of the on-premises router. |
| Google BGP IP address | 169.254.2.1 |
|
| Peer BGP IP address | 169.254.2.2 |
Click Save and Continue to complete.
Note: Add ingress firewall rules to allow inbound network traffic as per your security policy.
This guide assumes that you have strongSwan already installed. It also assumes a default layout of Debian 9.6.
Step 1: Configure BIRD
/etc/bird/bird.conf
# Config example for bird 1.6
#debug protocols all;

router id 169.254.2.2;

# Watch interface up/down events
protocol device {
       scan time 10;
}

# Import interface routes (Connected)
# (Not required in this example as kernel import all is used here to workaround the /32 on eth0 GCE VM setup)
#protocol direct {
#       interface "*";
#}

# Sync routes to kernel
protocol kernel {
       learn;
       merge paths on; # For ECMP
       export filter {
              krt_prefsrc = 10.164.0.6; # Internal IP Address of the strongSwan VM.
              accept; # Sync all routes to kernel
       };
       import all; # Required due to /32 on GCE VMs for the static route below
}

# Configure a static route to make sure route exists
protocol static {
       # Network connected to eth0
       route 10.164.0.0/20 recursive 10.164.0.1; # Network connected to eth0
       # Or blackhole the aggregate
       # route 10.164.0.0/20 blackhole;
}

# Prefix lists for routing security
# (Accept /24 as the most specific route)
define GCP_VPC_A_PREFIXES = [ 192.168.0.0/16{16,24} ]; # VPC A address space
define LOCAL_PREFIXES     = [ 10.164.0.0/16{16,24} ];  # Local address space

# Filter received prefixes
filter gcp_vpc_a_in
{
      if (net ~ GCP_VPC_A_PREFIXES) then accept;
      else reject;
}

# Filter advertised prefixes
filter gcp_vpc_a_out
{
      if (net ~ LOCAL_PREFIXES) then accept;
      else reject;
}

template bgp gcp_vpc_a {
       keepalive time 20;
       hold time 60;
       graceful restart aware; # Cloud Router uses GR during maintenance
       #multihop 3; # Required for Dedicated/Partner Interconnect

       import filter gcp_vpc_a_in;
       import limit 10 action warn; # restart | block | disable

       export filter gcp_vpc_a_out;
       export limit 10 action warn; # restart | block | disable
}

protocol bgp gcp_vpc_a_tun1 from gcp_vpc_a
{
       local 169.254.2.2 as 65002;
       neighbor 169.254.2.1 as 65000;
}
Step 2: Disable automatic routes in strongSwan
Routes are handled by BIRD, so you must disable automatic route creation in strongSwan.
/etc/strongswan.d/vti.conf
charon {
    # We will handle routes by ourselves
    install_routes = no
}
Step 3: Create a script that will configure the VTI interface
This script is called every time a new tunnel is established, and it takes care of proper interface configuration, including MTU, etc.
/var/lib/strongswan/ipsec-vti.sh
#!/bin/bash
set -o nounset
set -o errexit

IP=$(which ip)

PLUTO_MARK_OUT_ARR=(${PLUTO_MARK_OUT//// })
PLUTO_MARK_IN_ARR=(${PLUTO_MARK_IN//// })

VTI_TUNNEL_ID=${1}
VTI_REMOTE=${2}
VTI_LOCAL=${3}

LOCAL_IF="${PLUTO_INTERFACE}"
VTI_IF="vti${VTI_TUNNEL_ID}"
# GCP's MTU is 1460, so it's hardcoded
GCP_MTU="1460"
# ipsec overhead is 73 bytes, we need to compute new mtu.
VTI_MTU=$((GCP_MTU-73))

case "${PLUTO_VERB}" in
    up-client)
        ${IP} link add ${VTI_IF} type vti local ${PLUTO_ME} remote ${PLUTO_PEER} okey ${PLUTO_MARK_OUT_ARR[0]} ikey ${PLUTO_MARK_IN_ARR[0]}
        ${IP} addr add ${VTI_LOCAL} remote ${VTI_REMOTE} dev "${VTI_IF}"
        ${IP} link set ${VTI_IF} up mtu ${VTI_MTU}

        # Disable IPSEC Policy
        sysctl -w net.ipv4.conf.${VTI_IF}.disable_policy=1

        # Enable loosy source validation, if possible. Otherwise disable validation.
        sysctl -w net.ipv4.conf.${VTI_IF}.rp_filter=2 || sysctl -w net.ipv4.conf.${VTI_IF}.rp_filter=0

        # If you would like to use VTI for policy-based you should take care of routing by yourselv, e.x.
        #if [[ "${PLUTO_PEER_CLIENT}" != "0.0.0.0/0" ]]; then
        #    ${IP} r add "${PLUTO_PEER_CLIENT}" dev "${VTI_IF}"
        #fi
        ;;
    down-client)
        ${IP} tunnel del "${VTI_IF}"
        ;;
esac

# Enable IPv4 forwarding
sysctl -w net.ipv4.ip_forward=1

# Disable IPSEC Encryption on local net
sysctl -w net.ipv4.conf.${LOCAL_IF}.disable_xfrm=1
sysctl -w net.ipv4.conf.${LOCAL_IF}.disable_policy=1
You should also make /var/lib/strongswan/ipsec-vti.sh executable by using following command:
chmod +x /var/lib/strongswan/ipsec-vti.sh
Step 4: Configure IPsec credentials
Ensure that the following line is in the file:
/var/lib/strongswan/ipsec.secrets.inc
35.204.151.163 : PSK "secret"
Step 5: Configure IPsec connection
/var/lib/strongswan/ipsec.conf.inc
include /etc/ipsec.d/gcp.conf
/etc/ipsec.d/gcp.conf
conn %default
    ikelifetime=600m # 36,000 s
    keylife=180m # 10,800 s
    rekeymargin=3m
    keyingtries=3
    keyexchange=ikev2
    mobike=no
    ike=aes256gcm16-sha512-modp4096
    esp=aes256gcm16-sha512-modp8192
    authby=psk

conn net-net
    leftupdown="/var/lib/strongswan/ipsec-vti.sh 0 169.254.2.1/30 169.254.2.2/30"
    left=35.204.200.153 # In case of NAT set to internal IP, e.x. 10.164.0.6
    leftid=35.204.200.153
    leftsubnet=0.0.0.0/0
    leftauth=psk
    right=35.204.151.163
    rightid=35.204.151.163
    rightsubnet=0.0.0.0/0
    rightauth=psk
    type=tunnel
    # auto=add - means strongSwan won't try to initiate it
    # auto=start - means strongSwan will try to establish connection as well
    # Note that Google Cloud will also try to initiate the connection
    auto=start
    # dpdaction=restart - means strongSwan will try to reconnect if Dead Peer Detection spots
    #                  a problem. Change to 'clear' if needed
    dpdaction=restart
    # mark=%unique - We use this to mark VPN-related packets with iptables
    #                %unique ensures that all tunnels will have a unique mark here
    mark=%unique
leftupdown contains a path to a script and its command-line parameters:
- The first parameter is the tunnel ID because you cannot rely on strongSwan's
PLUTO_UNIQUEIDvariable if you need the tunnel ID to be persistent. - The second parameter specifies the Cloud Router IP and configured subnet.
- The third parameter specifies the IP address of the vti0 interface and where BIRD is configured.
Step 3: Start strongSwan and BIRD
systemctl start bird
systemctl start strongswan
After you make sure it's working as expected, you can add BIRD and strongSwan to autostart:
systemctl enable bird
systemctl enable strongswan