| title | description | author | tags | date_published |
|---|---|---|---|---|
Building CI/CD pipelines for a data lake's serverless data processing services |
Learn how to set up continuous integration and continuous delivery for a data lake's data processing pipeline with Terraform, GitHub, and Cloud Build using the popular GitOps methodology. |
prasadalle |
datalake, analytics, cicd, Cloud Build, BigQuery, Dataflow, Cloud Storage, GitHub, devops, GitOps, continuous integration, continuous deployment |
2021-01-08 |
Prasad Alle | Customer Engineer, Data and Analytics Specialist | Google
Contributed by Google employees.
Many enterprise customers build data processing pipelines for a data lake on Google Cloud. They often have hybrid and multi-cloud architecture patterns and use CI/CD tools, yet see challenges with version control, building, testing, and deploying pipelines seamlessly across their global development teams.
Data engineers, data scientists, and data analysts across global teams can adapt the methodologies from CI/CD practices to help to ensure high quality, maintainability, and adaptability of the data lake data processing pipelines.
This document show you how to do the following:
- Set up continuous integration and continuous delivery (CI/CD) for a data lake’s data processing pipelines by implementing CI/CD methods with Terraform, GitHub, and Cloud Build using the popular GitOps methodology.
- Build serverless data processing and CI/CD pipelines.
This document covers building CI/CD pipelines for data lakes for serveless data services Cloud Storage, Dataflow, and BigQuery. A future document in this series will cover building CI/CD pipelines for data lakes for Apache Spark applications on Dataproc.
You use the following Google Cloud services and open source tools in this document:
-
Cloud Storage is a highly available, durable object store to store any amount of data. In this document, you use it to store raw, unprocessed sample data.
-
Dataflow is a serverless unified batch and streaming data processing service. This document uses a Google-provided open source Dataflow template to build a Cloud Storage text to BigQuery data processing pipeline.
-
BigQuery is a serverless, highly scalable, and cost-effective multi-cloud data warehouse designed for business agility. This document uses BigQuery to store processed data for analytics use.
-
Cloud Build is used to create a CI/CD pipeline for building, deploying, and testing a data-processing workflow, and the data processing itself.
-
GitHub is a distributed version-control system for tracking changes in source code during software development. This document uses GitHub to store and perform version control for data processing pipelines and Terraform infrastructure-as-code models.
-
Terraform is an open source tool that uses infrastructure as code to provision and manage Google Cloud resources. This document uses Terraform to create a data processing pipeline.
In this solution, you build a serverless data processing pipeline as shown in the following diagram:
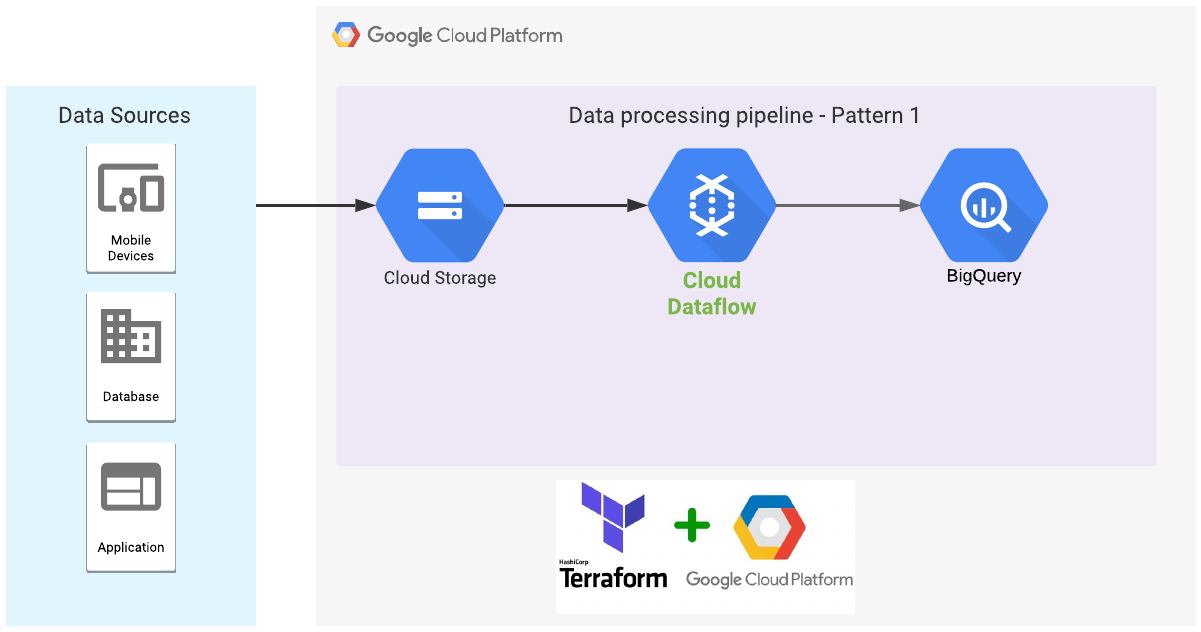
The general outline of the process is as follows:
- Create a Cloud Storage bucket.
- Load sample data and define schema and mapping files.
- Create a Dataflow pipeline.
- Create a dataset and table in BigQuery.
- Load data into the BigQuery table.
In addition to a serverless data processing pipeline, you also build a CI/CD pipeline for data processing that enables version control, allowing you to build, test, and deploy this code into various environments.
While implementing this architecture in your production environment, make sure to consider factors like security, monitoring, failure handling, and any operational issues.
-
Google Cloud account: If you don’t already have one, you can sign up for a new account.
-
Google Cloud project: You can create a new project or select an existing project in the Cloud Console.
If you don't plan to keep the resources that you create in this document, create a project instead of selecting an existing project. After you finish these steps, you can delete the project, removing all resources associated with the project.
-
GitHub account: If you don’t already have one, you can sign up for a new account).
-
Cloud Shell: In this document, you run commands in Cloud Shell. Cloud Shell is a shell environment with the Cloud SDK already installed, including the
gcloudcommand-line tool, and with values already set for your current project.
This document uses the following billable components of Google Cloud:
To generate a cost estimate based on your projected usage, use the pricing calculator.
In this section, you go through the following steps:
- Set up your environment and grant required permissions.
- Set up your GitHub repository.
- Create Cloud Storage bucket to store your data lake raw data and mapping files.
- Connect Cloud Build to your GitHub repository.
- Create a build trigger to respond to changes in your GitHub repository.
- Make changes in a feature branch.
- Promote changes to the development environment.
- Promote changes to the production environment.
-
Set environment variables with values appropriate for your environment:
SA_ID=datalake-deployer (SA=Service Account) PROJECT_ID=$(gcloud config list --format 'value(core.project)') PROJECT_NUMBER=$(gcloud projects describe "${PROJECT_ID}" --format='get(projectNumber)') SA_EMAIL=$SA_ID@$PROJECT_ID.iam.gserviceaccount.com BUCKET_NAME=$PROJECT_ID GITHUB_USERNAME=[YOUR_GITHUB_USERNAME] -
Enable the required APIs:
gcloud services enable cloudbuild.googleapis.com compute.googleapis.com bigquery-json.googleapis.com storage.googleapis.com dataflow.googleapis.com --project $PROJECT_ID -
Create a data lake service account:
gcloud iam service-accounts create $SA_ID \ --display-name $SA_ID \ --project $PROJECT_ID -
Add the appropriate IAM roles to the data lake service account:
for role in bigquery.admin storage.admin dataflow.admin compute.admin dataflow.worker; do \ gcloud projects add-iam-policy-binding $PROJECT_ID \ --member="serviceAccount:$SA_EMAIL" \ --role="roles/$role"; \ done -
Add the appropriate IAM roles to the default Cloud Build service account:
for role in bigquery.admin storage.admin dataflow.admin compute.admin dataflow.worker; do \ gcloud projects add-iam-policy-binding $PROJECT_ID \ --member="serviceAccount:$PROJECT_NUMBER@cloudbuild.gserviceaccount.com" \ --role="roles/$role"; \ done -
Add the Cloud Build service account as a service account user of the data lake service account within the project:
gcloud iam service-accounts add-iam-policy-binding \ $SA_EMAIL \ --member="serviceAccount:$PROJECT_NUMBER@cloudbuild.gserviceaccount.com" \ --role=roles/iam.serviceAccountUser \ --project $PROJECT_ID -
Get
PROJECT_IDandSA_EMAILfor use in later steps:echo $PROJECT_ID echo $SA_EMAIL
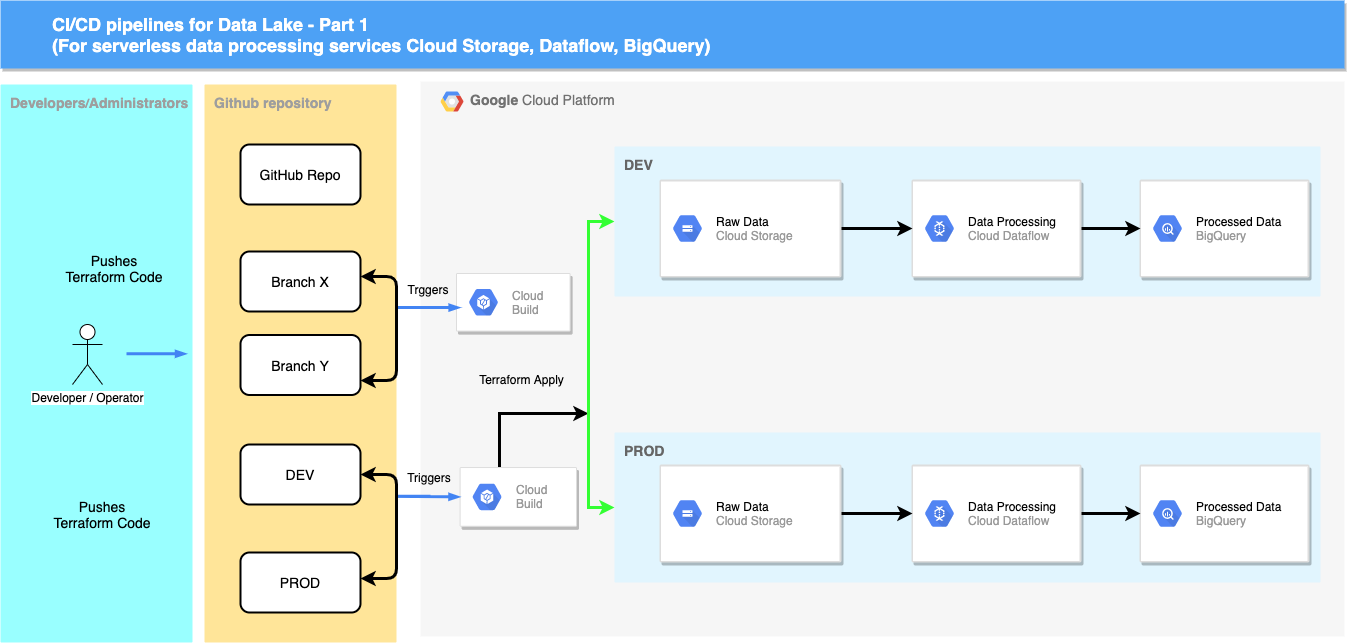
You use a single GitHub repository to define your cloud infrastructure and orchestrate this infrastructure by having different branches corresponding to different environments:
- The
devbranch contains the latest changes that are applied to the development environment. - The
prodbranch contains the latest changes that are applied to the production environment.
With this infrastructure, you can always reference the repository to know what configuration is expected in each environment and to propose new changes by first
merging them into the dev environment. You can then promote the changes by merging the dev branch into the subsequent prod branch.
-
In Cloud Shell, clone the Google Cloud Community repository:
cd ~ git clone https://github.com/GoogleCloudPlatform/community.git -
Create a new repository in your GitHub account.
-
Add your project to your repository:
cd ~/community/tutorials/cicd-datalake-part-1/

echo "# cicd-datalake-part-1" >> README.md
git init
git add .
git commit -m "commit CICD data lake project"
git branch -M dev
git branch -M prod

git remote add origin https://github.com/$GITHUB_USERNAME/cicd-datalake-part-1.git

git push -u origin dev
git push -u origin prod
The code in this repository is structured as follows:
-
The
environments/folder contains subfolders that represent environments, such asdevandproddata processing pipelines, which provide logical separation between workloads at the development and production stages. Although it's a good practice to have these environments as similar as possible, each subfolder has its own Terraform configuration to ensure that they can have unique settings if necessary. -
The
testdata/folder contains the test data and mapping scripts to build data processing pipeline. -
The
cloudbuild.yamlfile is a build configuration file that contains instructions for Cloud Build, such as how to perform tasks based on a set of steps. This file specifies conditional execution depending on the branch that Cloud Build is fetching the code from.For
devandprodbranches, the following steps are executed:terraform initterraform planterraform apply
For
devandprodbranches, the following steps are executed:terraform initfor all environments' subfoldersterraform planfor all environments' subfolders
The reason that terraform init and terraform plan run for all environments' subfolders is to make sure that the changes being proposed hold for every single
environment. This way, before merging the pull request, you can review the plans to make sure that access is not being granted to an unauthorized entity.
Sample data used in this document is from E for Excel. You can download the complete dataset as a ZIP file. This is not real transaction data, and it should not be used for any other purpose other than testing.
Create a Cloud Storage bucket to store raw unprocessed sample data files and mapping files required to build data processing pipelines.
-
Set up Cloud Storage bucket, with a region appropriate for your setup:
gsutil mb -c standard -l us-west1 gs://$BUCKET_NAME -
Upload the contents from
testdatafolder into the Cloud Storage bucket:cd ~/community/tutorials/cicd-datalake-part-1/testdata -
Copy the downloaded test data and schema files from the GitHub repository to your Cloud Storage bucket:
gsutil cp *.* gs://$BUCKET_NAME

gsutil ls gs://$BUCKET_NAME
This section shows how to install the Cloud Build GitHub app. This installation allows you to connect a GitHub repository to a Google Cloud project so that Cloud Build can automatically apply Terraform manifests each time a new branch is created or code is pushed to GitHub.
The following steps provide instructions for installing the app only for your new repository, but you can choose to install the app for more repositories.
-
Go to the GitHub Marketplace page for the Cloud Build app.
-
If this is your first time configuring an app in GitHub, click Setup with Google Cloud Build. Otherwise, click Edit your plan, select your billing information and, on the Edit your plan page, click Grant this app access.
-
On the Install Google Cloud Build page, select Only select repositories and enter
[YOUR_GITHUB_USERNAME]/cicd-datalake-part-1to connect to your repository. -
Click Install.
-
Sign in to Google Cloud.
The Authorization page is displayed. You are asked to authorize the Cloud Build GitHub app to connect to Google Cloud.
-
Click Authorize Google Cloud Build by GoogleCloudBuild.
You are redirected to the Cloud Console.
-
Select the Google Cloud project you are working on. If you agree to the terms and conditions, select the checkbox, and then click Next.
-
In Repository selection, select
[YOUR_GITHUB_USERNAME]/cicd-datalake-part-1to connect to your Google Cloud project, and then click Connect repository. -
Click Skip for now on the next screen.
-
Click Done.
The Cloud Build GitHub app is now configured and your GitHub repository linked to your Google Cloud project. From now on, any changes to the GitHub repository will trigger Cloud Build executions, which report the results back to GitHub by using GitHub checks.
Following the previous steps, you should have a configuration to establish connectivity between Cloud Build and your GitHub repositories. Now create a trigger in the Cloud build to respond to changes in the GitHub repository to test and run your infrastructure for data processing pipelines.
-
Go to the Cloud Build Triggers page in the Cloud Console.
-
Click Create trigger.
-
Provide the Name and Description of your trigger.
-
In the Event section, select Push to a branch.
-
In the Source section, do the following:
- Repository: Select your repository.
- Branch: Select .*(any branch).
-
In the Build configuration section, select Cloud Build configuration file.
-
In the Cloud Build configuration file location field, specify the file location as
cloudbuild.yamlafter the/. -
In the Advanced section, click Add variable and add your environment variables such as
ProjectID,ServiceAccountEmail,Region,
andSourceDatabucket. Use the following naming standard, which refers to variables created in previous sections:_PROJECT_ID=[YOUR_PROJECT_ID] _REGION=[YOUR_REGION] _SERVICE_ACCOUNT_EMAIL=[YOUR_SERVICE_ACCOUNT_EMAIL_ADDRESS] _SOURCE_GCS_BUCKET=[YOUR_SOURCE_FILE_CLOUD_STORAGE_BUCKET] -
Click Create

By now, you have most of your environment configured. So now it's time to make some code changes in your development environment and test the build trigger.
-
In GitHub, go to the main page of your repository (
cicd-datalake-part-1). -
Make sure that you're in the
devbranch. -
Open the
environments/dev/main.tffile for editing by clicking the pencil icon. -
Add comments (such as
“#cicd-datalake-part-1”) to themain.tffile. -
Add a commit message at the bottom of the page, such as
cicd-datalake-part-1, and select Create a new branch for this commit. -
Click the Propose change.
-
On the following page, click Create pull request to create a new pull request with your change.
When your pull request is created, a Cloud Build job is automatically initiated.
-
Click Show all checks and wait for the check to become green.
-
In the Cloud Console, go to the Cloud Build History page to see build details.
-
Make sure that you don’t have any build exceptions and that you are ready to promote changes to
devbranch.


You have a pull request waiting to be merged. It's time to apply the state you want to your dev environment.
-
In GitHub, go to the main page of your repository (
cicd-datalake-part-1). -
Under your repository name, click Pull requests.
-
Click the pull request that you just created.
-
Click Merge pull request, and then click Confirm merge.
-
Check the Cloud Build History page in the Cloud Console to confirm that a new build has been triggered. Make sure that it's successful.
-
After the Cloud Build job has successfully run, it creates a data processing pipeline in the
devenvironment with the following actions:-
Create a Dataflow job.
-
Create a dataset and table in BigQuery. (This tutorial uses
dev_datalake_demoandprod_datalake_demoas dataset names andsample_userdataas a table name. You can change these in themain.tffile.) -
Load data from the Cloud Storage bucket to a BigQuery table.
-
-
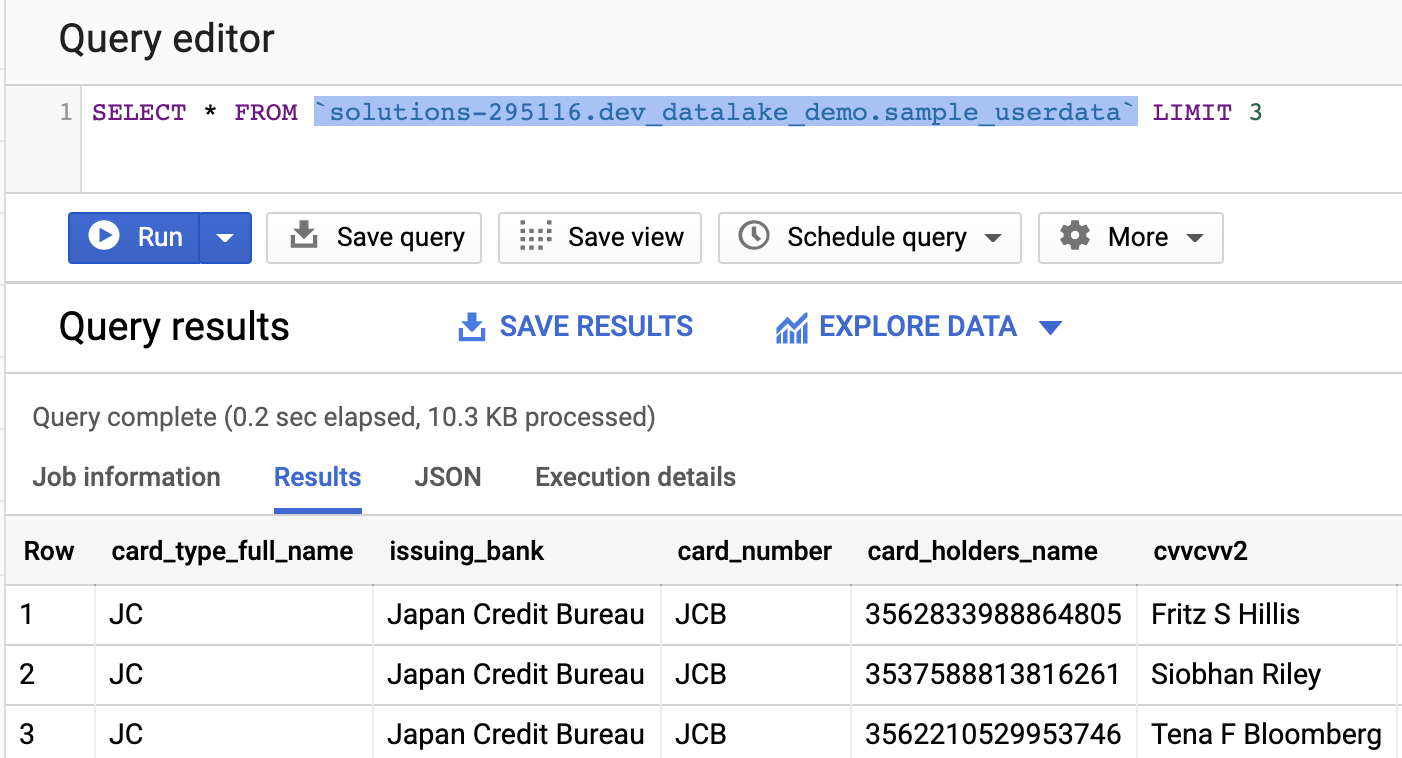
Go to the Dataflow page in the Cloud Console to check the job status.
-
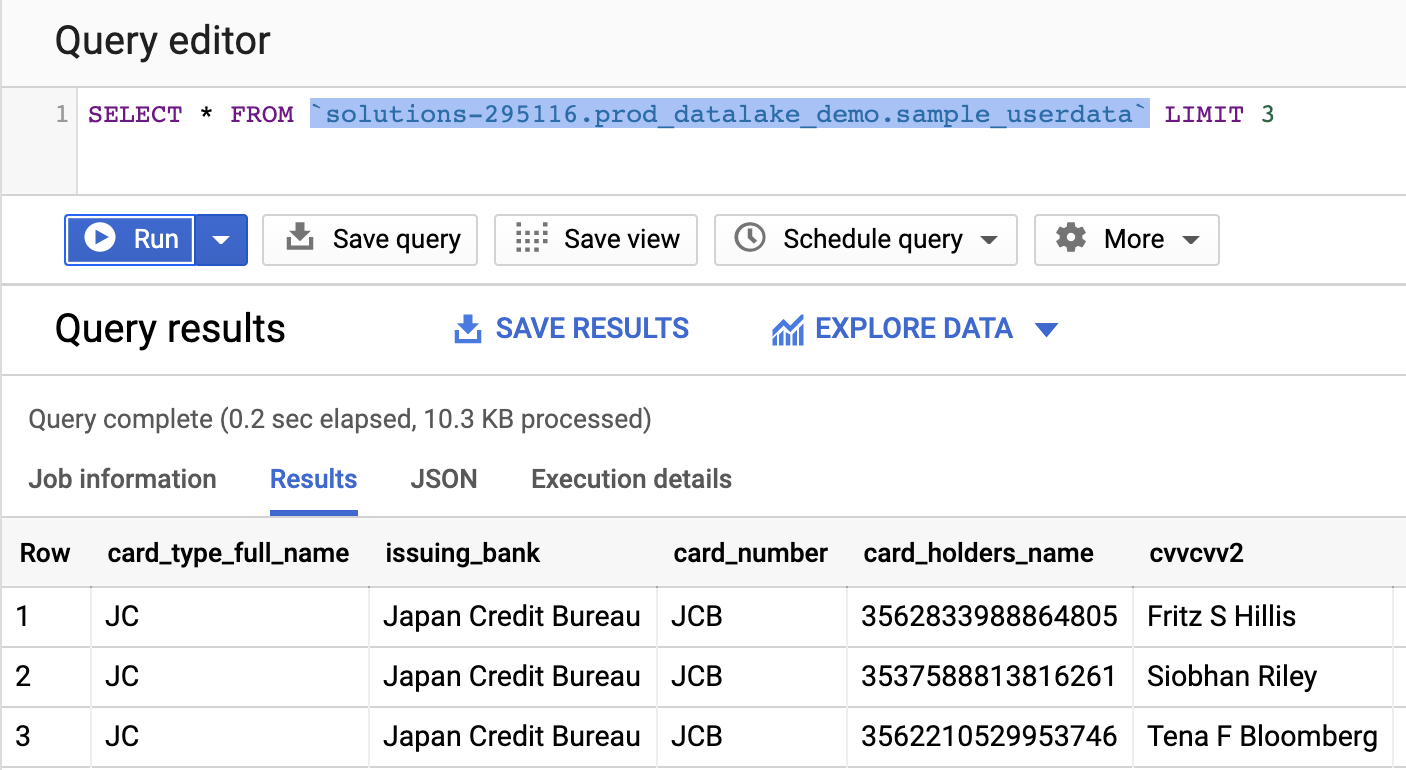
After successful completion of the Dataflow job, a BigQuery dataset and table are created, and the data from the CSV file in the Cloud Storage bucket is loaded into the BigQuery table.


Now that you have your development environment fully tested, you can promote your data processing pipeline code to production.
-
In GitHub, go to the main page of your repository (
cicd-datalake-part-1). -
Click New pull request.
-
For base, select prod and for compare, select dev.
-
Click Create pull request.
-
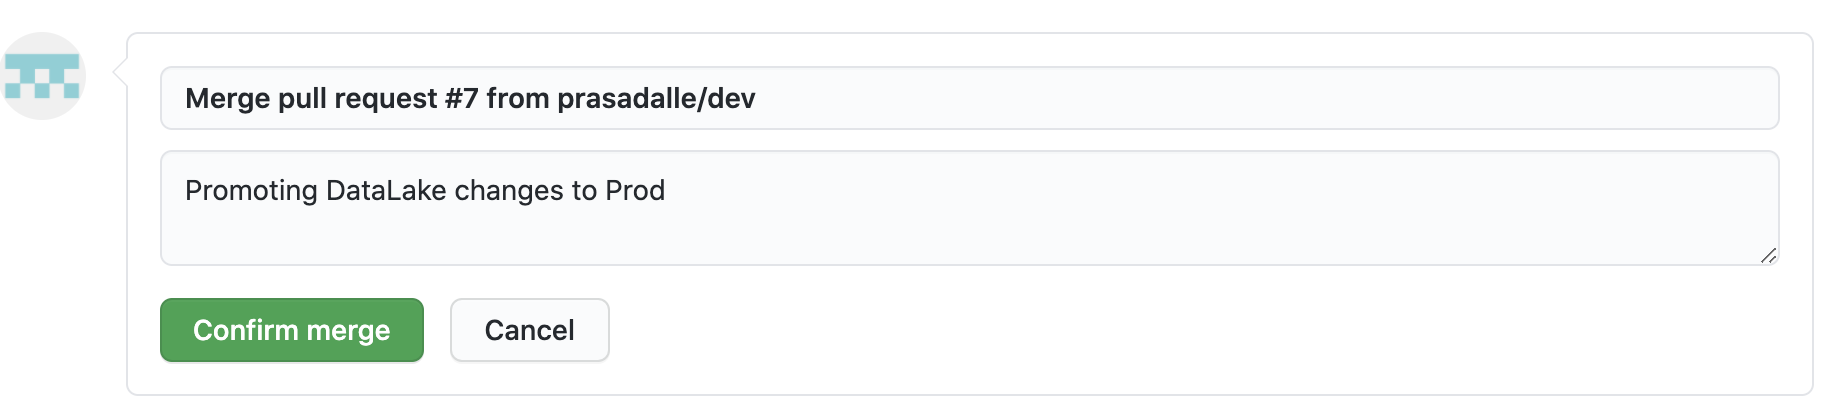
Enter a title, such as
Promoting data lake changes, and then click Create pull request. -
Review the proposed changes, including the Terraform plan details from Cloud Build, and then click Merge pull request.
-
Click Confirm merge.
-
In the Cloud Console, open the Build History page to see your changes being applied to the production environment:
-
Open Dataflow page to see the job status:
-
Wait for the Dataflow to finish, and then check BigQuery to make sure that the job created the production dataset and tables.


To avoid incurring charges to your Google Cloud account for the resources used in this document, you can delete the project or delete the individual resources (Cloud Storage bucket, BigQuery table and dataset, Cloud Build trigger) that you created while working through this document.
- Learn more about Google Cloud developer tools.
- Try out other Google Cloud features for yourself. Have a look at our tutorials.