| title | description | author | tags | date_published |
|---|---|---|---|---|
Mirroring an Azure DevOps repository to Cloud Source Repositories |
Learn how to set up mirroring from an Azure DevOps repository to Cloud Source Repositories. |
manokhina |
Repositories |
2021-03-05 |
Anastasiia Manokhina | Strategic Cloud Engineer | Google
Contributed by Google employees.
This tutorial shows how to set up mirroring from an Azure DevOps repository to Cloud Source Repositories.
This tutorial uses billable components of Google Cloud, including Cloud Source Repositories. (Check the free usage limits.)
Use the pricing calculator to generate a cost estimate based on your projected usage.
For this tutorial, you need a Google Cloud project. You can create a new one, or select a project that you have already created.
- Create a Google Cloud project.
- Enable billing for the project.
- Enable the Cloud Source Repositories API.
On the Azure side, you need to have an Azure DevOps account and an Azure DevOps project.
-
Install the Mirror Git Repository extension for your Azure organization.
-
In the Google Cloud Console, open Cloud Shell.
-
In Cloud Shell, create the Git repository in Cloud Source Repositories that will be the mirror of the Azure repository:
gcloud source repos create azure-csr-mirror
In order for Azure Repos to push to your Git repository to Cloud Source Repositories, you must complete an OAuth 2.0 authorization flow to generate static credentials for Cloud Source Repositories.
Important: The generated credentials are tied to the Google Account used to create them. Mirroring stops working if the Google Account is closed or loses access rights to the Git repository in Cloud Source Repositories.
-
In Cloud Source Repositories, go to the All Repositories page.
-
Click the name of your repository.
-
On the Add code to your repository page, under Select your preferred authentication method, select Manually generated credentials, and then click Generate and store your Git credentials.
The Cloud Source Repositories site (
https://source.developers.google.com), which identifies itself as Google Cloud Development, requests the credentials on your behalf. -
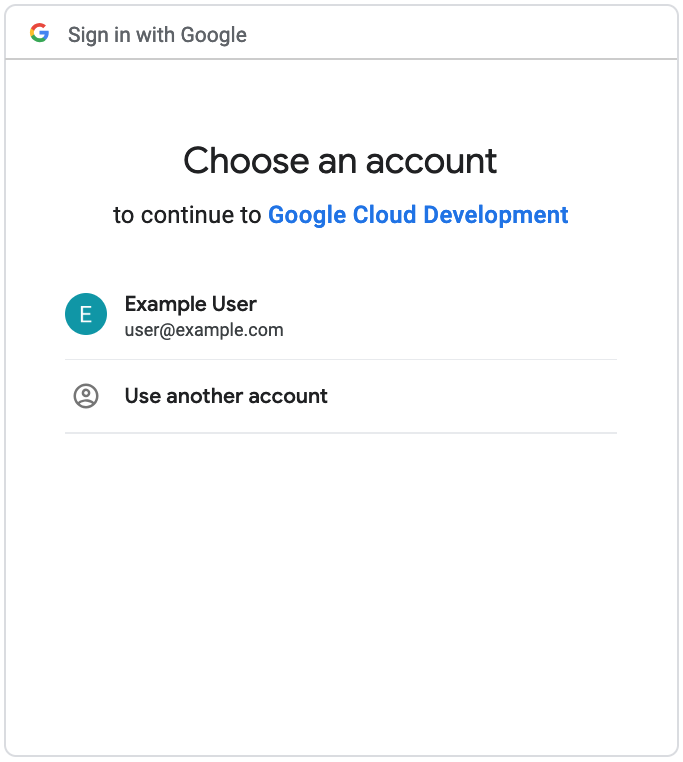
Choose your Google Account in the Sign in with Google dialog:
The following dialog appears, requesting permission to view and manage your data.
-
If you agree to the request for access, click Allow.
-
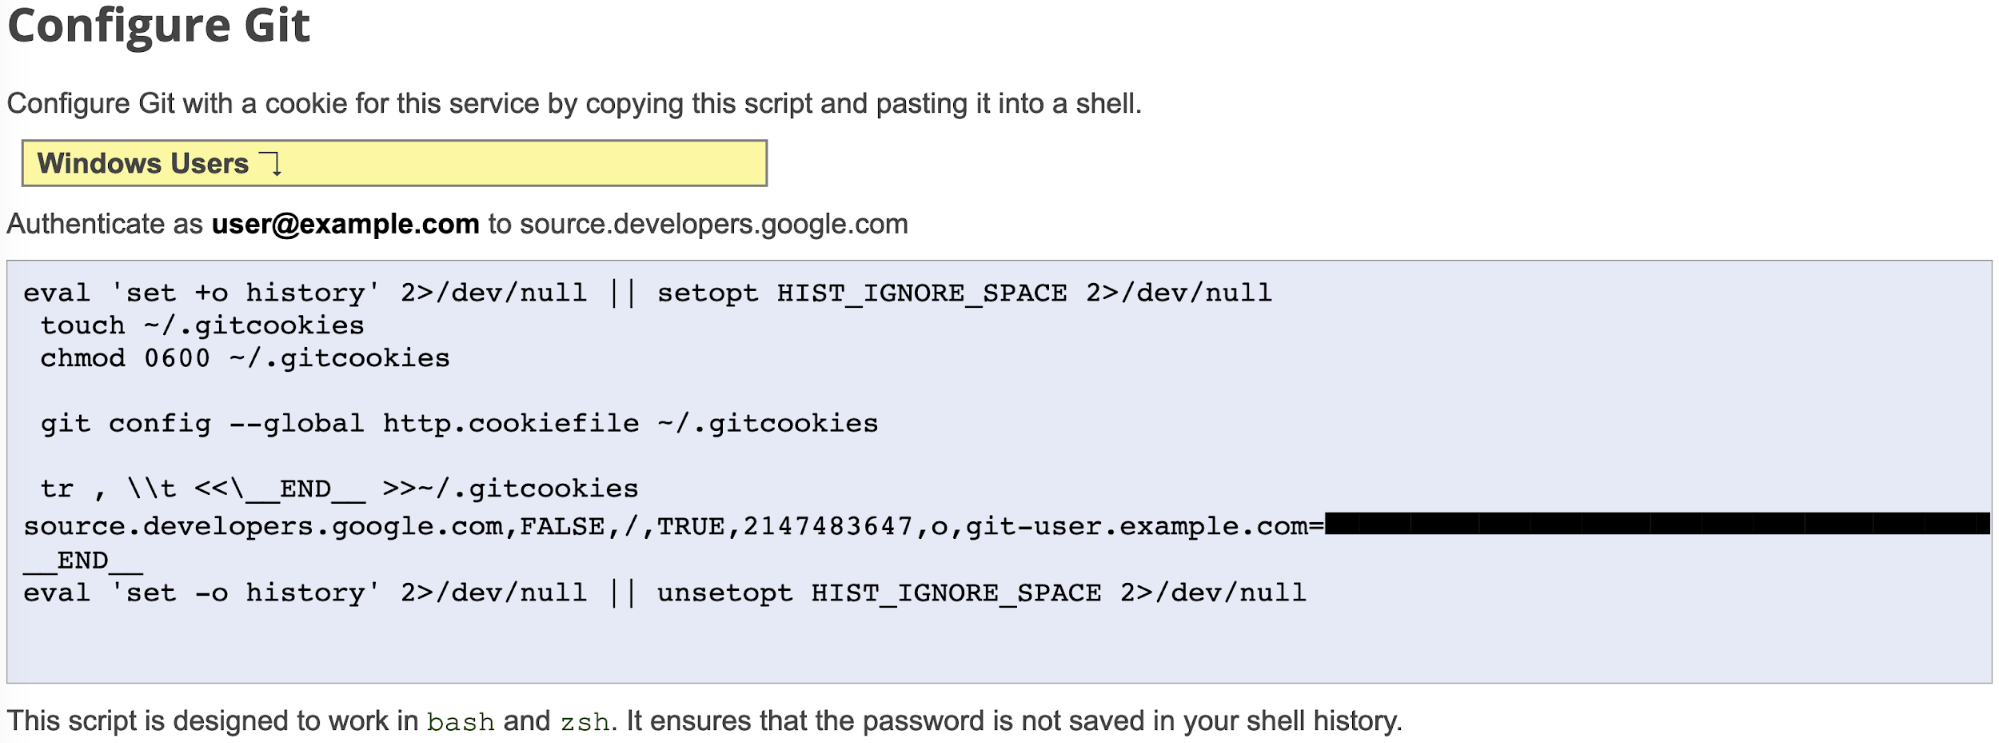
On the Configure Git page, note the
git-[USERNAME]and the highlighted text area. This will be the token used in the next steps.


-
In the project containing the repository, select Pipelines.
-
Select Create pipeline.
-
Select Use the classic editor to create a pipeline without YAML.
-
Select Azure Repos Git as a source for code. Click Continue.
-
At the top of the page, select Empty job as a template.
-
Rename the pipeline to Clone to Cloud Source Repo.
-
Click + Next to Agent job 1 to add the task. Find the Mirror Git Repository task and add it to the pipeline.
-
Click the task in the left pane. Change its display name if needed.
-
In the Source Git Repository field, paste the link to your Azure repository:
https://dev.azure.com/[YOUR_ORGANIZATION]/[PROJECT_NAME]/_git/[PROJECT_NAME] -
A personal access token (PAT) is used as an alternative password to authenticate into Azure DevOps. In the Source Repository - Personal Access Token field, paste the token created using the procedure in the Use personal access tokens article.
-
In the Destination Git Repository field, paste the URL of your repository in Cloud Source Repositories:
https://source.developers.google.com/p/[PROJECT_ID]/r/[REPOSITORY_NAME] -
Get the username and the token generated in the Configure Git section in Cloud Source Repositories and insert it to the Destination personal access token field as follows:
git-[USERNAME]:[TOKEN]In the token, replace the slash signs with its encoded variant,
%2F. So if your username isuserand your token starts with1//..., the token to be inserted is the following:git-user:1%2F%2F... -
Click Save & Queue.
-
Optionally, add a comment.
-
Click Save & Run.
-
You are redirected to the pipeline page, where you can see your job running in the Jobs tab. When it finishes running, you will see the status Success near the job name.
-
In Cloud Source Repositories, go to the All repositories page.
-
Click the name of your repository, which in this example is
azure-csr-mirror. -
Click to the
mainbranch. The files and commit history from the original repository should appear.
Note: If you want to do this regularly, note that service account keys expire after 30 days. Ensure that there is an established process of maintaining and regular rotation of keys.
The easiest way to eliminate billing and avoid incurring charges to your Google Cloud account for the resources used in this tutorial is to delete the project that you created for the tutorial:
- In the Cloud Console, go to the Manage resources page.
- In the project list, select the project that you want to delete, and then click Delete.
- In the dialog, type the project ID, and then click Shut down to delete the project.
If you want to revoke the generated credentials, go to the Apps with access to your account page under your Google Account, select Google Cloud Development, and click Remove access.
- Learn how to mirror a GitHub or Bitbucket repository to Cloud Source Repositories.
- Read Cloud Source Repositories how-to guides.
- Explore Cloud Source Repositories quickstarts.
- Learn how to mirror a GitLab repository to Cloud Source Repositories.
- Learn how to create a CI/CD pipeline with Azure Pipelines and Compute Engine.