The service mesh era: Advanced application deployments and traffic management with Istio on GKE

Megan O'Keefe
Staff Developer Advocate
Welcome back to our series about the Istio service mesh. In our last post, we explored the benefits of using a service mesh, and placed Istio in context with other developments in the cloud-native ecosystem. Today, we'll dive into the "what" and "how" of installing and using Istio with a real application. Our goal is to demonstrate how Istio can help your organization decrease complexity, increase automation, and ease the burden of application management on your operations and development teams.
Install with ease; update automatically
When done right, a service mesh should feel like magic: a platform layer that "just works," freeing up your organization to use its features to secure, connect, and observe traffic between your services. So if Istio is a platform layer, why doesn't it come preinstalled with Kubernetes? If Istio is middleware, why are we asking developers to install it?
At Google, we are working on simplifying adoption by providing a one-click method of installing Istio on Kubernetes. Istio on GKE, the first managed offering of its kind, is an add-on for Google Kubernetes Engine (GKE) that installs and upgrades Istio's components for you—no YAML required. With Istio on GKE, you can create a cluster with Istio pre-installed, or add Istio to an existing cluster.
Installing Istio on GKE is easy, and can be done either through the Cloud Console or the command line. The add-on supports mutual TLS, meaning that with a single check-box, you can enforce end-to-end encryption for your service mesh.
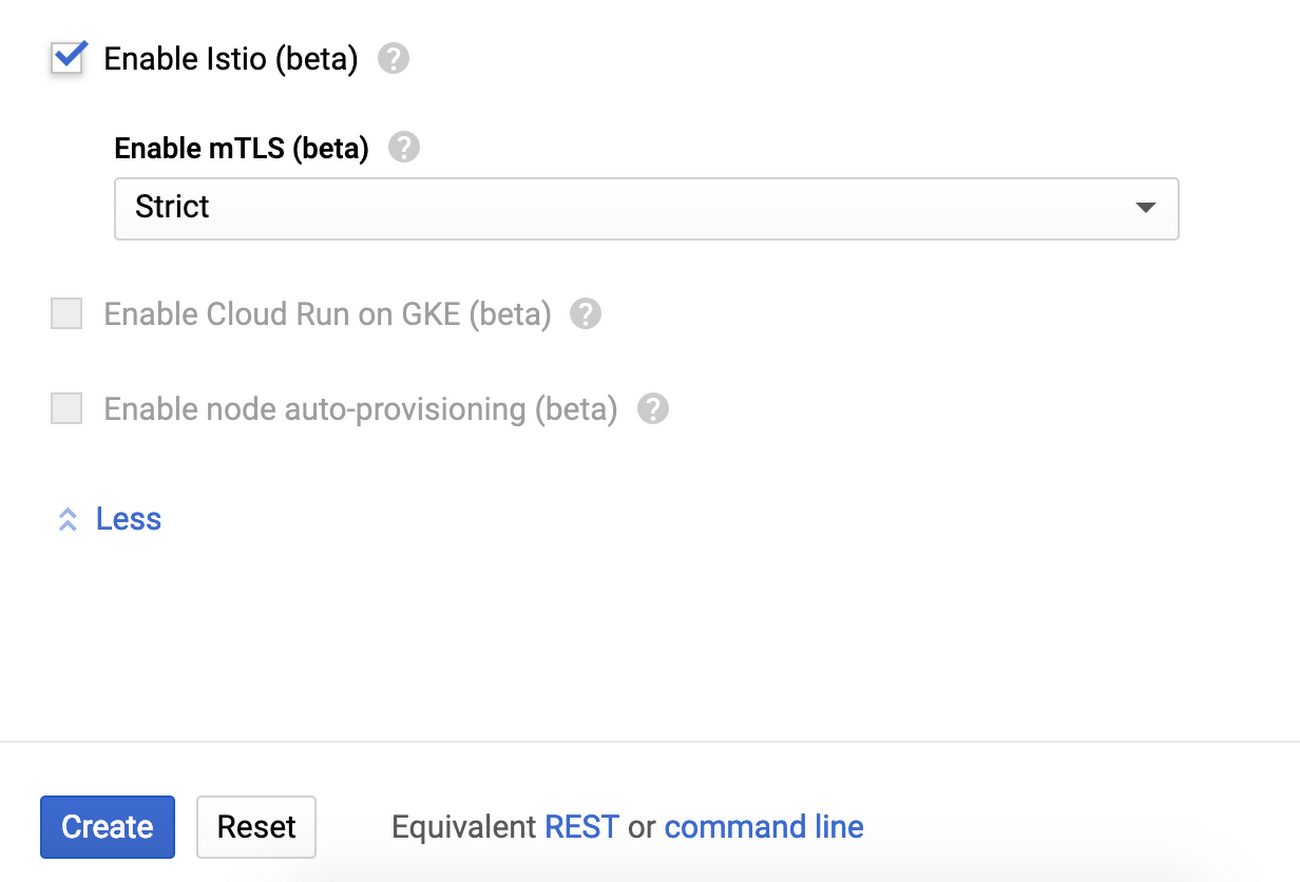
Once enabled, Istio on GKE provisions the Istio control plane for you, and enables Stackdriver integrations. You get to choose into which namespaces, if any, the Istio sidecar proxy is injected.
Now that we have Istio installed on a GKE cluster, let's explore how to use it with a real application. For this example, we'll use the Hipster Shop demo, a microservices-based web application.

While this sample app has multiple components, in this post we'll focus on Product Catalog, which serves the list of products above. You can follow along in this post with the step-by-step tutorial here.
Zero effort Stackdriver: Monitoring, logging, and tracing
When you use Istio on GKE, the Stackdriver Monitoring API is provisioned automatically, along with an Istio adapter that forwards service mesh metrics to Stackdriver. This means that you have access to Istio metrics right away, alongside hundreds of existing GCP and GKE metrics.
Stackdriver includes a feature called the Metrics Explorer, which allows you to use filters and aggregations together with Stackdriver’s built-in metrics to gain new insights into the behavior of your services. The example below shows an Istio metric (requests per second) grouped across each microservice in our sample application.
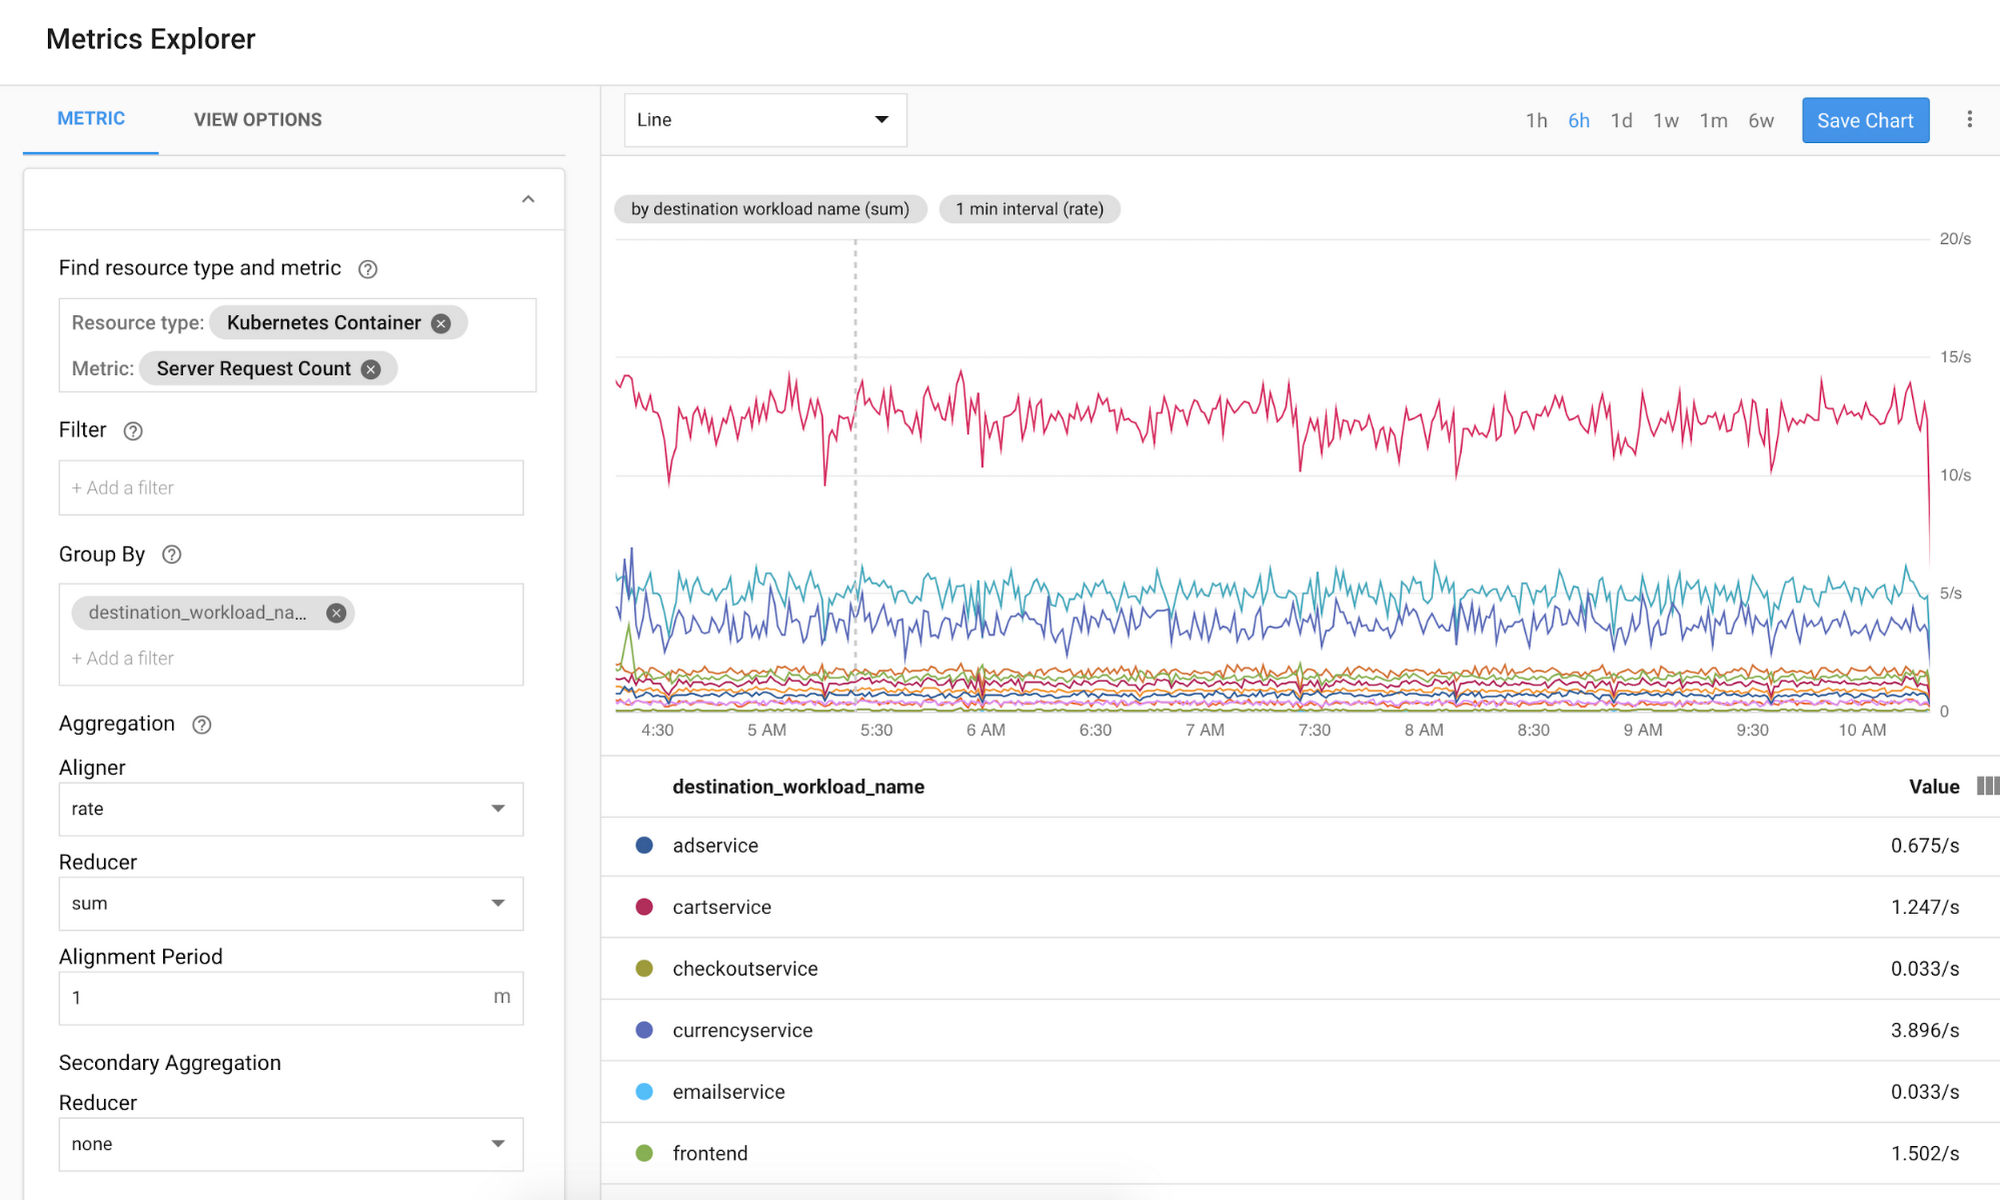
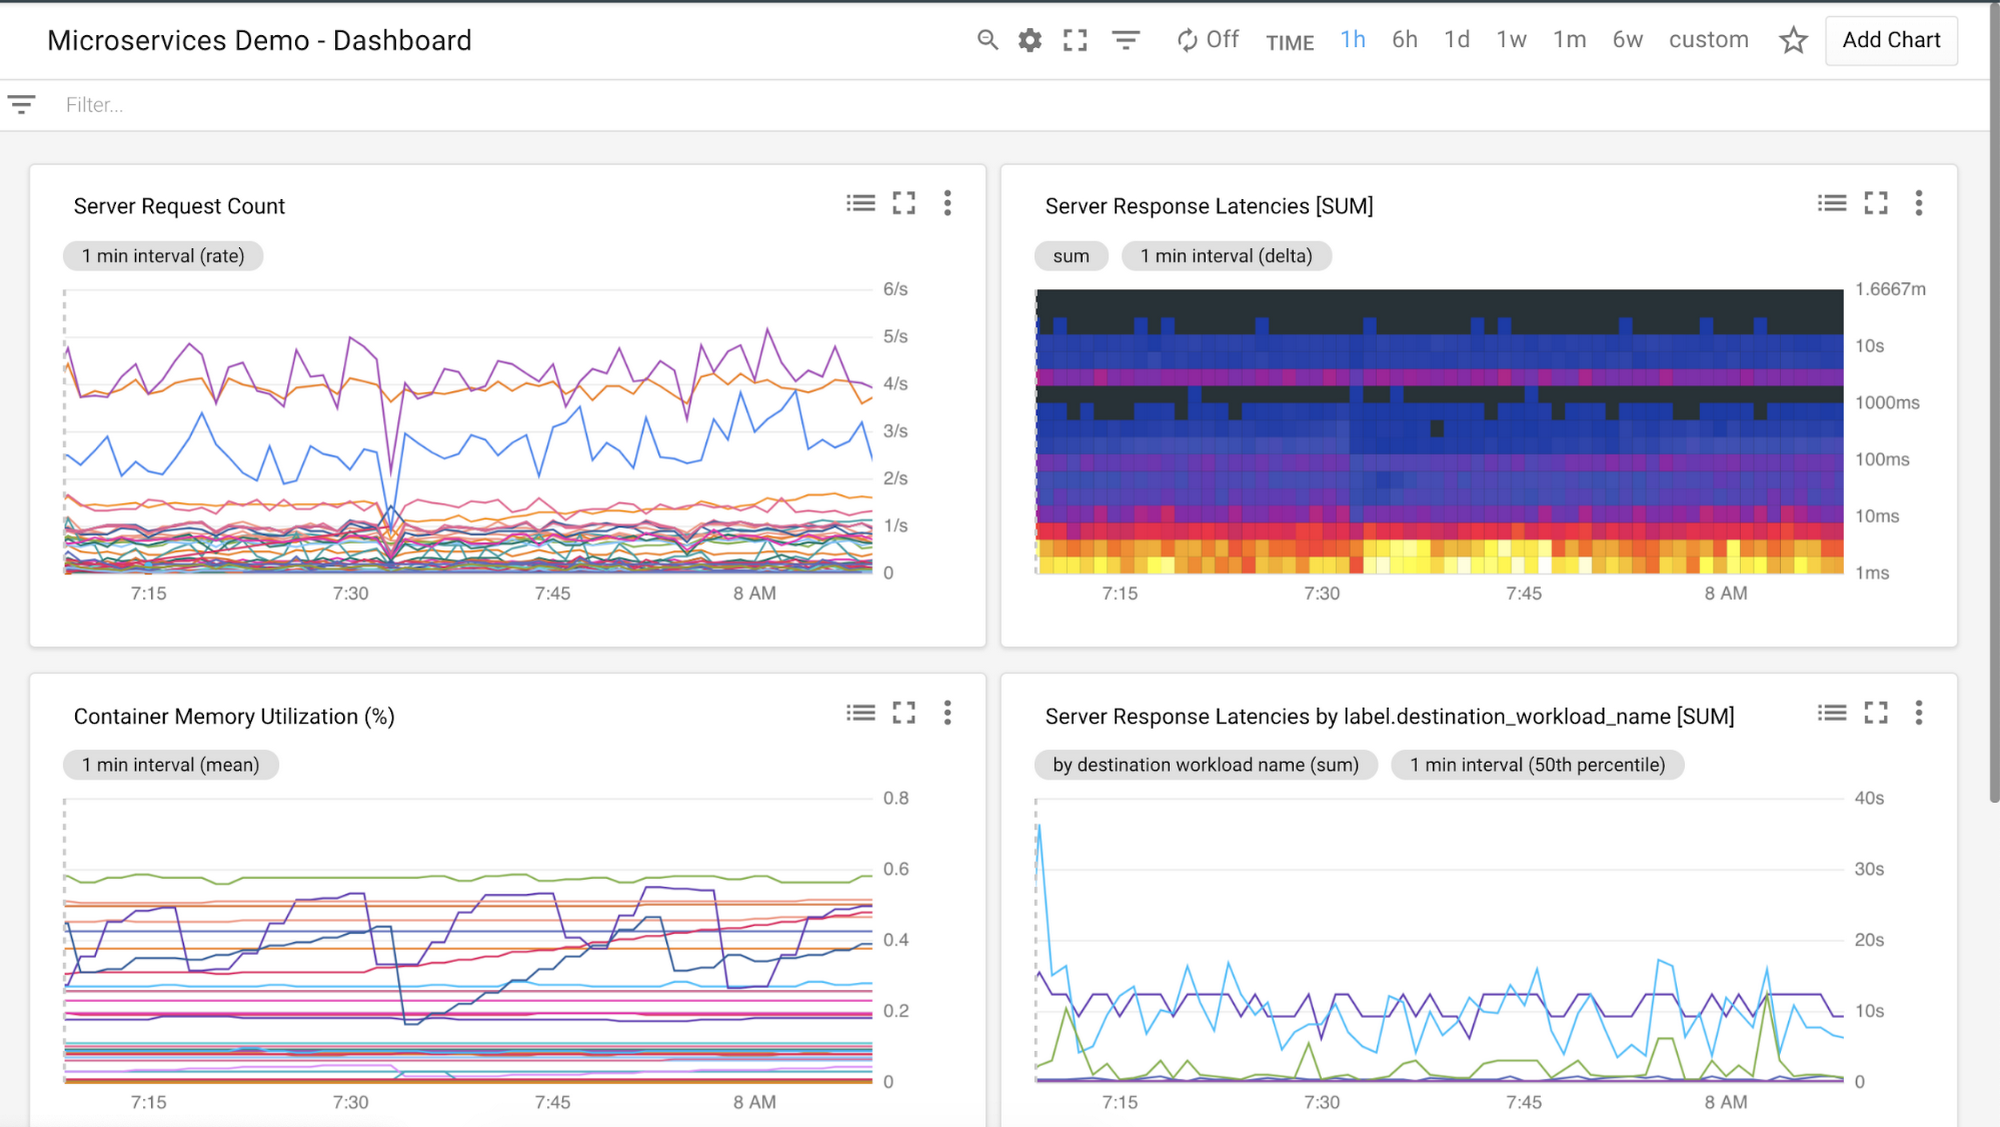
You can add any Metrics Explorer chart to a new or existing Stackdriver Dashboard. Using Dashboards, you can also combine Istio metrics with your application metrics, giving you a more complete view into the status of your application.
You can also use Stackdriver Monitoring to set SLOs using Istio metrics—for example, latency, or non-200 response codes. Then, you can set Stackdriver Policies against those SLOs to alert you when a policy reaches a failing threshold. In this way, Istio on GKE sets up your organization with SRE best practices, out of the box.
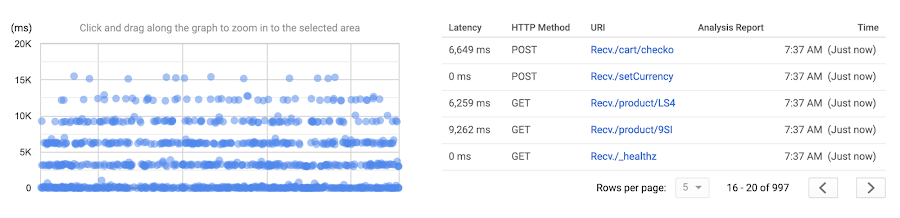
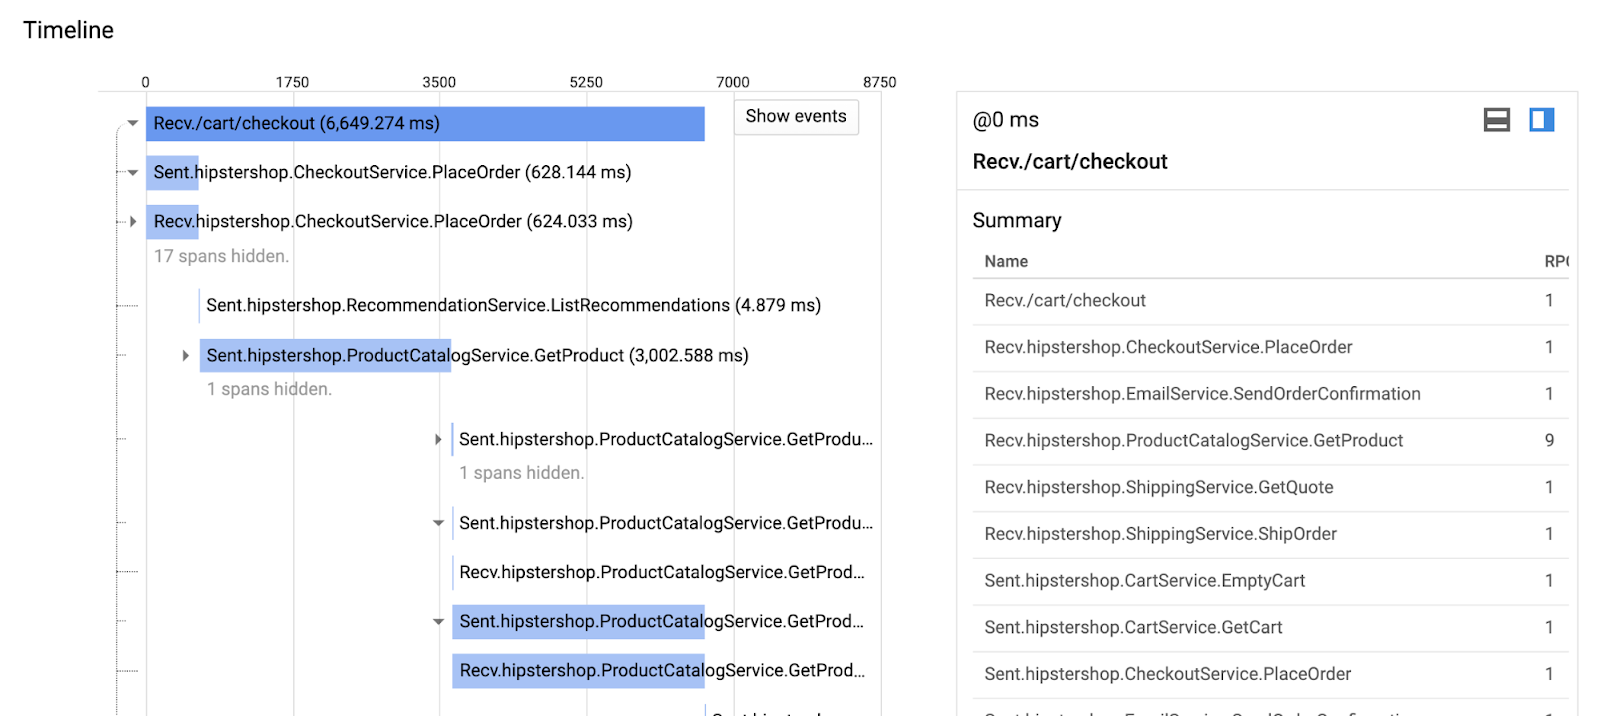
Istio on GKE also makes tracing easy. With tracing, you can better understand how quickly your application is handling incoming requests, and identify performance bottlenecks. When Stackdriver Trace is enabled and you’ve instrumented tracing in your application, Istio automatically collects end-to-end latency data and displays it in real-time to the GCP Console.
On the logging front, Stackdriver also creates a number of logs-based metrics. With logs-based metrics, you can extract latency information from log entries, or record the number of log entries that contain a particular message. You can also develop custom metrics to keep track of logs that are particularly important to your organization.
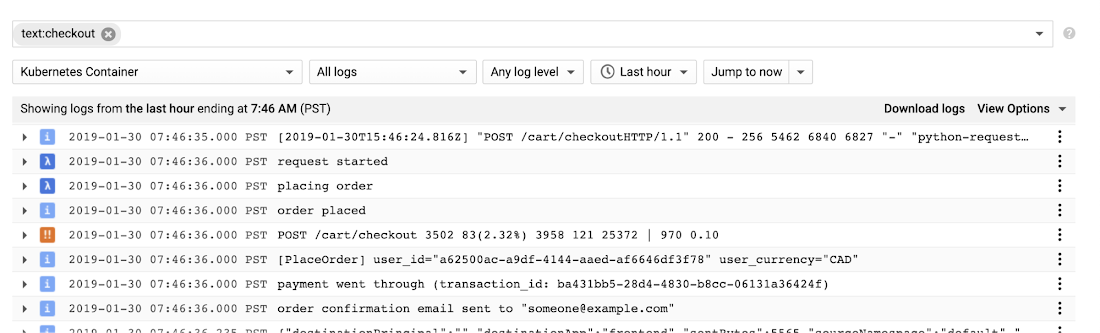
Then, using the Logs Viewer, you can export the logs to Google Cloud data solutions, including Cloud Storage and BigQuery, for storage and further analysis.
Traffic management and visualization
In addition to providing visibility into your service mesh, Istio supports fine-grained, rule-based traffic management. These features give you control over how traffic and API calls flow between your services.
As the first post in this series explains, adopting a service mesh lets you decouple your applications from the network. And unlike Kubernetes services, where load balancing is tethered to the number of running pods, Istio allows you to decouple traffic flow from infrastructure scaling through granular percentage-based routing.
Let's run through a traffic routing example, using a canary deployment.
A canary deployment routes a small percentage of traffic to a new version of a microservice, then allows you to gradually roll it out to the whole user base, while phasing out and retiring the old version. If something goes wrong during this process, traffic can be switched back to the old version.
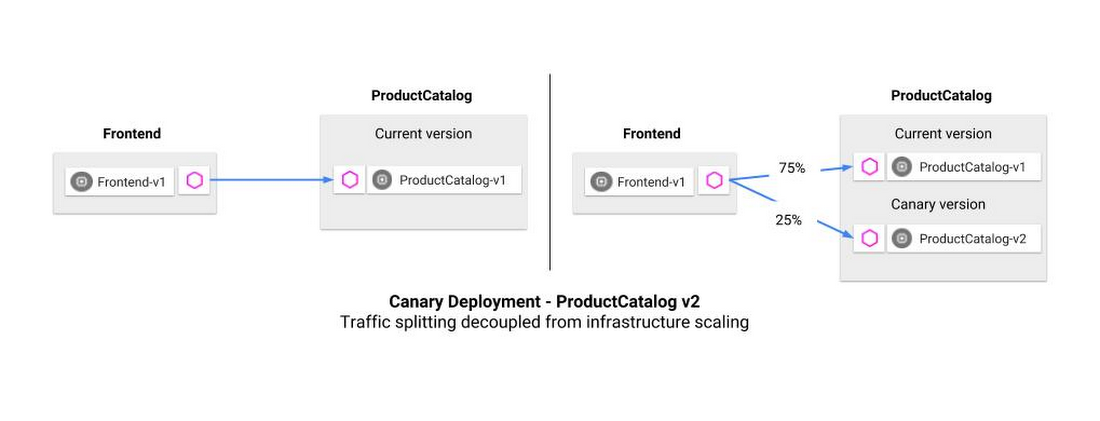
In this example, we create a new version of the ProductCatalog microservice. The new version ("v2") is deployed to Kubernetes alongside the working ("v1") deployment.
Then, we create an Istio VirtualService (traffic rule) that sends 25% of ProductCatalog traffic to v2. We can deploy this rule to the Kubernetes cluster, alongside our application. With this policy, no matter how much production traffic goes to ProductCatalog—and how many pods scale up as a result—Istio ensures that the right percentage of traffic goes to the specified version of ProductCatalog.
We’ll also use another feature of Istio and Envoy: for demo purposes, we inject a three-second latency into all ProductCatalog v2 requests.
Once the canary version is deployed to GKE, we can open Metrics Explorer to see how ProductCatalog v2 is performing. Notice that we are looking at the Istio Server Response Latency metric, and we have grouped by “destination workload name”—this tells us the time it takes for each service to respond to requests.

Here, we can see ProductCatalog v2's injected three-second latency. From here, it's easy to roll back from v2 to v1. We can do this by updating the Istio VirtualService to return 100% of traffic to v1, then deleting the v2 Kubernetes deployment.
Although this example demonstrates a manual canary deployment, often you'll want to automate the process of promoting a canary deployment: increasing traffic percentages, and scaling down the old version. Open-source tools like Flagger can help automate percentage-based traffic shifting for Istio.
Istio supports many other traffic management rules beyond traffic splitting, including content-based routing, timeout and retries, circuit breaking, and traffic mirroring for testing in production. Like in this canary example, these rules can be defined with the same declarative Istio building blocks.
We hope this example gives you a taste of how, together, Istio and Stackdriver help simplify complex traffic management operations.
What's next?
To get some more hands-on experience with Istio on GKE, check out the companion demo. You can find the instructions for getting started on GitHub.
To read more about Istio, Stackdriver, and traffic management, see:
- Drilling down into Stackdriver Service Monitoring (GCP blog)
- Incremental Istio Part 1, Traffic Management (Istio blog)
Stay tuned for the next post, which will be all about security with Istio.