Using your existing identity management system with Google Cloud Platform
Jaclyn Kollar
Cloud Customer Engineer
Grace Mollison
Head Cloud Solutions Architects EMEA
We hear from many new Google Cloud Platform (GCP) customers that they already have a well-established way to manage their users and want to keep using their existing identity management system. In this post, we’ll walk you through how to do that, and discuss the best ways to provision or sync users when using your existing identity management system with GCP.
First, it’s important to know that GCP uses Google Accounts for authentication and access management. As a prerequisite for access to GCP resources, employees must have a Google identity set up. This requirement does not preclude you from managing your identities as you do today and having one place to manage your identities. We’ll describe how to use Google’s Cloud Identity so that you can continue to manage your users from your existing identity management system when working with GCP.
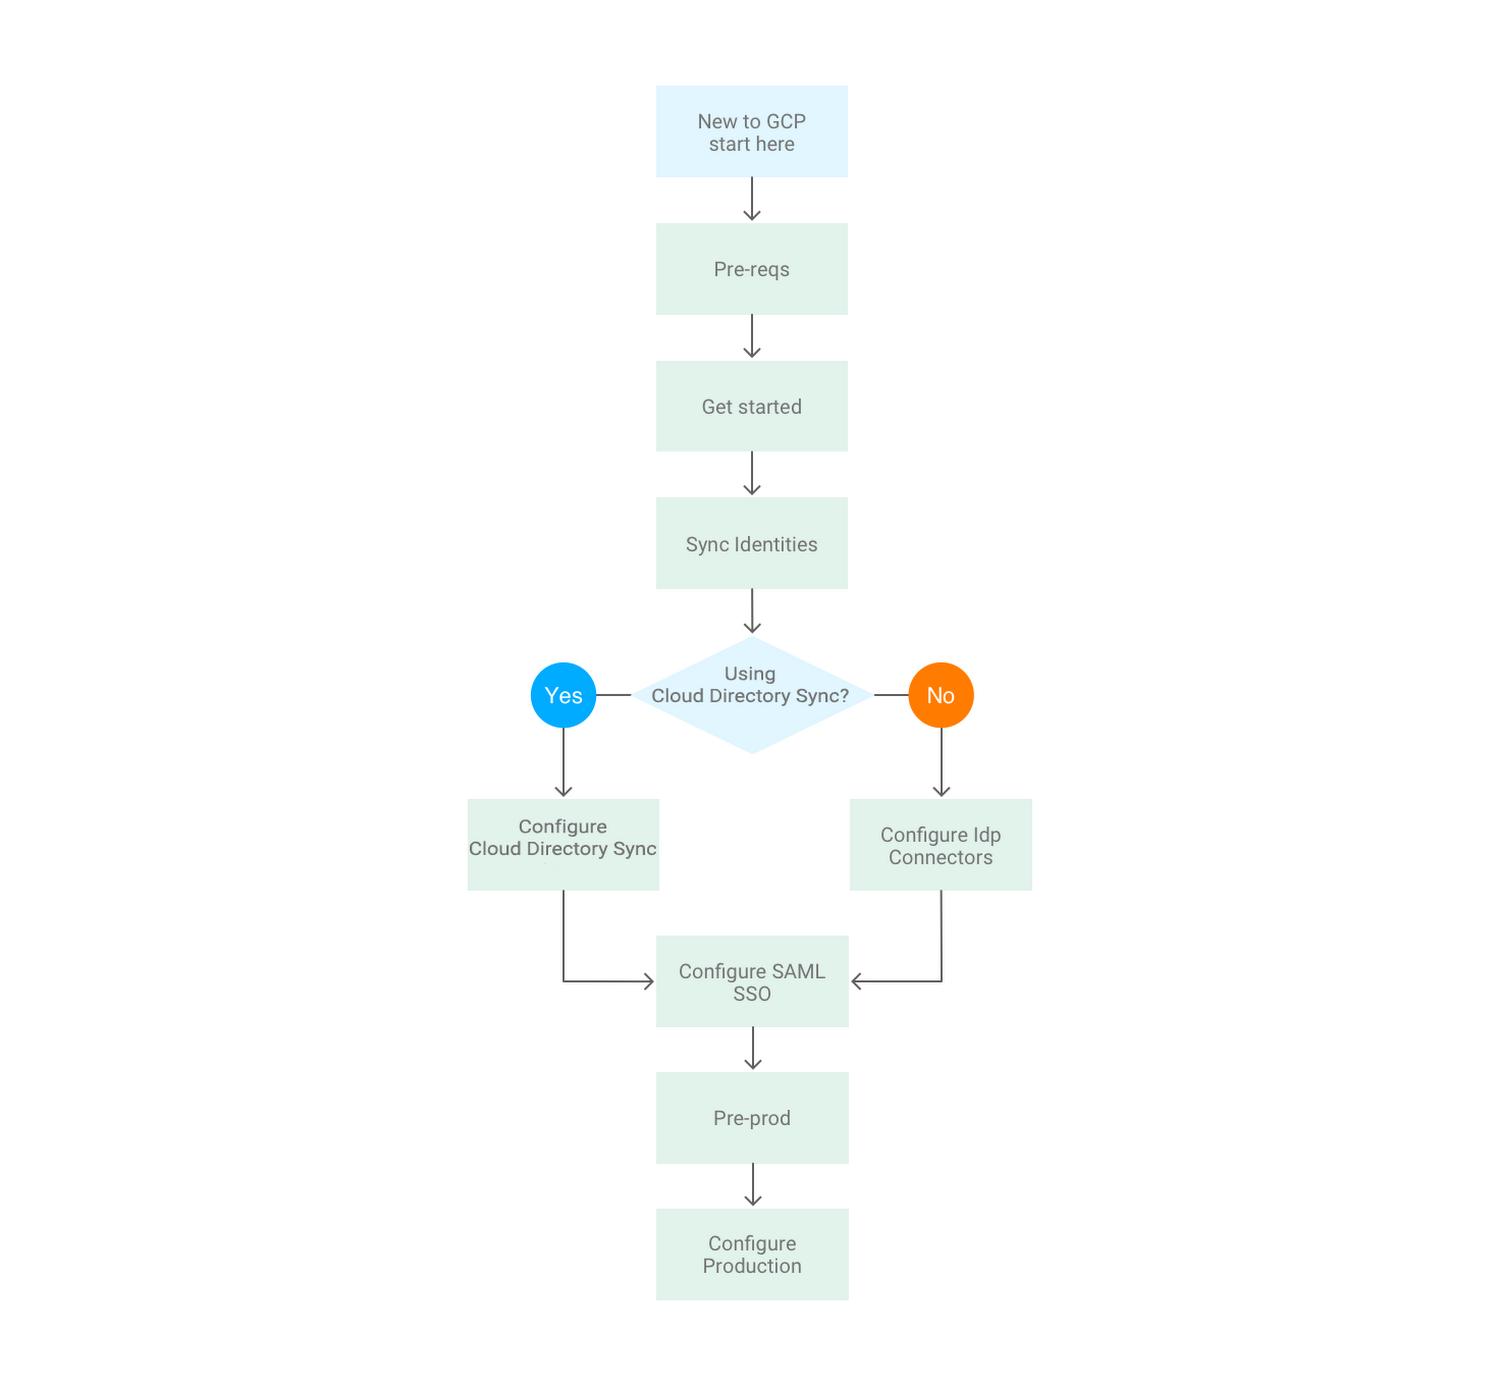
To get started, this flow chart illustrates the steps to integrating your current identity management system into GCP.
Note: This post assumes you are just starting your journey with GCP and have not set up an organization resource.
Let’s drill down into the various steps.
Pre-reqs
Identify a domain that you will use to set up your Cloud Identity account. Note that the domain is assumed to be enabled for email, as users will get project invites and messages via email from GCP.
Ensure you or another authorized person can make a TXT or CNAME entry to your DNS settings. This is part of the verification steps required to verify domain ownership.
To allow your users to authenticate using your identity management system when accessing the GCP console, you’ll have to implement SAML SSO, so make sure you have the right details to configure this later.
Get started with account configuration
Configure your no-cost GCP Cloud Identity account here. You’ll see a straightforward set of steps.
When you’re prompted to enter your current email address, enter an email address you can check easily (we recommend using your corporate email). You’ll get an initial email as part of the flow.
Then, you’ll be prompted to add the name of the business domain you’re using for your Cloud Identity account, and it’ll check to make sure the domain exists. If it doesn’t or is already registered at a Google domain, you won’t be able to proceed.
Next, you’ll be prompted to create your first user, which will be your primary Cloud Identity administration account for your organization. Administration accounts are privileged and should only be used when needed. (You can use your name and transfer this account later if needed.) You’ll be required to enter your first name and last name.
At the next prompt, “How you'll sign in,” create an account for the Cloud Identity admin who will manage users. This account will also automatically be the admin for your GCP Organization, able to manage resources and assign user permissions. (Note: This account will be associated with the details you completed in the previous prompt.)
Next, accept the terms of service, then verify your domain, as shown here:
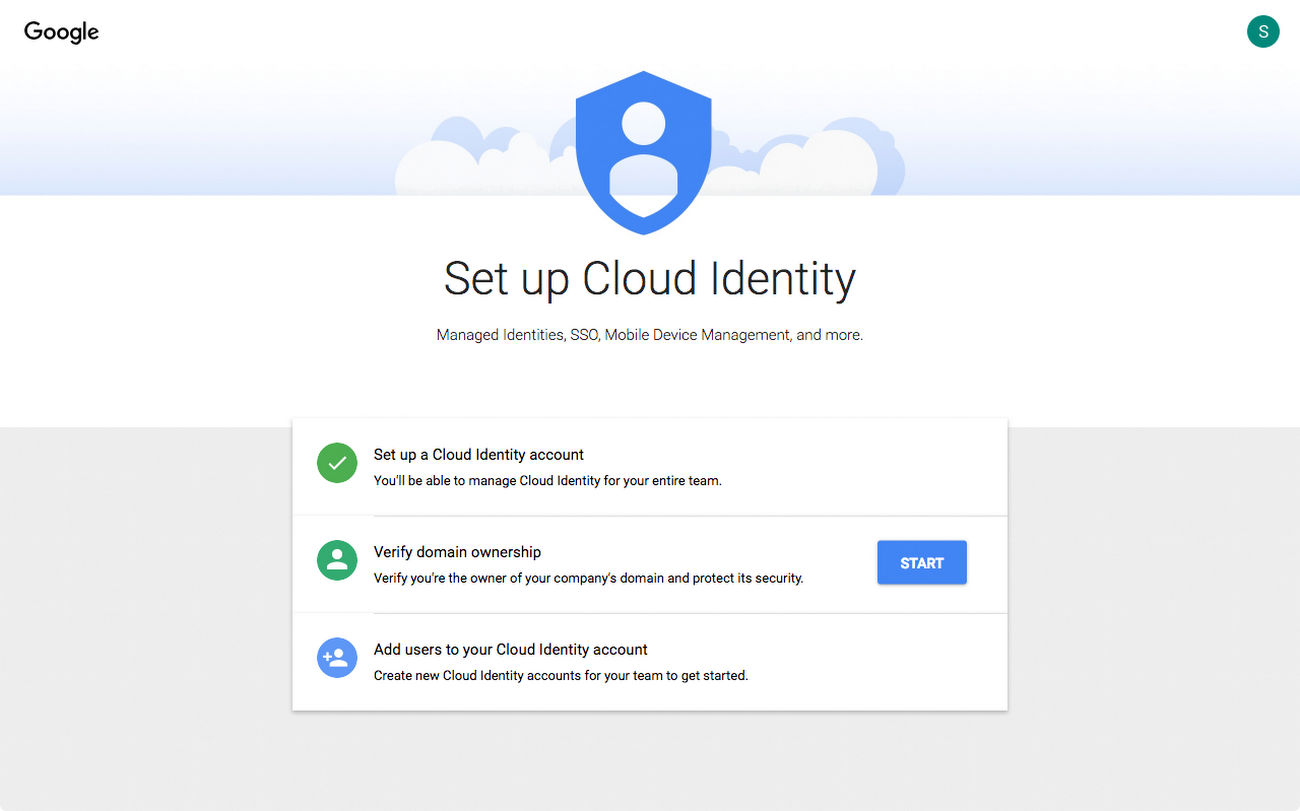
At this stage, you will have a GCP Organization resource created that matches the Cloud Identity domain.
Before proceeding to the next steps, you should add your initial users to your Cloud Identity account. These will typically be your admin users who will configure initial GCP setup.
Configuring initial GCP accounts and setting up billing
Now, you should see the Cloud Identity screen in the GCP console that lists your next steps (some of which are optional at this stage).
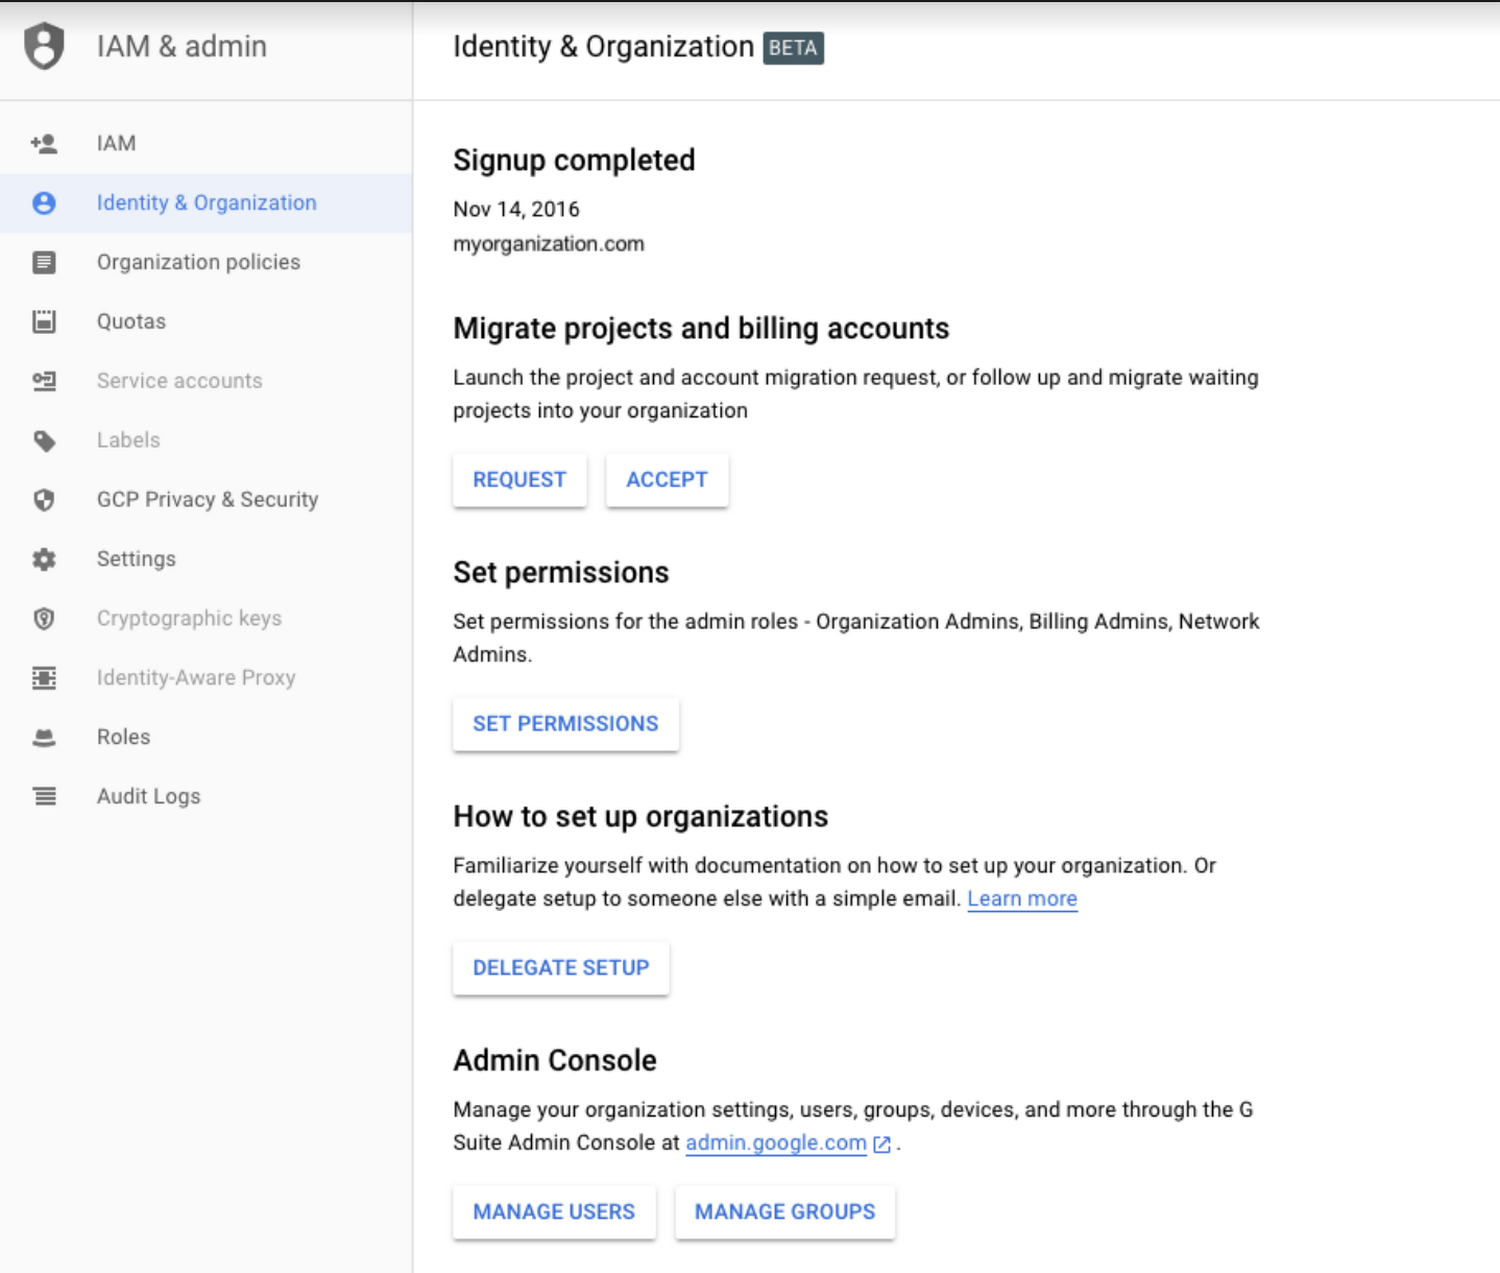
Migrate existing projects or billing accounts: If you have any projects or billing accounts you need to migrate under your organization, follow the workflow and undertake those tasks.
Set permissions: Set up your Cloud Platform administrators. These may or may not be separate from your organization’s identity administrators
How to set up organizations: You can go here to learn more. (This isn’t crucial for configuring identities; you can do this task after you have configured your identity management system to be synchronized with your Cloud Identity account.)
In addition to the above steps, make sure you create your billing account for using GCP resources. There are two options:
Create online billing account linked to credit card or bank account
Create offline invoiced billing account tied to a PO# (in this case, you work with our Google Cloud Sales team).
Sync identities
You need to enable Cloud Platform to recognize your users, using one of two recommended methods: Google Cloud directory sync (shown on the left below), or third-party identity provider connectors to Cloud Identity (shown on the right below).
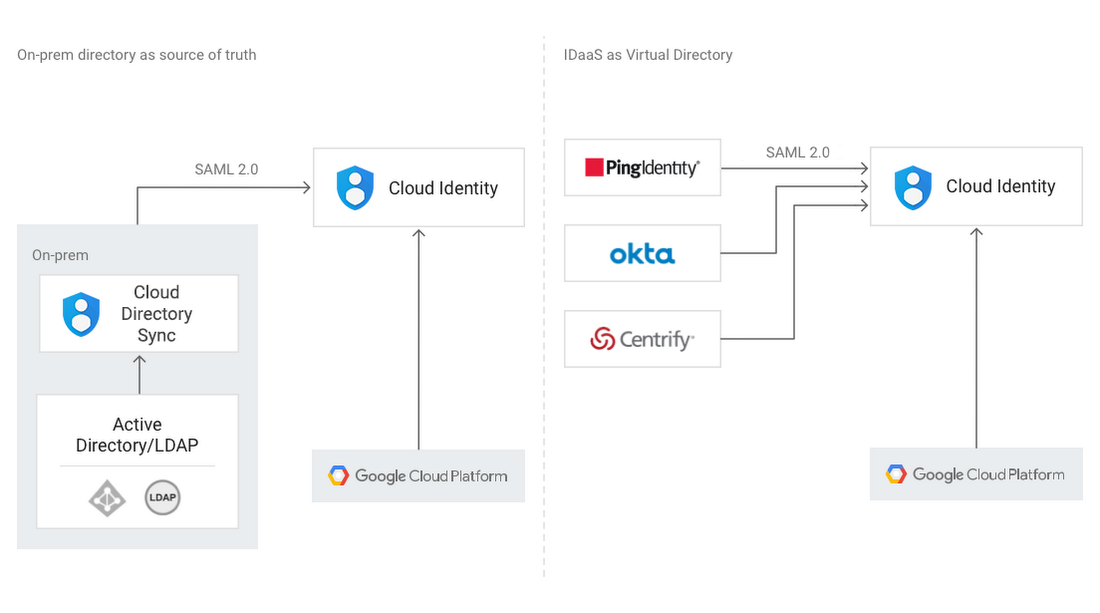
Regardless of the method you choose, it is important to understand that your users’ passwords are not synchronized by default. Only the identities are synchronized, unless you make an explicit choice to synchronize passwords (which is not a best practice and should be avoided). The best practice to sync identities is to use SSO with any existing identity provider, which we’ll explain next. When you use SSO like this, your users are authenticated against your existing on-premises identity management system, and passwords aren’t synced out to GCP.
You’ll have to decide which sync method you’d like to use. If you already have a third-party IDP connector configured to extend identities and would like to keep using it, see if it provides a connector to extend identities to GCP. Note that this is sometimes named Google Cloud Identity, Google Domain or G Suite connector in third-party documentation.
If you’d rather not use existing connectors or would prefer a fully Google-provided and -supported solution, configure Google Cloud Directory Sync to extend identities to GCP.
Let’s look at both methods for syncing identities.
1) Using Google Cloud Directory Sync
Google Cloud Directory Sync is a Google-provided connector tool that integrates with most enterprise LDAP management systems and synchronizes identities on a schedule.
By configuring a Cloud Identity account and using Google Cloud Directory Sync, you can configure which of your user accounts—including users, groups, user profiles, aliases and more—will synchronize on a schedule between your local identity management system and your GCP system. This gives you granular control over corporate users to whom you wish to grant or rescind direct GCP resource access. These users are typically the developers, data scientists, and operational staff who need direct access to GCP resources. Google Cloud Directory Sync maps sub-organizations on your LDAP directory server to GCP organizational units with the same name. It connects to the Cloud Identity domain through the internet using HTTPS on port 443 or through a proxy host in your network. This synchronization is one-way; the data in your LDAP directory server is never modified. You can configure Google Cloud Directory Sync to either disable or delete users in Cloud Identity, once the users are deleted from the source directory.
Check out this demo of on-premises identities being extended to Google Cloud using Google Cloud Directory Sync.
2) Using third-party IDP connectors for sync
Many identity management vendors (such as Ping and Okta) provide a connector for G Suite and Cloud Identity Global Directory, which sync changes to users via the Admin SDK Directory API. If you are using Azure Active Directory to manage your users, you can use the AD Azure G Suite connector.
The identity providers control usernames, passwords and other information used to identify, authenticate and authorize users for web applications that Google hosts—in this context, it’s the GCP console. There are a number of existing open source and commercial identity provider solutions that can help you implement SSO with Google. (Read more about SAML-based federated SSO if you’re interested in using Google as the identity provider.)
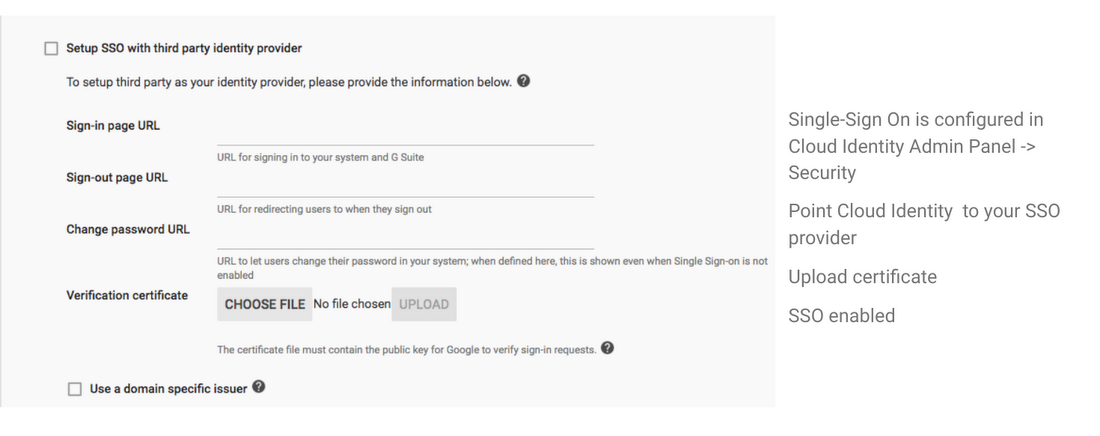
Configure SAML SSO
Once you have selected one of the above methods, set up SSO for your users. You’ll want to configure SSO so your users authenticate from your single source of truth: your identity management system.
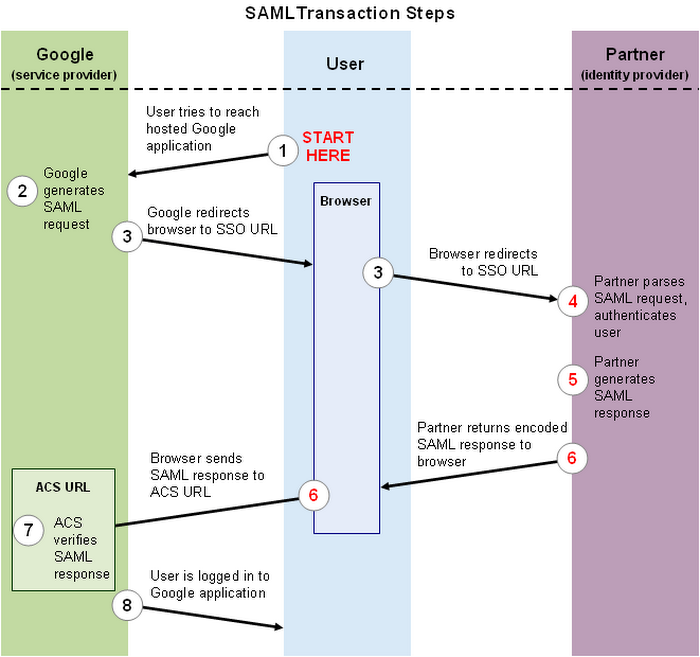
GCP supports SAML 2.0 SSO, where Google acts as the service provider and a third party, such as ADFS, Ping or Okta, acts as the identity provider. This provides seamless SSO against GCP console, web- and command-line-based SSH, and OAuth authorization prompts. GCP's command-line interface tools, such as gcloud, gsutil, and bq, use SAML 2.0-based SSO for browser-based authentication as well. The diagram below illustrates the SAML transaction steps.
To configure SSO, log into the Cloud Identity admin console and complete the form to point Cloud Identity to your SSO provider.
In either sync scenario, authentication and central management of users occurs through your identity management system. Authorization is configured using Cloud Identity and Access Management (Cloud IAM). Follow best practice advice for using Cloud IAM to grant access to GCP resources.
Preparing for identity management in production
Do a proof of concept (PoC) trial: synchronize a small number of users or a small group from an on-premises organization unit.
When your PoC has met all its success criteria, use the PoC set up to model your production configuration, then set up your production configuration.
Configuring production
Don’t map your entire organization to Cloud Identity, but plan what needs to be synchronized. You’ll likely provide direct access to GCP resources to only a subset of your users.
Map out the functional roles for your users and create groups to map to these roles. Grant roles to a Google group instead of to individual users when possible. It is easier to add and remove members from a Google group than updating a Cloud IAM policy to add or remove a user.
After initial setup, schedule and configure ongoing sync from your on-premises or existing identity system, so users and groups in GCP remain updated.
Troubleshooting identity management sync issues
We’ve heard about some common pitfalls during the process we’ve outlined. Here’s what to look for and how to resolve any issues.
During the signup flow, you get an error message when you enter your domain. For example: “This domain is already in use” or “This domain has been registered.” See our Signup Troubleshooter to help guide in troubleshooting this issue.
SSO setup process issues. Using your domain rather than a sub-domain (e.g., acme.com vs. cloud.acme.com) simplifies the SSO setup process.
You run into conflict accounts. Prior to setting up your Cloud Identity account, you may have some users who used their organizational email address to sign up as a Google Account before you set up your company’s Cloud Identity account. These existing unmanaged users need to become managed accounts. Try the unmanaged user invite tool to resolve this issue ahead of time.
What’s next
Once you've set up your GCP organization, read the Designing GCP policy docs to help you plan and implement the configuration of your environment.
You might also consider signing up for a premium cloud identity account. Learn more about the differences in Cloud Identity accounts. Enjoy smooth sailing ahead with your well-integrated identity management systems.