Protecting your GCP infrastructure at scale with Forseti Config Validator
Adrien Walkowiak
Strategic Cloud Engineer
One of the greatest challenges customers face when onboarding in the cloud is how to control and protect their assets while letting their users deploy resources securely.
In this series of four articles, we’ll show you how to start implementing your security policies at scale on Google Cloud Platform (GCP). The goal is to write your security policies as code once and for all, and to apply them both before and after you deploy resources in your GCP environment.
In this first post, we’ll discuss two open-source tools that can help you secure your infrastructure at scale and scan for non-compliant resources: Forseti and Config Validator.
You can see it in action in this live demo from Alex Sung, PM for Forseti at Google Cloud.
In follow-up articles, we’ll go over how you can use policy templates to add policies to your Forseti scans on your GCP resources (using the enforce_label template as an example). Then, we’ll explain how to write your own templates, before expanding to securing your deployments by applying your policies in your CI/CD pipelines using the terraform-validator tool.
Scanning for violations with Forseti and the config_validator scanner
Cloud environments can be very dynamic. It’s a best practice to use Forseti to scan your GCP resources on a regular basis (a new scan runs every two hours by default) and evaluate them for violations.
In this example, Forseti will forward its findings to Cloud Security Command Center (Cloud SCC) for integration, using a custom notifier. Cloud SCC also integrates with the most popular security tools within the Google Cloud ecosystem like DLP, Cloud Security Scanner, Cloud Anomaly Detection, as well as third party tools (Chef Automate, Cloudflare, Dome9, Qualys etc.).
This provides a single-pane of glass for your security and operation teams to look for violations.
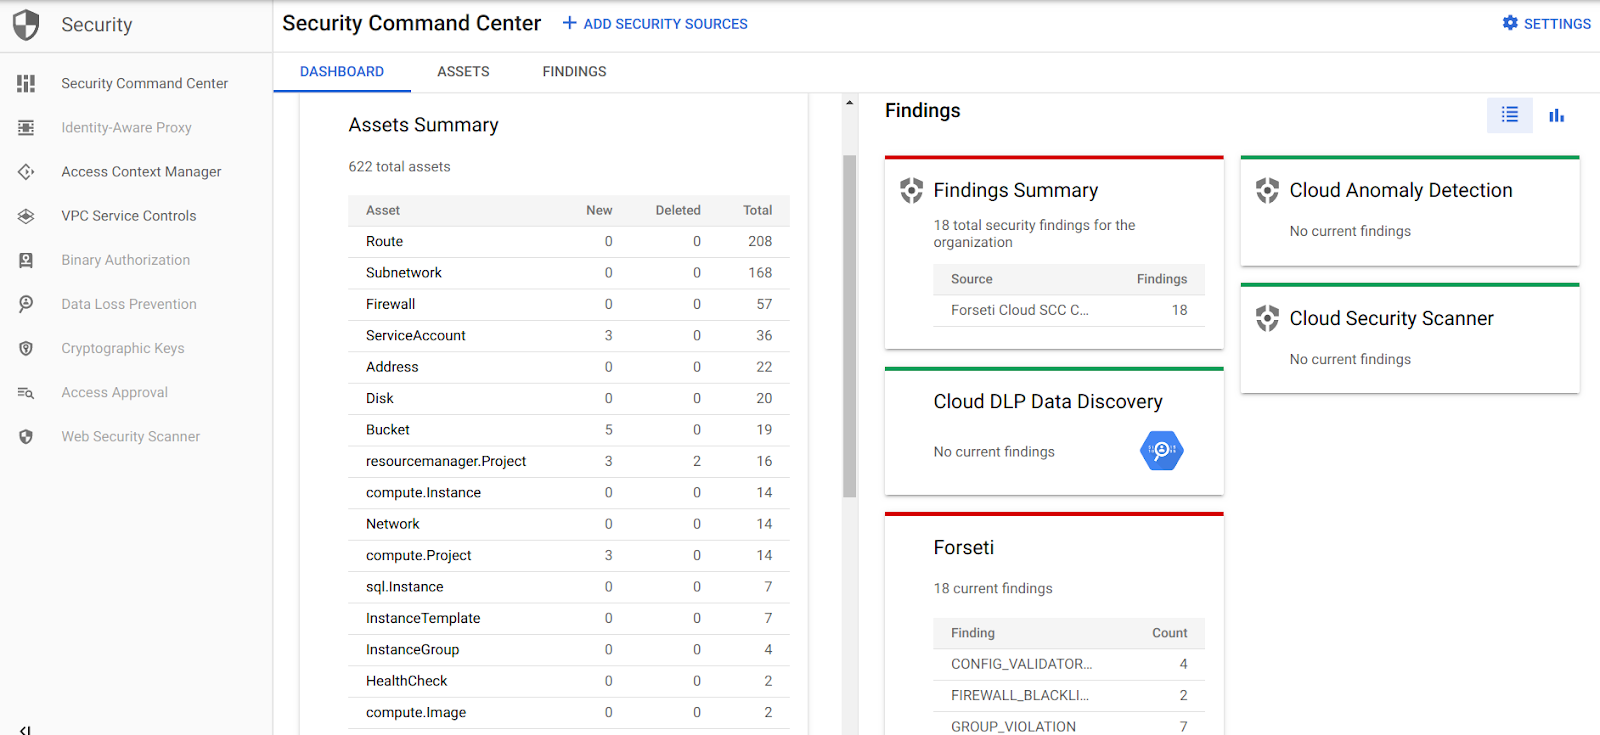
Here is an example of the Cloud SCC dashboard with few security sources set up. At a high level, here’s what you need to do to get your Forseti integration working:
Deploy a basic Forseti infrastructure with the config_validator scanner enabled in a dedicated project
Add a new SCC connector for Forseti via the UI manually (the other alternative is to use the API directly at this point)
Update your Forseti notifier configuration to send the violations to SCC
Add your custom policy library to the forseti server GCS bucket so that the next scan applies your constraints on your infrastructure. You can use Google’s open-source policy-library as a starting point for this.
Let’s go over these steps in greater detail.
1. Forseti initial setup
The official Forseti documentation lists a few options to deploy Forseti in your organization. A good option is the Forseti Terraform module, since it’s easy to maintain, and we because it’s easy to deploy Terraform templates from a CI/CD pipeline, as you’ll see in next posts.
Another alternative for installing Forseti is to follow this simple tutorial for the Terraform module (includes a full Cloud Shell tutorial).
There are 139 inputs (for v2.2.0) you can play with to configure your Forseti deployment if you feel like it. For this demo, we recommend you use the default values for most of them.
First, clone the repo:
Then, set some variables to specify the input you need in a new terraform.tfvars file:
Note: Make sure your credential file is valid and corresponds to a service account with the right permissions, unless you are leveraging an existing CI/CD pipeline that handles that part for you.
Check out the module helper script to create the service account using your own credentials if needed.
You can now test your setup. First run terraform init:
Then create a terraform plan from these templates and save it as a file.
If everything looks good, you can deploy your plan:
You now have a Forseti client and a Forseti server in your project (among many other things, like a SQL instance and Cloud Storage buckets).
2. Setting up Cloud SCC
At this point, you’ll need to follow these steps to configure Cloud SCC to receive Forseti notifications. You simply need to create a new source, that you’ll use in your Forseti configuration.
Note: Stop at step #4 (do not follow step 5) in the Cloud SCC setup instructions, as you’ll do this using Terraform instead of manually updating the Forseti server.
If you follow the steps in the link above to add the Forseti Cloud SCC Connector as a new security source, you should end up with something like this in your Cloud SCC settings:
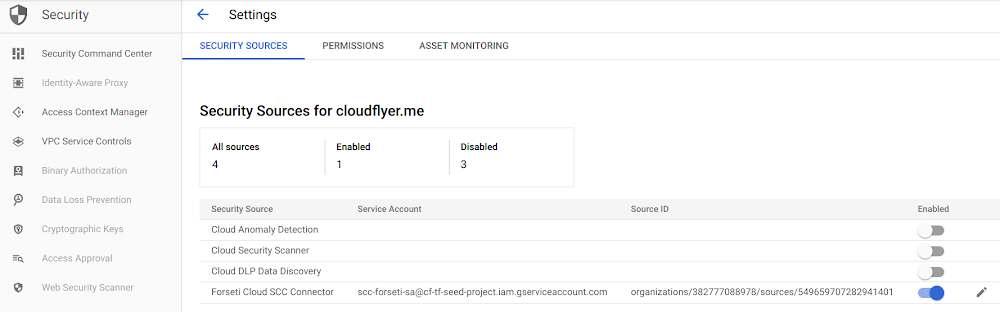
Take a note of your Forseti Cloud SCC Connector source ID and Service Account for the next step.
3. Updating the Forseti configuration
Now, you’ll need to update our Forseti infrastructure to configure the server to send the notifications to Cloud SCC.
Here is your updated terraform.tfvars file:
If you run terraform plan and terraform deploy again, your Forseti server should now be correctly configured.
You can check the /home/ubuntu/forseti-security/configs/forseti_conf_server.yaml file on the Forseti server to see the changes, or by running the forseti server configuration get command).
Then, add your policy library to let the config_validator scanner check for violations once everything is set up.
4. Setting up the config_validator scanner in Forseti
Now, you need to import your policy-library folder in the Forseti server Cloud Storage bucket and reload its configuration. Please refer to the Config Validator user guide to learn more about these steps.
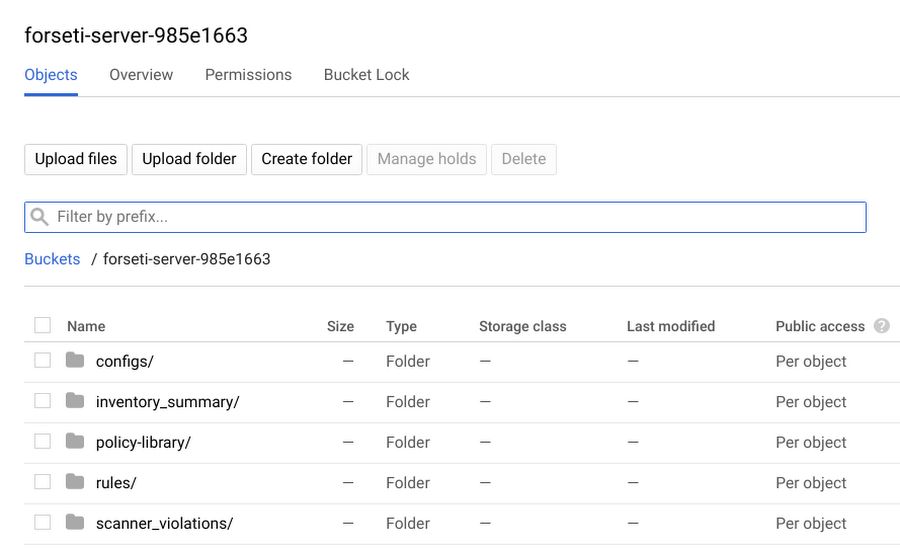
Then, once the config validator scanner is enabled, you can add your own constraints to it. You do this by updating the Forseti Cloud Storage server bucket, following these instructions. The end result should look like this (after Forseti first runs):
Note: All of these steps should be automated in your CI/CD pipeline. Any merge to your policy-library repository should trigger a build that updates this bucket.
As a general rule, constraints need to be added in the policies/constraints folder and use a template in the policies/templates folder.
You can also check that the config-validator service is running and healthy using:
Now you can test out your setup, by running a scan and sending the violations manually to Cloud SCC. This is just to confirm that everything is working as expected and avoid waiting until the next scheduled scan to troubleshoot it.
The traditional way to query a Forseti server is SSH to the forseti client, using the console UI, and create a new model based on the latest inventory (or you can create a new inventory if you need to capture newly created resources). Using this model you can run the server scanners manually and finally run the notifier command to send out the result to Cloud SCC.
A quicker way to test out this setup is to run the same script that will run automatically on the server every two hours. Simply SSH into the server and manually run (from /home/ubuntu/forseti-security):
This gets the latest data from the Cloud Storage bucket, and run all the steps mentioned earlier (create a model from the latest inventory, run the scanners and then the notifiers) in an automated fashion.
Once it successfully runs, you can check in Cloud SCC what violations (if any) were found. Since you didn’t add any custom constraints in the policy-library/policies/constraints folder, the config_validator scanner shouldn’t find any violations at this point.
If you are having issues in any of the setup steps, please read the Troubleshooting tips section for common issues that people run into.
Troubleshooting tips
Forseti install issues
If you do not see the forseti binary when you SSH in the client or the server. Check out your various log files, to see if the install was successful.
This is usually a red flag that means your Forseti installation failed. You cannot move forward from there; you need to fix the situation first. Most of the useful logs are in /var/log: syslog, cloud-init.log, cloud-init-output.log and forseti.log.
Do not hesitate to run ‘terraform destroy’ and double check every variable you passed to the module too, to check for permissions issues.
Config Validator issues
Forseti runs scanners independently, based on the server configuration file. If everything is configured properly, when you run the forseti scanner command, you should see among other things, something like:
If the Forseti config validator scanner does not run, check out the forseti server configuration file to see if it’s enabled (/home/ubuntu/forseti-security/configs/forseti_conf_server.yaml under scanners):
Also check out if the current configuration has the same value, using ‘forseti server configuration get | grep --color config_validator’ to make it easier to spot.
Finally, verify that the config_validator service is up and running.
If your issue is that your latest constraint changes are not automatically updated in your scan results (even though they should be), you can upload the latest version to the Cloud Storage bucket, and restart the config_validator service on the server.
Cloud SCC issues
If you don’t see the Forseti connector in your Cloud SCC UI, restart the steps to enable the Forseti connector in SCC, or check that your connector is enabled in the settings.
If you don’t receive the violations you can see in the Forseti server, make sure that the Forseti server’s service-account has the Security Center Findings Editor role assigned at the org level.
Next steps
At this point, you are ready to add your own constraints in your policy-library and start scanning your infrastructure for violations based on them. The Forseti project offers a great list of sample constraints you can use freely to get started.
In the next article of this series, you’ll learn to add a new constraint to scan for labels in your existing environment. This can prove quite useful to ensure your environment is like you expect it to be (no shadow infrastructure, for instance) and let you react quickly whenever some non-compliant (or mislabeled in this case) resource is detected.
Useful links
Forseti / Config Validator
Repositories: