Creating a scalable API with microservices
Sandeep Dinesh
Developer Advocate
So you want to build an API, and do it with microservices? Microservices are perfect for building APIs. Teams can focus on building small, independent components that perform a specific API call. You can write each endpoint in a different language, provide different SLAs and even scale the microservices independently.
You may have seen some of my talks on microservices.

I talk about how easy it is to deploy and run multiple services in a kubernetes cluster. This demo code shows how easy it is to launch a frontend and backend service that communicates together and scales independently.
One thing this demo didn’t really show is services written in multiple languages all working together transparently to the end user. Recently, my colleague Sara Robinson and I built a demo with the folks at NGINX that shows you how you can build such a service, and we just open sourced all the code. Read on for an in-depth writeup. (This is a long post — feel free to jump to the sections that apply to your specific needs.)
This demo relies on Kubernetes and Google Container Engine to run the cluster. Before we get started, make sure you've created a Google Cloud project. If you need to get up to speed on Kubernetes, check out this blog post.
Why we used Kubernetes
Sara and I program in a lot of different languages. Certain languages are better suited for certain problems, so it makes sense to use the best tool for the job. For example, Google runs a combination of primarily C++, Java, Python and Go internally.Before containers and Kubernetes, this would mean setting up four different servers with four different stacks, which is a very ops-heavy thing to do. If you wanted to consolidate servers, you would have to install multiple stacks on the same machine. But upgrading one stack might break another stack, scaling the system becomes an operational challenge, and things in general become harder. At this point, many people begrudgingly choose one stack and stick with it.
With containers, this headache goes away. Containers help abstract the machines from the code, so you can run any stack on any machine without having to explicitly configure that machine. Kubernetes automates the orchestration part of the story, so you can actually deploy and manage all these containers without having to SSH into machines.
Creating a Kubernetes cluster
Let’s create a Kubernetes cluster to run our applications. Make sure you've installed the Google Cloud SDK or use Cloud Shell (and if you're new to Google Cloud, sign up for the free trial). I’m going to use a standard three machine cluster.And now log in.
You're now done with your cluster setup!
Microservices code samples
The code we're deploying is super simple. In each language, we wrote a different string implementation. We have four different services (click the links to see the code):Ruby - Arrayify:
Python - Reverse:
Node.js - To Lower:
Go - To Upper:
As you can see, this is really basic stuff.
Containerizing the code
The next step is to put this code into a container. The container build process gathers all the dependencies and bundles them into a single shippable blob.
We're going to use Docker to do this. Make sure you have Docker installed or are using Cloud Shell. Docker makes it super simple to build containers and feel confident that they'll run the same in all environments. If you haven’t used Docker before, check out one of my previous blog posts that discusses running a MEAN stack with containers.
The first step is to create something called a Dockerfile. Here are the Dockerfiles we're using.
Ruby:
Python:
Node.js:
Go:
These are all you need to install your whole stack!
Your dependencies may be a bit more complicated, but the basic idea of a Dockerfile is to write out the linux commands you want to run and specify the files you want to mount or copy into the container. Check out the Dockerfile docs to learn more.
To build the apps, run the docker build command in the directory containing the Dockerfile. You can “tag” these images so they're ready to be securely saved in the cloud using Google Container Registry.
Replace <PROJECT_ID> with your Google Cloud project ID, with a name for your container (e.g., reverser), and
<CONTAINER_VERSION> with the version (e.g., 0.1)
(For the rest of this post, I’ll refer to the string
gcr.io/<PROJECT_ID>/<CONTAINER_NAME>:<CONTAINER_VERSION> as
<CONTAINER_NAME> to keep things simple.)
Repeat this command for all four microservices. You've now built your containers!
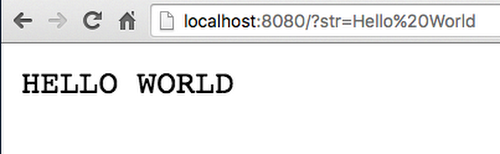
You can test them locally by running this command:
If you're running linux, you can visit your microservice at localhost:8080.
If you're not running linux, you should use docker-machine to run your docker engine (until Docker gets native support for Mac and Windows, which will be soon).
With docker-machine, get your instance name using:
And then get your machine’s IP address using:
You should see something like this:
Deploying containers to Google Container Engine
Now that you've built your containers, it’s time to deploy them. The first step is to copy your containers from your computer to the cloud.
This will push your image into a private repository that your cluster can access. Remember to push all four containers.
You can see and manage all of your pushed containers in the Container Registry page.
Now you need to deploy the containers to the cluster. The easiest way to do this is to run this command:
This deploys one instance of your container to the cluster as a Kubernetes deployment, which automatically restarts and reschedules your container if anything happens to it. A previous blog post discusses ReplicationControllers (the old version of Deployments) and why they're important.
You can stop here, but I like to create config files for my Deployments as it makes it easier to remember what I did and make changes later on.
Here's my YAML file for the arrayify microservice. It gives the Deployment a name (arrayify), specifies the number of replicas (3), as well as the container name and the ports to open.
Save this into a file called "deployment.yaml" and deploy it:
Repeat this process for all four microservices, by creating a file for each and changing the container image and tags (basically replace "arrayify" with the other names).
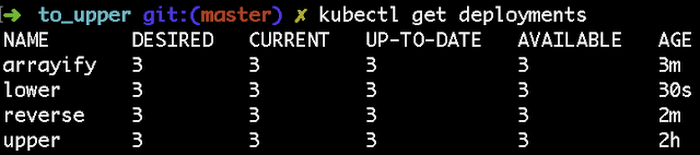
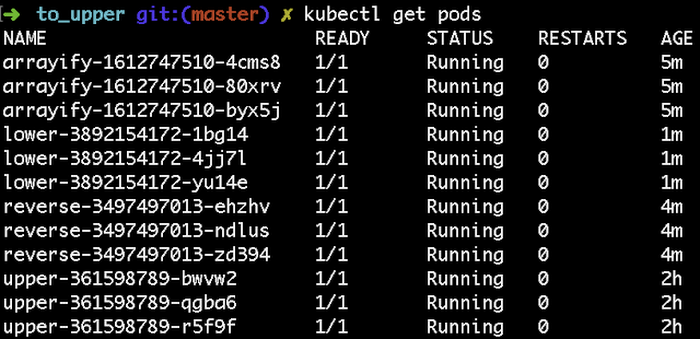
At this point, you should be able to see all the deployments and containers running in your cluster.
Exposing the microservices
If you've read my previous blog posts, you know the next step is to create a Kubernetes service for each microservice. This will create a stable endpoint and load balance traffic to each microservice.
However, you don't want to expose each service to the outside world individually. Each of the microservices is part of a singular API. If you expose each microservice individually, each microservice will have its own IP address, which you definitely don 't want.
Instead, use NGINX to proxy the microservices and expose a single endpoint. I’ll be using NGINX Plus, which is the paid version that comes with some goodies, but the open source version works just as well.
NGINX lets you do many things that're required to build a scalable API. By setting it up as an API Gateway, you can get fine grain control over the API, including rate limiting, security, access control and more. I'll configure the most basic NGINX setup required to get things working, and let you take things from there.
Creating internal services
The first step is to create internal services that you can proxy with NGINX. Here's the service for the arrayify microservice:The target for this service is port 80 on all pods with the "arrayify-pods" tag. Save this in a file called "service.yaml" and deploy it with the following command:
Again, do this for all four microservices. Create a file for each and change the tags (basically replace "arrayify" with the other names).
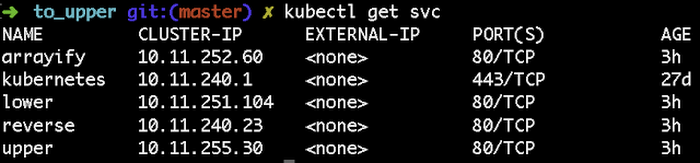
At this point, you should be able to see all your services running in your cluster.
Configuring NGINX
The next step is to configure NGINX to proxy the microservices. Check out the NGINX folder in github for all the details.
I’m going to focus on the nginx.conf file, which is where you configure NGINX.
Let’s look at the first line:
This line sets up the DNS service that NGINX will use to find your microservices. This might not be necessary for your cluster, but I found it's safer to include this line. You might be curious about where this IP address comes from. It’s the DNS service built into Kubernetes. If you have a custom DNS setup, you can find the IP address for your cluster with this command.

Next, you need to set up the upstreams. An upstream is a collection of servers that do the same thing (i.e., a microservice). Because you can use DNS, this is fairly easy to set up. Here's the upstream for the arrayify microservice.
Arrayify.default.svc.cluster.local is the Fully Qualified Domain Name for our kubernetes service. Repeat the process for all four microservices (basically replace "arrayify" with the other names).
Moving on to the server block. This is where you tell NGINX which paths need to be redirected to which microservice. Let’s take a look:
Here, you're telling NGINX that any request that starts with ‘/arrayify/’ should be passed to the arrayify microservice. Create a location block for all four microservices (basically replace "arrayify" with the other names).
Take a look at the full nginx.conf file for details.
Then, build and push out the custom NGINX image just like the other microservices. Again, check out the folder on GitHub for all the details.
Exposing NGINX
The final step is to expose NGINX publically. This is the same process as creating an internal service for your microservice, but you specify "type: LoadBalancer", which will give this service an external IP. You can see this in the svc.yaml file in the NGINX folder.
Once you deploy this service, you can get the external IP address with this command:

Trying it out
Now go to the External IP and test out the unified API endpoint to see the results. Pretty cool stuff!


Overview
To recap, this is what we built:
We use NGINX to expose a single API endpoint and proxy traffic to four different microservices, each having three instances. Woot!
Extra reading: scaling, updating and monitoring
At this point you have everything up and running. Let’s take a quick look at how you can monitor, scale and update your microservice.Scaling
Scaling your microservices with Kubernetes couldn’t be easier. Let’s say you wanted to scale up the number of Arrayify containers running in your cluster. You can use the following command to scale up to five containers:Scaling down is the same. If you want to scale the service down to one container, run the following command:
You can also turn on autoscaling. This dynamically resizes the number of containers in your cluster depending on CPU load. To do this, use the following command:
As you'd expect, this will ensure a minimum of one container always exists, and will scale up to five containers if necessary. It will try to make sure each container is at about 80% CPU utilization.
You can also use this command to scale NGINX!
It's important to note that VM (node) autoscaling isn't currently supported directly in Kubernetes. However, you can scale the nodes using the Google Cloud Managed Instance Group.
Updating
Being able to update your microservices with zero downtime is a big deal. Different parts of an app depend on various microservices, so if one microservice is down, it can have a negative impact on many parts of the system.Thankfully, Kubernetes makes zero downtime deployments of microservices much more manageable.
To update a microservice, first build a new container with the new code, and give it a new tag. For example, if you want to update the "arrayify" microservice, rerun the same Docker build command, but bump the version from 0.1 to 0.2
Then push it up just like before:
Now, open your "deployment.yaml" file for the arrayify microservice, and change the container version from 0.1 to 0.2. Now you can deploy the new version.
Kubernetes will scale the new version up while scaling the old version down automatically!
If the new version has a bug, you can also roll back with a single command:
(Replace "arrayify" with the name of the microservice you want to update or rollback.)
To read more about all the things you can do with Kubernetes deployments, check out the docs.
Monitoring
Using NGINX Plus, you get a cool dashboard where you can see the live status of each microservice.
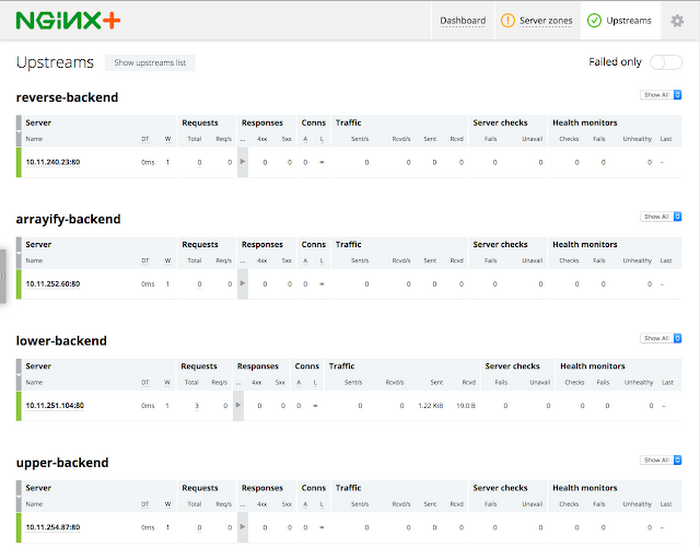
You can see the traffic, errors, and health status of each individual microservice. See the NGINX config file to see how to set this up.
Finally, I also highly recommend using Google Stackdriver to set up automatic alerts and triggers for your microservices. Stackdriver is a one-stop shop for monitoring your application. By default, the stdout and stderr of each container is sent to Stackdriver Logging. Stackdriver Monitoring can also look into our Kubernetes cluster and monitor individual pods, and Stackdriver Debugging can help debug live production code without performance hits.
If you’ve made it this far, thanks for sticking with me all the way to the end. Let me know what you think about this tutorial or other topics you’d like me to cover. You can find me on Twitter at @SandeepDinesh.