Building your first Google Hangouts Chatbot in Apps Script
Christian Schalk
Google Cloud Developer Advocate
Learn how to build G Suite-centric chatbots on Google Hangouts using Apps Script
Try Google Workspace at No Cost
Get a business email, all the storage you need, video conferencing, and more.
SIGN UPLearning to build chatbots, with all the available approaches and technologies, can seem daunting. Similarly, building Google Hangouts chatbots can require some early decisions on server architectures, technical implementations, and even programming languages. You could, for example, build Google Hangouts chatbots using a variety of different technologies including Cloud Functions, HTTP web services, Cloud Pub/Sub, and Webhooks, to name a few.
Fortunately for those who are in the early stages of learning to build bots for Google Hangouts, the “low code” Google Apps Script environment provides an easy path to get started. Also, because Apps Script offers native G Suite integration (including authentication), it can be the most pragmatic choice for building G Suite-centric chatbots on Google Hangouts.
Here’s a step-by-step guide on how to build your first Google Hangouts chatbot using Apps Script.
What is Apps Script?
Apps Script is a cloud-based scripting language and runtime environment based on JavaScript. It offers direct code access to a variety of Google products and APIs via its extensive library of services.
Apps Script is typically used to enhance the functionality of G Suite products (Google Sheets, Docs, Slides, Drive, and Gmail) by offering a streamlined “low code” approach. For example, to send an email in Apps Script, you can simply use:
MailApp.SendMail(“recipient@acme.com”,“My Subject”,“Hello from Apps Script!”);
Apps Script code development can also be done entirely in a browser, so there’s no need to install a local software development environment (for more on Apps Script, check out this Apps Script Overview).
Pre-reqs
Before diving in to this guide, please make sure you meet the following prerequisites:
You can create projects on Google Cloud Platform (GCP).
You’ve got a basic familiarity with Apps Script and/or JavaScript.
You’ve got G Suite Admin authority (you’ll need this for domain-wide publishing—for the simple testing described in this walkthrough, however, G Suite Admin authority isn’t needed)..
Now that you’re ready to get started, here are the basic steps to build and test your own chatbot in Apps Script.
Step 1: Create and configure your Apps Script project
Go to script.google.com, click the “Create Project” button, name your project “Hello ChatBot”, click Save.
To configure the project for Chat:
- Access the Apps Script project’s Manifest file. View -> Show Manifest File
- This opens the file appsscript.json (manifest) file in the script editor. You can now customize this file.
- To add chat capabilities to this project, simply add
”chat”: { }to the manifest. For example:
- Save the project.
- In the Code.gs file, add the following function to handle the incoming chat message:
- Save the project.
That’s all the Apps Script code needed to run the chatbot!
Step 2: Saving your deployment ID
Our next steps are to associate the bot’s Apps Script project with a GCP project by getting the Apps Script project’s Deployment ID and saving it for later when configuring a GCP project.
To get a deployment ID from the Manifest:
- Publish > Deploy from manifest.
- In the Deployments dialog box next to Latest Version (HEAD), click Get ID.
- In the Deployment ID dialog box, copy the value listed for the deployment ID. It will look something like:
AKfycbyS1N2v-_ZVNldWGBuY4azxodbOE06PTJGXKBU9hV3m - Copy and save the Deployment ID for later.
- Click Close and Close to dismiss the dialog boxes.
Step 3: Create and configure your GCP Project
Here, you’ll create and configure your GCP project so that it can serve as the chatbot backend.
To create a new GCP project:
Goto https://console.cloud.google.com and create a “New Project” (you can name it “My First Chatbot”).
Select your associated Billing account.
Accept the defaults for Organization and Location.
Click CREATE, and then select the new project in the console.
Next, you need to enable the Chat API in the project
From the main GCP Dashboard, click “goto APIs overview” to open the “APIs and Services” Dashboard.
Click:

- Search for ‘‘Hangouts Chat API”.
- Once located, click ENABLE.

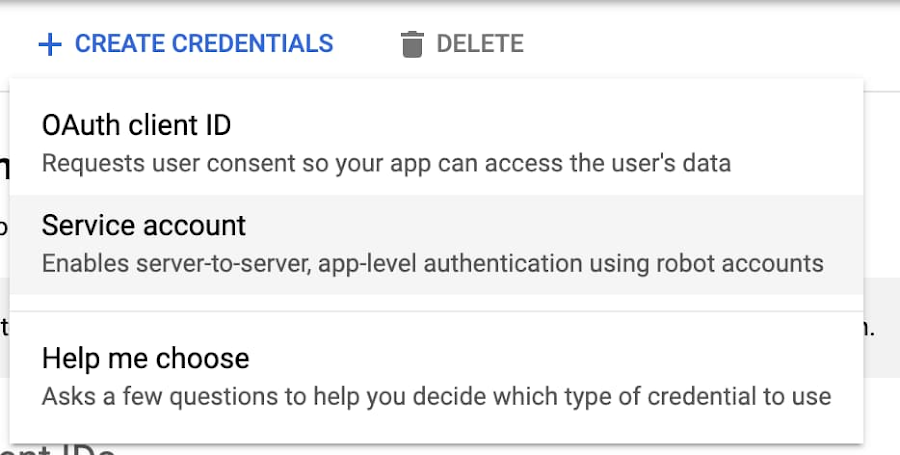
- Once enabled, Click Credentials on the left side.
- On the Credentials screen, click + CREATE CREDENTIALS and select Service account.
- For your service account name, enter: “My First ChatBot Service Account.” An account id will be generated automatically (my-first-chat-bot-service-accou).
- You can also add a service account description, but this is optional.
- Click CREATE.
- After the account is created, look for the “Service account permissions” section, and, in the Role dropdown menu, select Project -> Owner.
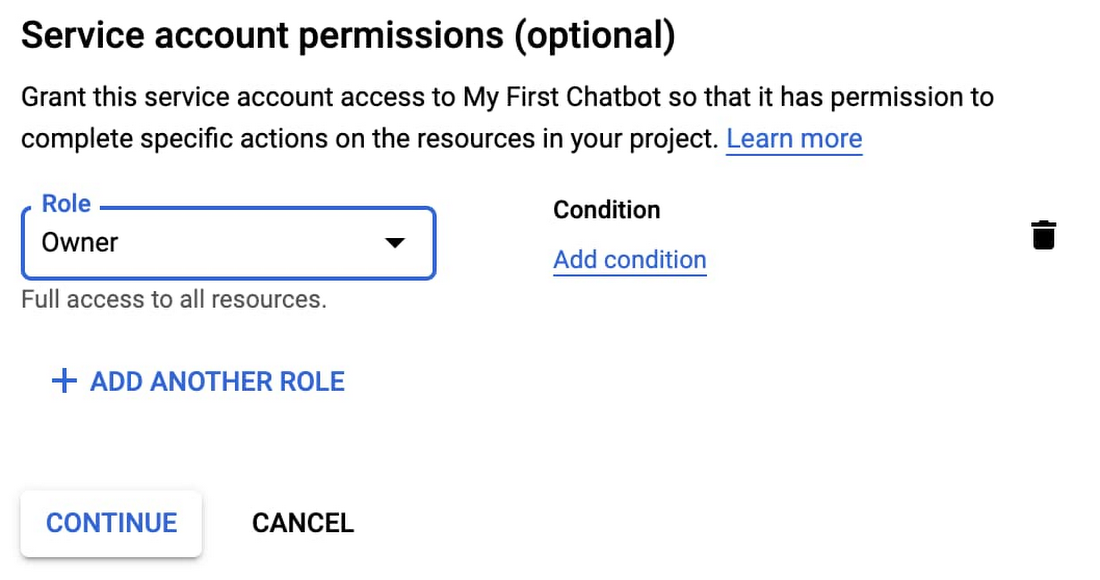
- Click CONTINUE and DONE.
Finally, you’ll need to configure the Chat API. Click Configuration in the menu on the left, and add the following options:
Bot name: enter “My First Bot”.
Avatar URL:
https://www.gstatic.com/images/branding/product/1x/chat_48dp.png
(You can provide your own publicly accessible image here if you want)Description: ‘A simple first Hello Bot'.
Functionality: select Bot works in direct messages.
Connection settings: select Apps Script project and paste the Deployment ID from the Apps Script project into the field.
Under Permissions, select Specific people and groups in your domain, and enter your own email (from within the G Suite domain). Then click SAVE. Note that the SAVE button will remain active after saving, but the Bot status at the top of the page will change to “LIVE - available to users.”

Step 4: Test your new bot!
In a new browser window, open chat.google.com in the same domain and user specified as a chatbot user that you specified in the previous step.
Next to BOTS, click + to add your new bot. Search for your new bot.
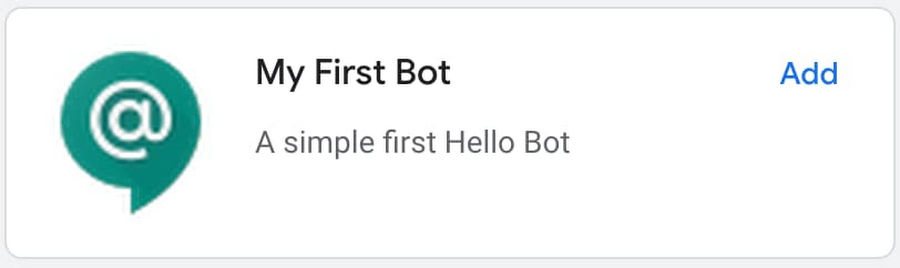
Once located, click Add (and Message) to start a chat session with the new bot.
Enter “Hello!” and see the response!

Bonus step! Now that your bot is working, go back to the Apps Script code and add a change to the code so that it translates the message to French.
Hint, use:LanguageApp.translate(event.message.text,'en','fr')
- As you save the project, you’ll notice that you can immediately test the bot with your latest code.

Coming up: More chatbot examples
In the near future we’ll be adding more posts with interesting examples of what you can do with chatbots, such as linking them to APIs and services, and even tapping into Google AI ML platform. In the meantime, check out some examples of bots that are built in to Hangouts Chat in this recent blog post.