Jupyter Notebook Manifesto: Best practices that can improve the life of any developer using Jupyter notebooks
Michael Cheng
Software Engineer, Google Cloud
Viacheslav Kovalevskyi
Software Engineer, Google Cloud
Many data science teams, both inside and outside of Google, find that it’s easiest to build accurate models when teammates can collaborate and suggest new hyperparameters, layers, and other optimizations. And notebooks are quickly becoming the common platform for the data science community, whether in the form of AI Platform Notebooks, Kaggle Kernels, Colab, or the notebook that started it all, Jupyter.
A Jupyter Notebook is an open-source web application that helps you create and share documents that contain live code, equations, visualizations, and narrative text. Because Jupyter Notebooks are a relatively recently-developed tool, they don’t (yet) follow or encourage consensus-based software development best practices.
Data scientists, typically collaborating on a small project that involves experimentation, often feel they don’t need to adhere to any engineering best practices. For example, your team may have the odd Python or Shell script that has neither test coverage nor any CI/CD integration.
However, if you’re using Jupyter Notebooks in a larger project that involves many engineers, you may soon find it challenging to scale your environment, or deploy to production.
To set up a more robust environment, we established a manifesto that incorporates best practices that can help simplify and improve the life of any developer who uses Jupyter tools.
It’s often possible to share best practices across multiple industries, since the fundamentals remain the same. Logically, data scientists, ML researchers, and developers using Jupyter Notebooks should carry over the best practices already established by the older fields of computer science and scientific research.
Here is a list of best practices adopted by those communities, with a focus on those that still apply today:
Our Jupyter Notebooks development manifesto
0. There should be an easy way to use Jupyter Notebooks in your organization, where you can “just write code” within seconds.
1. Follow established software development best practices: OOP, style guides, documentation
2. You should institute version control for your Notebooks
3. Reproducible Notebooks
4. Continuous Integration (CI)
5. Parameterized Notebooks
6. Continuous Deployment (CD)
7. Log all experiments automatically
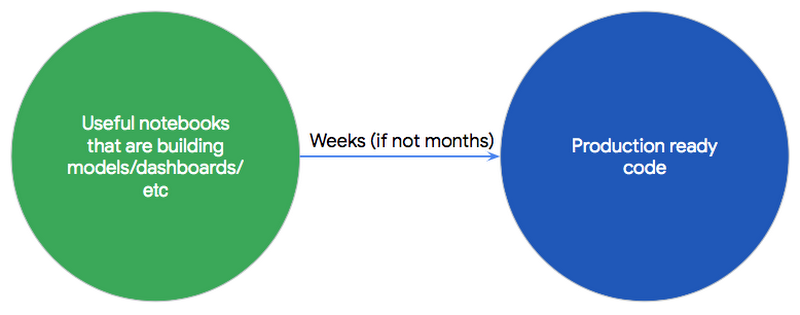
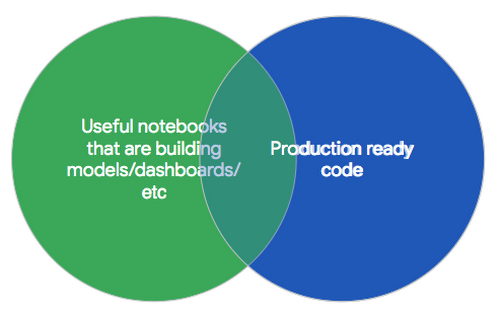
By following the above guidelines in this manifesto, we want to help you to achieve this outcome:
Note: Security is a critical part of Software Development practices. In a future blog we will cover best practices for secure software development with Jupyter Notebooks, currently this topic is not covered in this blog post, but is something critical you must consider.
Principles
Easy access to Jupyter Notebooks
Creating and using a new Jupyter Notebook instance should be very easy. On Google Cloud Platform (GCP), we just launched a new service called AI Platform Notebooks. AI Platform Notebooks is a managed service that offers an integrated JupyterLab environment, in which you can create instances running JupyterLab that come pre-installed with the latest data science and machine learning frameworks in a single click.
Follow established software development best practices
This is essential. Jupyter Notebook is just a new development environment for writing code. All the best practices of software development should still apply:
Version control and code review systems (e.g. git, mercurial).
Separate environments: split production and development artifacts.
A comprehensive test suite (e.g. unitests, doctests) for your Jupyter Notebooks.
Continuous integration (CI) for faster development: automate the compilation and testing of Jupyter notebooks every time a team member commits changes to version control.
Just as an Android Developer would need to follow the above best practices to build a scalable and successful mobile app, a Jupyter Notebook focused on sustainable data science should follow them, too.
Using a version control system with your Jupyter Notebooks
Version control systems record changes to your code over time, so that you can revisit specific versions later. This also lets you develop separate branches in parallel, such as allowing you to perform code reviews and providing CI/CD revision history to know who is the expert in certain code areas.
In order to unblock effective use of a version control system like git, there should be a tool well integrated into the Jupyter UI that allows every data scientist on your team to effectively resolve conflicts for the notebook, view the history for each cell, and commit and push particular parts of the notebook to your notebook’s repository right from the cell.
Don’t worry, though: if you perform a diff operation in git and suddenly see that multiple lines have changed, instead of one, this is the intended behavior, as of today. With Jupyter notebooks, there is a lot of metadata that can change with a simple one-line edit, including kernel spec, execution info, and visualization parameters.
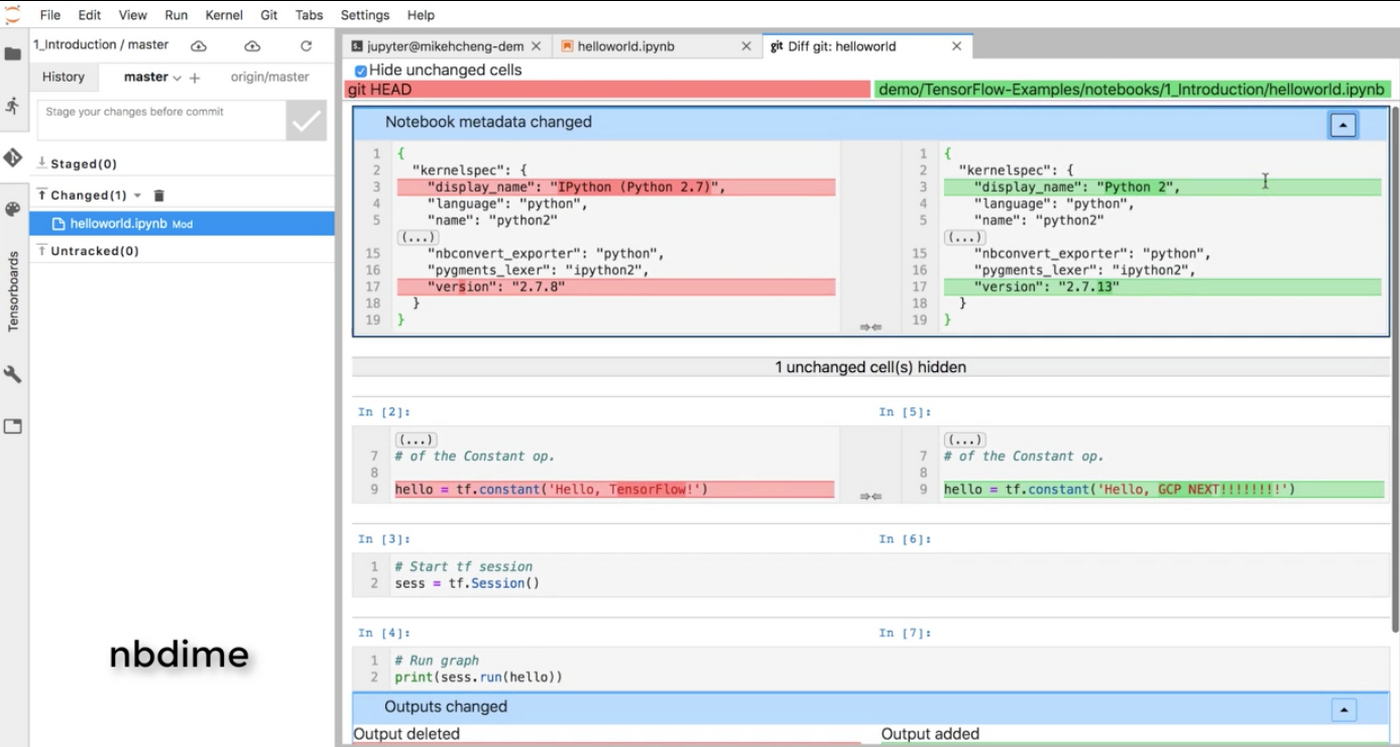
To apply the principles and corresponding workflows of traditional version control to Jupyter notebooks, you need the help of two additional tools:
nbdime: tool for “diffing” and merging of Jupyter Notebooksjupyterlab-git: a JupyterLab extension for version control using git
In this demo, we clone a Github repository, then after this step is completed, we modified some minor parts of the code. If you execute a diff command, you would normally expect git to show only the lines that changed, but as we explained above, this is not true for Jupyter notebooks. nbdime allows you to perform a diff from Jupyter notebook and also from CLI, without the distraction of extraneous JSON output.
Reproducible notebooks
You and your team should write notebooks in such a way that anyone can rerun it on the same inputs, and produce the same outputs. Your notebook should be executable from top to bottom and should contain the information required to set up the correct, consistent environment.
How to do it?
If you are using AI Platform notebooks, for example on the TensorFlow M22 image, this platform information should be embedded in your notebook’s metadata for future use.
Let’s say you create a notebook and install TensorFlow’s nightly version. If you execute the same notebook in a different Compute Engine instance, you need to make sure that this dependency is already installed. A notebook should have a notion of dependencies and its dependencies appropriately tracked, this can be in the environment or in the notebook metadata.
In summary, a notebook is reproducible if it meets the following requirements:
The Compute Engine image and underlying hardware used for creating the Notebook should be embedded in the notebook itself.
All dependencies should be installed by the notebook itself.
A notebook should be executable from top to bottom without any errors.
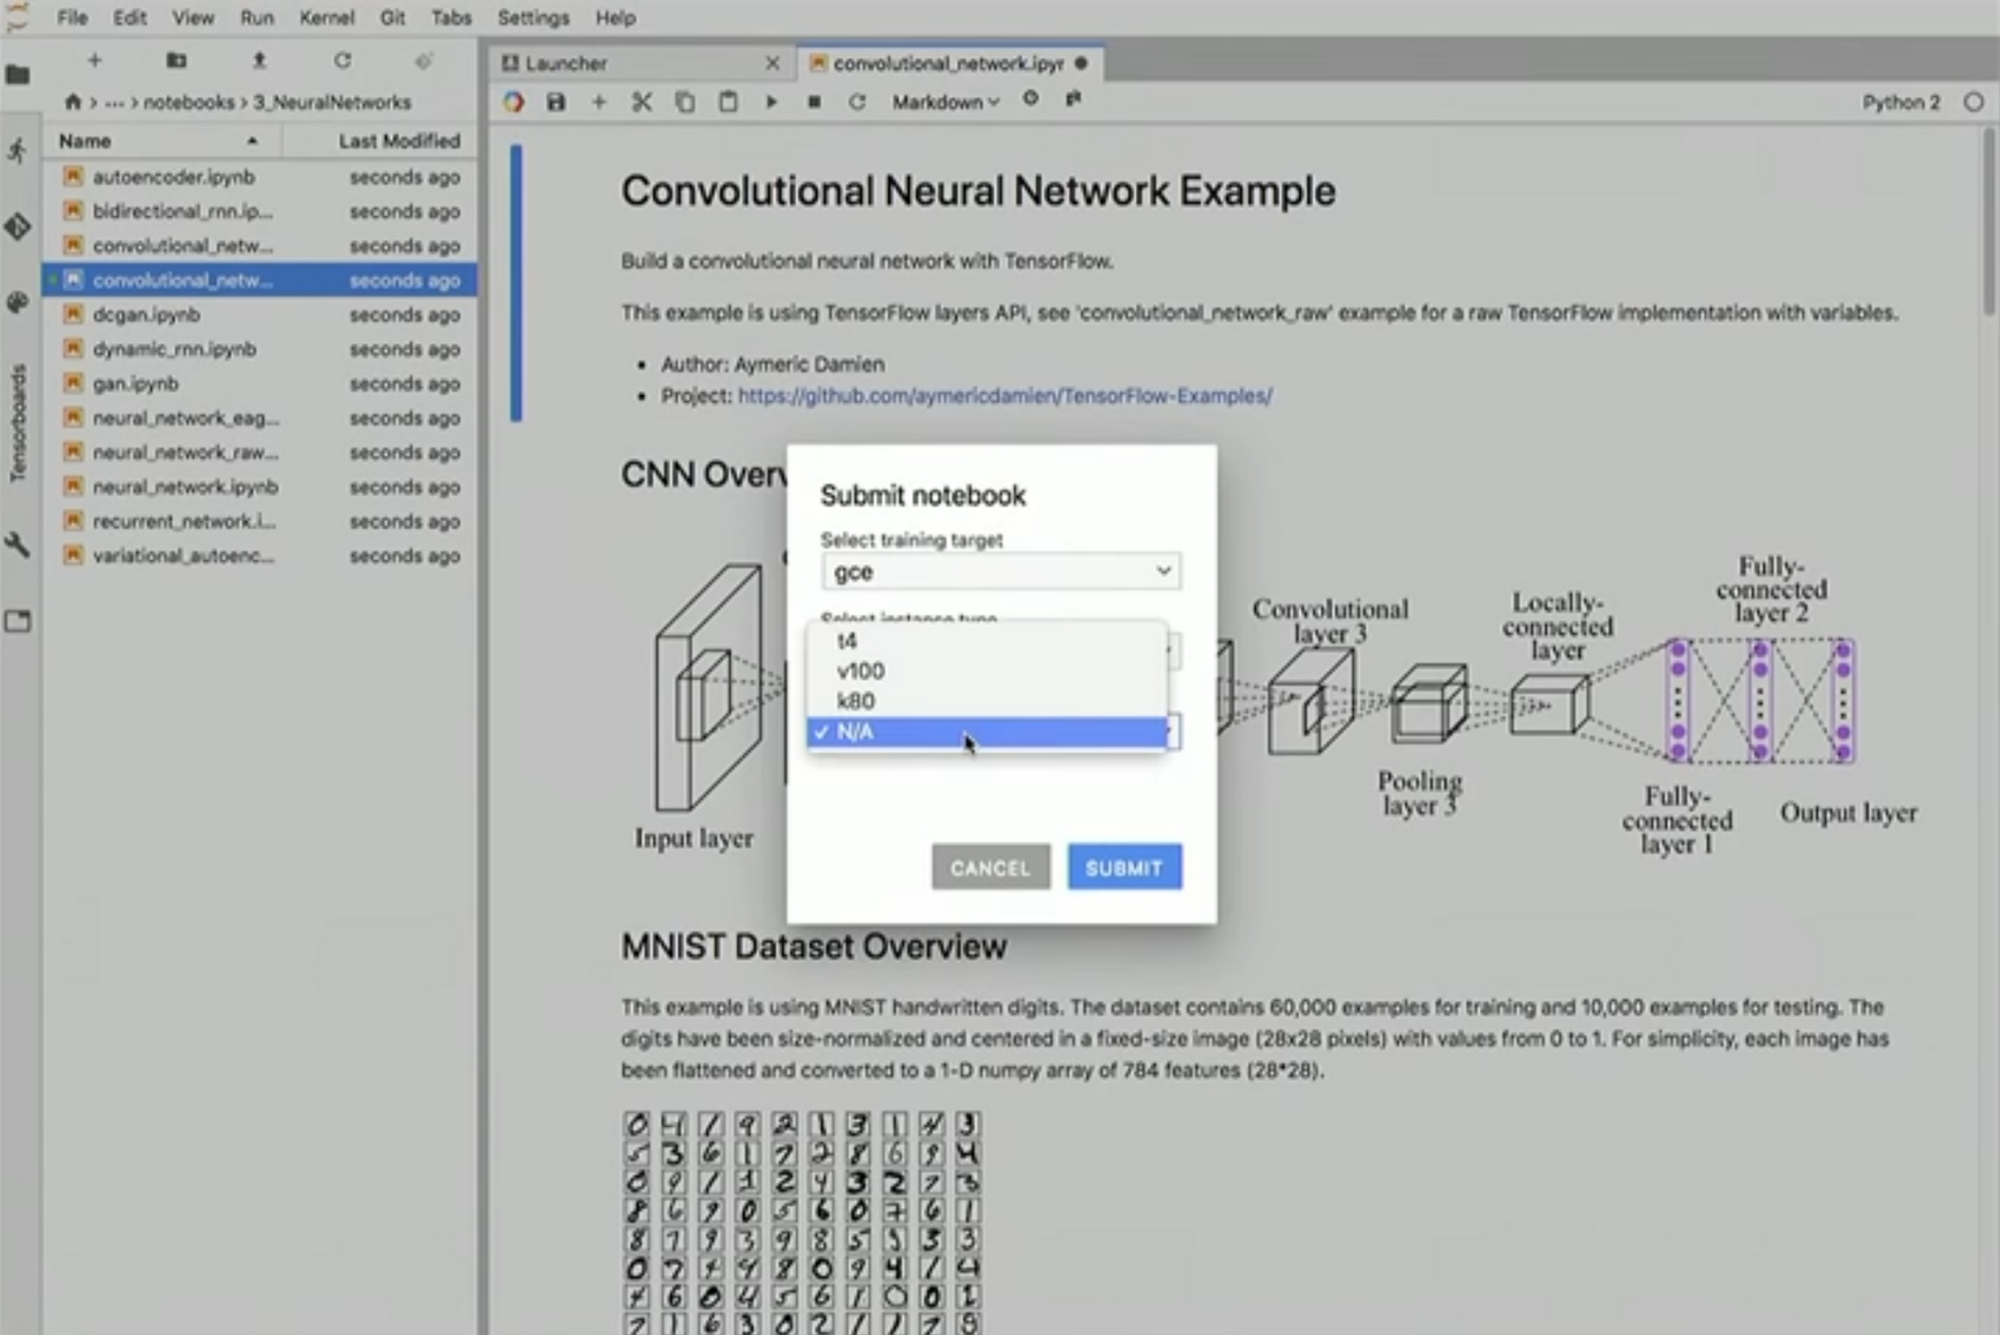
In this demo we clone a GitHub repository that contains a few notebooks, and then activate the new Nova plugin, which allows you to execute notebooks directly from your Jupyter UI. Nova and its corresponding compute workload runs on a separate Compute Engine instance using Nteract papermill. AI Platform notebooks support this plugin by default—to enable it, run the enable_notebook_submission.sh script.
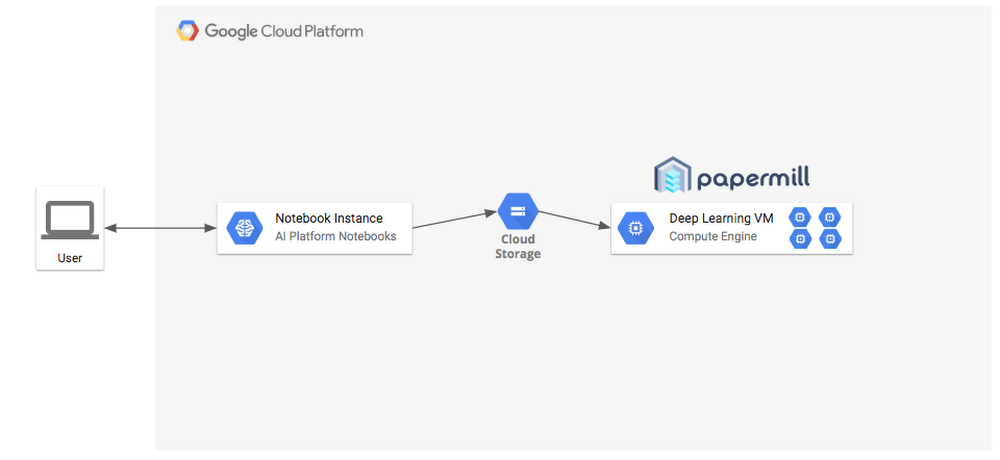
Nova plugin
Continuous integration
Continuous integration is a software development practice that requires developers to integrate code into a shared repository. Each check-in is verified by an automated build system, allowing teams to detect problems at early stages. Each change to a Jupyter notebook should be validated by a continuous integration system before being checked in; this can be done using different setups (non-master remote branch, remote execution in local branch, etc)
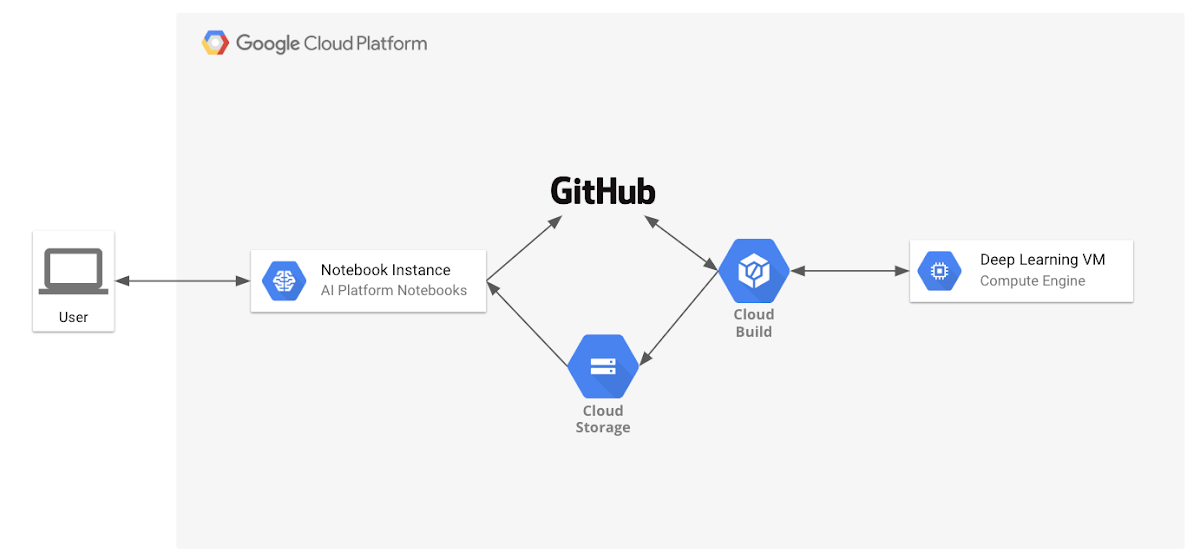
In this demo, we modified a notebook so that it contains invalid Python code, and then we commit the results to git. This particular git repository is connected to Cloud Build. The notebook executes and the commit step fails as the engine finds an invalid cell at runtime. Cloud Build creates a new notebook to help you to troubleshoot your mistake. Once you correct the code, you’ll find that your notebook runs successfully, and Cloud Build can then integrate your code.
Parameterized Notebooks
Reusability of code is another software development best practice.
You can think of a production-grade notebook as a function or a job specification: A notebook takes a series of inputs, processes them, and generates some outputs—consistently. If you’re a data scientist you might start running grid search to find your model’s optimal hyperparameters for training, stepping through different parameters such as learning rate, num_steps or batch_size:
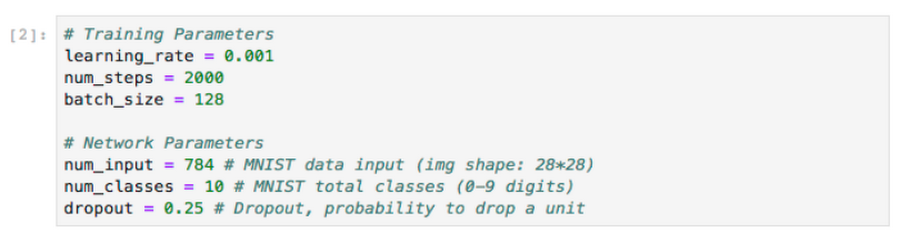
During notebook execution, you can pass different parameters to your models, and once results are generated, pick the best options using the same notebook. For the previous execution steps, consider using Papermill and its ability to configure different parameters, these parameters will be used by the notebook during execution. This means you can override the default source of data for training or submit the same notebook with different input (for example different learning rate, epochs, etc).
In this demo, we execute a notebook passing different extra parameters. Here we’re using information about bike rentals in San Francisco, with the bike rental data stored in BigQuery. This notebook queries the data and generates a top ten list and station map of the most popular bike rental stations, using start and end date as parameters. By tagging the cells with a parameters tags so Papermill can use these options, you can run reuse your notebook without making any updates to it, but still generate a different dashboard.

Continuous deployment
Each version of a Jupyter Notebook that has passed all the tests should be used to automatically generate a new artifact and deploy it to staging and production environments.
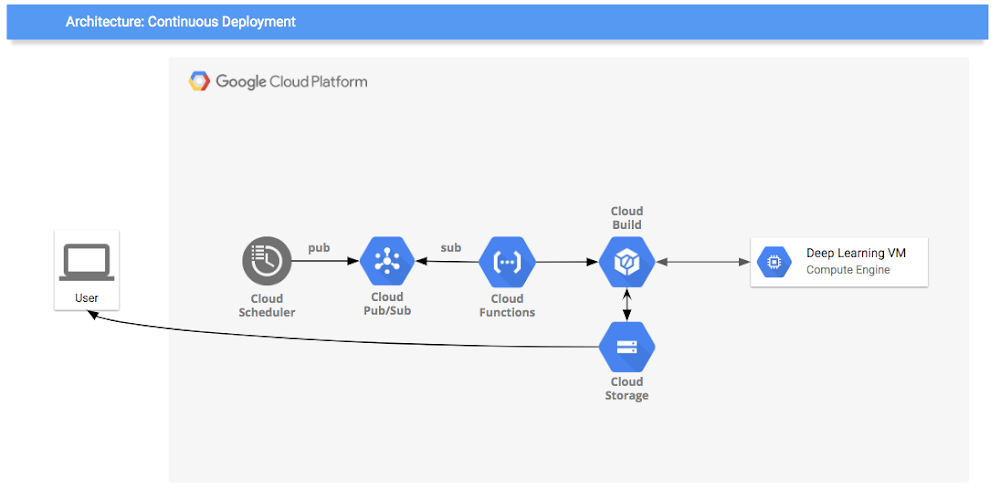
In this demo, we show you how to perform continuous deployment on GCP, incorporating Cloud Functions, Cloud Pub/Sub, and Cloud Scheduler.
Now that you’ve established a CI system that generates a tested, reproducible, and parameterized notebook, let’s automate the generation of artifacts for a continuous deployment system.
Based on the previous CI system, there is an additional step in CI to upload a payload to Cloud Functions when tests are successful. When triggered, this payload sends the same artifact build request with parameters to Cloud Build, spinning up the instance and storing the results. To add the automation, we’ll orchestrate using Cloud Pub/Sub (message passing) and Cloud Scheduler (cron). The first time the cloud function is deployed, it will create a new Pub/Sub topic and subscribe to it, later any published message will start the cloud function. This notification is published using Cloud Scheduler, which sends messages based on time. Cloud Scheduler can use different interfaces, for example new data arriving in Cloud Storage or a manual job request.
Log all experiments
Every time you try to train a model, metadata about the training session should be automatically logged. You'll want to keep track of things like the code you ran, hyperparameters, data sources, results, and training time. This way, you remember past results and won't find yourself wondering if you already tried running that experiment.
Conclusion
By following the guidelines defined above, you can make your Jupyter notebooks deployments more efficient. To learn more, read our AI Platform Notebooks overview.
Acknowledgements: Gonzalo Gasca Meza, Developer Programs Engineer and Karthik Ramachandran, Product Manager contributed to this post.