AI in depth: Creating preprocessing-model serving affinity with custom online prediction on AI Platform Serving
Vijay Reddy
ML Solutions Engineer
Khalid Salama
Staff Machine Learning Solutions Architect
AI Platform Serving now lets you deploy your trained machine learning (ML) model with custom online prediction Python code, in beta. In this blog post, we show how custom online prediction code helps maintain affinity between your preprocessing logic and your model, which is crucial to avoid training-serving skew. As an example, we build a Keras text classifier, and deploy it for online serving on AI Platform, along with its text preprocessing components. The code for this example can be found in this Notebook.
Background
The hard work of building an ML model pays off only when you deploy the model and use it in production—when you integrate it into your pre-existing systems or incorporate your model into a novel application. If your model has multiple possible consumers, you might want to deploy the model as an independent, coherent microservice that is invoked via a REST API that can automatically scale to meet demand. Although AI Platform may be better known for its training abilities, it can also serve TensorFlow, Keras, scikit-learn, and XGBoost models with REST endpoints for online prediction.
While training that model, it’s common to transform the input data into a format that improves model performance. But when performing predictions, the model expects the input data to already exist in that transformed form. For example, the model might expect a normalized numerical feature, for example TF-IDF encoding of terms in text, or a constructed feature based on a complex, custom transformation. However, the callers of your model will send “raw”, untransformed data, and the caller doesn’t (or shouldn’t) need to know which transformations are required. This means the model microservice will be responsible for applying the required transformation on the data before invoking the model for prediction.
The affinity between the preprocessing routines and the model (i.e., having both of them coupled in the same service) is crucial to avoid training-serving skew, since you’ll want to ensure that these routines are applied on any data sent to the model, with no assumptions about how the callers prepare the data. Moreover, the model-preprocessing affinity helps to decouple the model from the caller. That is, if a new model version requires new transformations, these preprocessing routines can change independently of the caller, as the caller will keep on sending data in its raw format.
Beside preprocessing, your deployed model’s microservice might also perform other operations, including postprocessing of the prediction produced by the model, or even more complex prediction routines that combine the predictions of multiple models.
To help maintain affinity of preprocessing between training and serving, AI Platform Serving now lets you customize the prediction routine that gets called when sending prediction requests to a model deployed on AI Platform Serving. This feature allows you to upload a custom model prediction class, along with your exported model, to apply custom logic before or after invoking the model for prediction.
Customizing prediction routines can be useful for the following scenarios:
Applying (state-dependent) preprocessing logic to transform the incoming data points before invoking the model for prediction.
Applying (state-dependent) post-processing logic to the model prediction before sending the response to the caller. For example, you might want to convert the class probabilities produced by the model to a class label.
Integrating rule-based and heuristics-based prediction with model-based prediction.
Applying a custom transform used in fitting a scikit-learn pipeline.
Performing complex prediction routines based on multiple models, that is, aggregating predictions from an ensemble of estimators, or calling a model based on the output of the previous model in a hierarchical fashion.
The above tasks can be accomplished by custom online prediction, using the standard framework supported by AI Platform Serving, as well as with any model developed by your favorite Python-based framework, including PyTorch. All you need to do is to include the dependency libraries in the setup.py of your custom model package (as discussed below). Note that without this feature, you would need to implement the preprocessing, post-processing, or any custom prediction logic in a “wrapper” service, using, for example, App Engine. This App Engine service would also be responsible for calling the AI Platform Serving models, but this approach adds complexity to the prediction system, as well as latency to the prediction time.
Next we’ll demonstrate how we built a microservice that can handle both preprocessing and post-processing scenarios using the AI Platform custom online prediction, using text classification as the example. We chose to implement the text preprocessing logic and built the classifier using Keras, but thanks to AI Platform custom online prediction, you could implement the preprocessing using any other libraries (like NLTK or Scikit-learn), and build the model using any other Python-based ML framework (like TensorFlow or PyTorch). You can find the code for this example in this Notebook.
A text classification example
Text classification algorithms are at the heart of a variety of software systems that process text data at scale. The objective is to classify (categorize) text into a set of predefined classes, based on the text’s content. This text can be a tweet, a web page, a blog post, user feedback, or an email: in the context of text-oriented ML models, a single text entry (like a tweet) is usually referred to as a “document.”
Common use cases of text classification include:
Spam-filtering: classifying an email as spam or not.
Sentiment analysis: identifying the polarity of a given text, such as tweets, product or service reviews.
Document categorization: identifying the topic of a given document (for example, politics, sports, finance, etc.)
Ticket routing: identifying to which department to dispatch a ticket
You can design your text classification model in two different ways; choosing one versus the other will influence how you’ll need to prepare your data before training the model.
N-gram models: In this option, the model treats a document as a “bag of words,” or more precisely, a “bag of terms,” where a term can be one word (uni-gram), two words (bi-gram) or n words (n-grams). The ordering of the words in the document is not relevant. The feature vector representing a document encodes whether a term occurs in the document or not (binary encoding), how many times the term occurs in the document (count encoder) or more commonly, Term Frequency Inverse Document Frequency (TF-IDF encoder). Gradient-boosted trees and Support Vector Machines are typical techniques to use in n-gram models.
Sequence models: With this option, the text is treated as a sequence of words or terms, that is, the model uses the word ordering information to make the prediction. Types of sequence models include convolutional neural networks (CNNs), recurrent neural networks (RNNs), and their variations.
In our example, we utilize the sequence model approach.
Hacker News is one of many public datasets available in BigQuery. This dataset includes titles of articles from several data sources. For the following tutorial, we extracted the titles that belong to either GitHub, The New York Times, or TechCrunch, and saved them as CSV files in a publicly shared Cloud Storage bucket at the following location:
gs://cloud-training-demos/blogs/CMLE_custom_prediction
Here are some useful statistics about this dataset:
Total number of records: 96,203
Min, Max, and Average number of words per title: 1, 52, and 8.7
Number of records in GitHub, The New York Times, and TechCrunch: 36,525, 28,787, and 30,891
Training and evaluation percentages: 75% and 25%
The objective of the tutorial is to build a text classification model, using Keras to identify the source of the article given its title, and deploy the model to AI Platform serving using custom online prediction, to be able to perform text pre-processing and prediction post-processing.
Preprocessing text
Sequence tokenization with Keras
In this example, we perform the following preprocessing steps:
Tokenization: Divide the documents into words. This step determines the “vocabulary” of the dataset (set of unique tokens present in the data). In this example, you’ll make use of the most frequently 20,000 words, and discard the other ones from the vocabulary. This value is set through the
VOCAB_SIZEparameter.Vectorization: Define a good numerical measure to characterize these documents. A given embedding’s representation of the tokens (words) will be helpful when you’re ready to train your sequence model. However, these embeddings are created as part of the model, rather than as a preprocessing step. Thus, what you need here is to simply convert each token to a numerical indicator. That is, each article’s title is represented as a sequence of integers, and each is an indicator of a token in the vocabulary that occured in the title.
Length fixing: After vectorization, you have a set of variable-length sequences. In this step, the sequences are converted into a single fixed length: 50. This can be configured using
MAX_SEQUENCE_LENGTHparameter. Sequences with more than 50 tokens will be right-trimmed, while sequences with fewer than 50 tokens will be left-padded with zeros.
Both the tokenization and vectorization steps are considered to be stateful transformations. In other words, you extract the vocabulary from the training data (after tokenization and keeping the top frequent words), and create a word-to-indicator lookup, for vectorization, based on the vocabulary. This lookup will be used to vectorize new titles for prediction. Thus, after creating the lookup, you need to save it to (re-)use it when serving the model.
The following block shows the code for performing text preprocessing. The TextPreprocessor class in the preprocess.py module includes two methods.
fit(): applied on training data to generate the lookup (tokenizer). The tokenizer is stored as an attribute in the object.transform(): applies the tokenizer on any text data to generate the fixed-length sequence of word indicators.
Preparing training and evaluation data
The following code prepares the training and evaluation data (that is, it converts each raw text title to a NumPy array with 50 numeric indicator). Note that, you use both fit() and transform() with the training data, while you only use transform() with the evaluation data, to make use of the tokenizer generated from the training data. The outputs, train_texts_vectorized and eval_texts_vectorized, will be used to train and evaluate our text classification model respectively.
Next, save the processor object (which includes the tokenizer generated from the training data) to be used when serving the model for prediction. The following code dumps the object to processor_state.pkl file.
Training a Keras model
The following code snippet shows the method that creates the model architecture. We create a Sequential Keras model, with an Embedding layer, Dropout layer, followed by two Conv1d and Pooling Layers, then a Dense layer with Softmax activation at the end. The model is compiled withsparse_categorical_crossentropy loss and accuracy acc (accuracy) evaluation metric.The following code snippet creates the model by calling the create_model method with the required parameters, trains the model on the training data, and evaluates the trained model’s quality using the evaluation data. Lastly, the trained model is saved to keras_saved_model.h5 file.
Implementing a custom model prediction class
In order to apply a custom prediction routine that includes preprocessing and postprocessing, you need to wrap this logic in a Custom Model Prediction class. This class, along with the trained model and the saved preprocessing object, will be used to deploy the AI Platform Serving microservice. The following code shows how the Custom Model Prediction class (CustomModelPrediction) for our text classification example is implemented in the model_prediction.py module.
Note the following points in the Custom Model Prediction class implementation:
from_pathis a “classmethod”, responsible for loading both the model and the preprocessing object from their saved files, and instantiating a newCustomModelPredictionobject with the loaded model and preprocessor object (which are both stored as attributes to the object).
predictis the method invoked when you call the “predict” API of the deployed AI Platform Serving model. The method does the following:Receives the instances (list of titles) for which the prediction is needed
Prepares the text data for prediction by applying the
transform()method of the "stateful"self._processorobject.Calls the
self._model.predict()to produce the predicted class probabilities, given the prepared text.Post-processes the output by calling the
_postprocessmethod._postprocessis the method that receives the class probabilities produced by the model, picks the label index with the highest probability, and converts this label index to a human-readable labelgithub,nytimes, ortechcrunch.
Deploying to AI Platform Serving
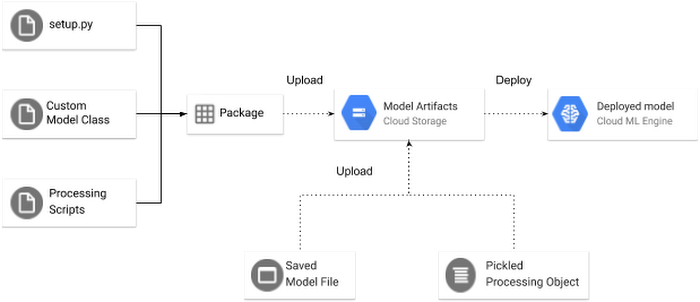
Figure 1 shows an overview of how to deploy the model, along with its required artifacts for a custom prediction routine to AI Platform Serving.
Uploading the artifacts to Cloud Storage
The first thing you want to do is to upload your artifacts to Cloud Storage. First, you need to upload:
Your saved (trained) model file:
keras_saved_model.h5(see the Training a Keras model section).
Your pickled (serialized) preprocessing objects (which contain the state needed for data transformation prior to prediction): processor_state.pkl. (see the Preprocessing Text section). Remember, this object includes the tokenizer generated from the training data.
Second, upload a python package including all the classes you need for prediction (e.g., preprocessing, model classes, and post-processing). In this example, you need to create a pip-installable tar with model_prediction.py and preprocess.py. First, create the following setup.py file:
Now, generate the package by running the following command:
This creates a .tar.gz package under a new /dist directory, created in your working directory. The name of the package will be $name-$version.tar.gz where $name and $version are the ones specified in the setup.py.
Once you have successfully created the package, you can upload it to Cloud Storage:
Deploying the model to AI Platform Serving
Let’s define the model name, the model version, and the AI Platform Serving runtime (which corresponds to a TensorFlow version) required to deploy the model.
First, create a model in AI Platform Serving using the following gcloud command:
Second, create a model version using the following gcloud command, in which you specify the location of the model and preprocessing object (--origin), the location the package(s) including the scripts needed for your prediction (--package-uris), and a pointer to your Custom Model Prediction class (--prediction-class).This should take one to two minutes.
Calling the deployed model for online predictions
After deploying the model to AI Platform Serving, you can invoke the model for prediction using the following code:
Given the titles defined in the request object, the predicted source of each title from the deployed model would be as follows: [techcrunch, techcrunch, techcrunch, nytimes, nytimes, nytimes, github, github, techcrunch]. Note that the last one was mis-classified by the model.
Conclusion
In this tutorial, we built and trained a text classification model using Keras to predict the source media of a given article. The model required text preprocessing operations for preparing the training data, and preparing the incoming requests to the model deployed for online predictions. Then, we showed you how to deploy the model to AI Platform Serving with custom online prediction code, in order to perform preprocessing to the incoming prediction requests and post-processing to the prediction outputs. Enabling a custom online prediction routine in AI Platform Serving allows for affinity between the preprocessing logic, the model, and the post-processing logic required to handle prediction request end-to-end. This helps to avoid training-serving skew, and simplifies deploying ML models for online prediction.
Thanks for following along. To find out more about these features, you can read the documentation. If you’re curious to try out some other machine learning tasks on GCP, take this specialization on Coursera. If you want to try out these examples for yourself in a local environment, run this Notebook. Send a tweet to @GCPcloud if there’s anything we can change or add to make text analysis even easier on Google Cloud.
Acknowledgements
We would like to thank Lak Lakshmanan, Technical Lead, Machine Learning and Big Data in Google Cloud, for reviewing and improving the blog post.