本页面介绍如何一次向 AutoML Tables 提供多行数据,以及获得每一行的预测。
简介
创建(训练)模型后,您可以使用 batchPredict 方法创建异步请求,进行批量预测。您以表的格式向 batchPredict 方法提供输入数据。每一行都为您训练模型使用的特征提供值。batchPredict 方法将该数据发送到模型并为每行数据返回预测。
模型必须每 6 个月重新训练一次,才能继续执行预测。
请求批量预测
对于批量预测,请在 BigQuery 表或 Cloud Storage 中的 CSV 文件中指定数据源和结果目标位置。您无需对来源和目标使用相同的技术。例如,您可以将 BigQuery 用作数据源,将 Cloud Storage 中的 CSV 文件用作结果的目标位置。根据您的需求,使用以下两个任务中的相应步骤。
您的数据源必须包含用于训练模型的所有列的表格数据。您可以添加不属于训练数据的列,或者属于训练数据但不用于训练的列。这些额外的列包含在预测输出中,但不用于生成预测。
使用 BigQuery 表
输入数据的列名称和数据类型必须与您在训练数据中使用的数据相匹配。列可以与训练数据的顺序不同。
BigQuery 表要求
- BigQuery 数据源表不得大于 100 GB。
- 必须使用
US和EU位置的多区域 BigQuery 数据集。 - 如果该表属于其他项目,您必须向该项目中的 AutoML Tables 服务账号提供
BigQuery Data Editor角色。了解详情。
请求批量预测
控制台
转到 Google Cloud 控制台中的 AutoML Tables 页面。
选择模型并打开要使用的模型。
选择测试和使用标签页。
点击批量预测。
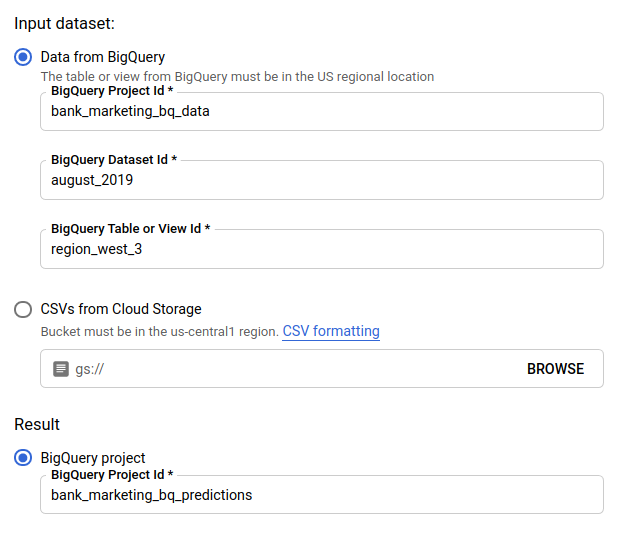
对于输入数据集,选择从 BigQuery 加载表格并为数据源提供项目 ID、数据集 ID 和表 ID。
对于结果,选择 BigQuery 项目并为结果目标提供项目 ID。
如果您想了解每个特征如何对预测产生影响,请选择生成特征重要性。
生成特征重要性会增加预测所需的时间和计算资源。局部特征重要性不能用于 Cloud Storage 的结果目的地。
点击发送批量预测以请求批量预测。
REST
使用 models.batchPredict 方法请求批量预测。
在使用任何请求数据之前,请先进行以下替换:
-
endpoint:全球位置为
automl.googleapis.com,欧盟地区为eu-automl.googleapis.com。 - project-id:您的 Google Cloud 项目 ID。
- location:资源的位置:全球位置为
us-central1,欧盟位置为eu。 - model-id:模型的 ID。例如
TBL543。 - dataset-id:预测数据所在的 BigQuery 数据集的 ID。
-
table-id:预测数据所在的 BigQuery 表的 ID。
AutoML Tables 在 project-id.dataset-id.table-id 中为预测结果创建一个名为
prediction-<model_name>-<timestamp>的子文件夹。
HTTP 方法和网址:
POST https://endpoint/v1beta1/projects/project-id/locations/location/models/model-id:batchPredict
请求 JSON 正文:
{
  "inputConfig": {
    "bigquerySource": {
      "inputUri": "bq://project-id.dataset-id.table-id"
    },
  },
  "outputConfig": {
    "bigqueryDestination": {
      "outputUri": "bq://project-id"
    },
  },
}
如需发送请求,请选择以下方式之一:
curl
将请求正文保存在名为 request.json 的文件中,然后执行以下命令:
curl -X POST \
    -H "Authorization: Bearer $(gcloud auth print-access-token)" \
    -H "x-goog-user-project: project-id" \
    -H "Content-Type: application/json; charset=utf-8" \
    -d @request.json \
    "https://endpoint/v1beta1/projects/project-id/locations/location/models/model-id:batchPredict"
PowerShell
将请求正文保存在名为 request.json 的文件中,然后执行以下命令:
$cred = gcloud auth print-access-token
$headers = @{ "Authorization" = "Bearer $cred"; "x-goog-user-project" = "project-id" }

Invoke-WebRequest `
    -Method POST `
    -Headers $headers `
    -ContentType: "application/json; charset=utf-8" `
    -InFile request.json `
    -Uri "https://endpoint/v1beta1/projects/project-id/locations/location/models/model-id:batchPredict" | Select-Object -Expand Content
您可以通过向请求数据添加 feature_importance 参数来获取局部特征重要性。如需了解详情,请参阅局部特征重要性。
Java
如果资源位于欧盟区域,您必须明确设置端点。了解详情。
Node.js
如果资源位于欧盟区域,您必须明确设置端点。了解详情。
Python
AutoML Tables 的客户端库包含其他 Python 方法,这些方法使用 AutoML Tables API 进行简化。这些方法按名称而不是 ID 来引用数据集和模型。您的数据集和模型的名称必须是唯一的。如需了解详情,请参阅客户端参考。
如果资源位于欧盟区域,您必须明确设置端点。了解详情。
使用 Cloud Storage 中的 CSV 文件
输入数据的列名称和数据类型必须与您在训练数据中使用的数据相匹配。列可以与训练数据的顺序不同。
CSV 文件要求
- 数据源的第一行必须包含列名称。
每个数据源文件不得大于 10 GB。
可以包含多个文件,但总大小不得超过 100 GB。
Cloud Storage 存储桶必须符合存储桶要求。
如果 Cloud Storage 存储桶位于其他项目而不是您使用 AutoML Tables 的位置,您必须向该项目中的 AutoML Tables 服务账号提供
Storage Object Creator角色。了解详情。
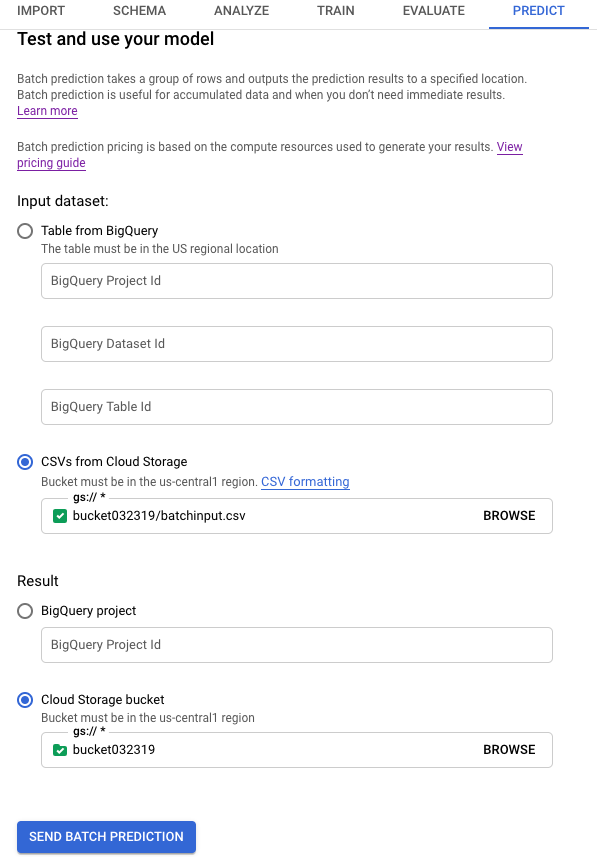
控制台
转到 Google Cloud 控制台中的 AutoML Tables 页面。
选择模型并打开要使用的模型。
选择测试和使用标签页。
点击批量预测。
对于输入数据集,选择从 Cloud Storage 上传 CSV 并提供数据源的存储桶 URI。
对于结果,选择 Cloud Storage 存储桶并提供目标存储桶的 URI。
如果您想了解每个特征如何对预测产生影响,请选择生成特征重要性。
生成特征重要性会增加预测所需的时间和计算资源。局部特征重要性不能用于 Cloud Storage 的结果目的地。
点击发送批量预测以请求批量预测。
REST
使用 models.batchPredict 方法请求批量预测。
在使用任何请求数据之前,请先进行以下替换:
-
endpoint:全球位置为
automl.googleapis.com,欧盟地区为eu-automl.googleapis.com。 - project-id:您的 Google Cloud 项目 ID。
- location:资源的位置:全球位置为
us-central1,欧盟位置为eu。 - model-id:模型的 ID。例如
TBL543。 - input-bucket-name:预测数据所在的 Cloud Storage 存储桶的名称。
- input-directory-name:预测数据所在的 Cloud Storage 目录的名称。
- object-name:预测数据所在的 Cloud Storage 对象的名称。
- output-bucket-name:预测结果的 Cloud Storage 存储桶的名称。
-
output-directory-name:预测结果的 Cloud Storage 目录的名称。
AutoML Tables 会为
gs://output-bucket-name/output-directory-name中名为prediction-<model_name>-<timestamp>的预测结果创建一个子文件夹。您必须拥有此路径的写入权限。
HTTP 方法和网址:
POST https://endpoint/v1beta1/projects/project-id/locations/location/models/model-id:batchPredict
请求 JSON 正文:
{
  "inputConfig": {
    "gcsSource": {
      "inputUris": [
        "gs://input-bucket-name/input-directory-name/object-name.csv"
      ]
    },
  },
  "outputConfig": {
    "gcsDestination": {
      "outputUriPrefix": "gs://output-bucket-name/output-directory-name"
     },
  },
}
如需发送请求,请选择以下方式之一:
curl
将请求正文保存在名为 request.json 的文件中,然后执行以下命令:
curl -X POST \
    -H "Authorization: Bearer $(gcloud auth print-access-token)" \
    -H "x-goog-user-project: project-id" \
    -H "Content-Type: application/json; charset=utf-8" \
    -d @request.json \
    "https://endpoint/v1beta1/projects/project-id/locations/location/models/model-id:batchPredict"
PowerShell
将请求正文保存在名为 request.json 的文件中,然后执行以下命令:
$cred = gcloud auth print-access-token
$headers = @{ "Authorization" = "Bearer $cred"; "x-goog-user-project" = "project-id" }

Invoke-WebRequest `
    -Method POST `
    -Headers $headers `
    -ContentType: "application/json; charset=utf-8" `
    -InFile request.json `
    -Uri "https://endpoint/v1beta1/projects/project-id/locations/location/models/model-id:batchPredict" | Select-Object -Expand Content
您可以通过向请求数据添加 feature_importance 参数来获取局部特征重要性。如需了解详情,请参阅局部特征重要性。
Java
如果资源位于欧盟区域,您必须明确设置端点。了解详情。
Node.js
如果资源位于欧盟区域,您必须明确设置端点。了解详情。
Python
AutoML Tables 的客户端库包含其他 Python 方法,这些方法使用 AutoML Tables API 进行简化。这些方法按名称而不是 ID 来引用数据集和模型。您的数据集和模型的名称必须是唯一的。如需了解详情,请参阅客户端参考。
如果资源位于欧盟区域,您必须明确设置端点。了解详情。
检索结果
检索 BigQuery 中的预测结果
如果您将 BigQuery 指定为输出的目标位置,则批量预测请求的结果会作为新数据集返回到您指定的 BigQuery 项目中。BigQuery 数据集的名称是该模型的名称附加前缀“prediction_”,并附加了预测作业开始的时间戳。在模型的测试和使用标签页中,您可以在批量预测页面的最近的预测中找到 BigQuery 数据集名称。
BigQuery 数据集包含两个表:predictions 和 errors。errors 表中的行用于保存在预测请求中 AutoML Tables 无法返回预测结果(例如,如果不可为 Null 的特征为 Null)对应的各行。predictions 表中包含的行用于保存返回的每个预测结果。
AutoML Tables 在 predictions 表中返回您的预测数据,并通过在目标列名称前附加“predicted_”来为预测结果创建一个新列。预测结果列包含嵌套的 BigQuery 结构,其中包含预测结果。
如需检索预测结果,您可以在 BigQuery 控制台中使用查询。查询的格式取决于您的模型类型。
二元分类:
SELECT predicted_<target-column-name>[OFFSET(0)].tables AS value_1,
predicted_<target-column-name>[OFFSET(1)].tables AS value_2
FROM <bq-dataset-name>.predictions
“value_1”和“value_2”都是位置标记,您可以将它们替换为目标值或等效值。
多类别分类:
SELECT predicted_<target-column-name>[OFFSET(0)].tables AS value_1,
predicted_<target-column-name>[OFFSET(1)].tables AS value_2,
predicted_<target-column-name>[OFFSET(2)].tables AS value_3,
...
predicted_<target-column-name>[OFFSET(4)].tables AS value_5
FROM <bq-dataset-name>.predictions
“value_1”、“value_2”等是位置标记,您可以将其替换为目标值或等效值。
回归:
SELECT predicted_<target-column-name>[OFFSET(0)].tables.value,
predicted_<target-column-name>[OFFSET(0)].tables.prediction_interval.start,
predicted_<target-column-name>[OFFSET(0)].tables.prediction_interval.end
FROM <bq-dataset-name>.predictions
检索 Cloud Storage 中的结果
如果您将 Cloud Storage 指定为输出的目标位置,则批量预测请求的结果会作为 CSV 文件返回到您指定的存储桶的新文件夹中。文件夹的名称是模型的名称,该名称附加了前缀“prediction-”,并附加了预测作业开始的时间戳。在模型的测试和使用标签页中,您可以在批量预测页面底部的最近的预测中找到 Cloud Storage 文件夹名称。
Cloud Storage 文件夹包含两种文件:错误文件和预测文件。如果结果较大,系统会另行创建文件。
错误文件按如下格式命名:errors_1.csv、errors_2.csv,依此类推。它们包含一个标题行,还包含另一个行,用于保存在预测请求中 AutoML Tables 无法返回预测结果所对应的各行。
预测文件按如下格式命名:tables_1.csv、tables_2.csv,依此类推。它们包含一个具有列名称的标题行和一个包含返回的各个预测结果的行。
AutoML Tables 会在预测文件中返回您的预测数据,并根据模型类型为预测结果创建一个或多个新列:
分类:
对于目标列的每个可能的值,结果中都会添加一个名为 <target-column-name>_<value>_score 的列。此列包含对应值的得分或置信度估计值。
回归:
对应行的预测值会返回到名为 predicted_<target-column-name> 的列中。系统不会为 CSV 输出返回预测区间。
局部特征重要性不能用于 Cloud Storage 中的结果。
解读结果
如何解读结果取决于您要解决的业务问题以及数据的分布情况。
解读分类模型的结果
分类模型(二元和多类)的预测结果会为目标列的每个可能值返回一个概率分数。您必须确定如何使用这些分数。例如,要通过提供的分数获得二元分类,您需要确定阈值。假设有“A”和“B”这两类,如果“A”的得分大于所选阈值,则应将示例归为“A”类,否则应归为“B”类。对于不均衡的数据集,阈值可能接近 100% 或 0%。
您可以在 Google Cloud 控制台中模型的评估页面上使用精确率召回率曲线图、接收者运算符曲线图以及其他相关的每个标签的统计信息,以了解更改阈值对评估指标有何影响。这样可帮助您确定使用得分值来解读预测结果的最佳方式。
解读回归模型的结果
对于回归模型,系统会返回预期的值。您可以直接使用该值解决许多问题。如果范围与您的业务问题息息相关,您还可以使用预测区间(若返回有)。
解读局部特征重要性结果
要了解如何解读局部特征重要性结果,请参阅局部特征重要性。