Protecting your volumes against unintentional or accidental changes is an important component of data lifecycle management. Cloud Volumes Service provides volume snapshots to ensure that you can recover your data from such a change. Snapshots are local-space efficient. They are image copies of your current volume state. You can use a snapshot to revert a volume to a previous version or to restore to a new volume as a copy of your original volume.
Considerations
Snapshots provide short-term protection for a volume. The following considerations apply:
Because snapshots are stored locally with the volume data, they persist as long as the volume remains. When a volume is deleted, its snapshots are also deleted. If you require longer-term protection for your volume, use backups. For more information about how to back up and restore a cloud volume, see Cloud Volumes Service backups.
A snapshot reflects the volume's state at a specific moment in time. Each subsequent snapshot captures the changes to the volume's state from the prior snapshot. These related volume snapshots are called a snapshot series. Because this snapshot series is a chain of related snapshots, reverting a volume to a prior state using a snapshot other than the most recent snapshot removes any snapshots that existed after the selected snapshot.
Snapshots allow access to a prior state of the file system. They allow read access to data that has been deleted. The capacity required to store deleted files referenced by a snapshot is counted against the allocated capacity. See Snapshot space requirements.
Internal snapshots that begin with
snapmirror-andcloud-snapshot-can be used for volume replication and backup but don't support creating volumes.
Create a volume snapshot
If you want to schedule volume snapshots regularly, create a volume with a snapshot schedule or edit an existing volume to modify its snapshot schedule.
You can also manually create a volume snapshot. Both the general-purpose Cloud Volumes Service and Cloud Volumes Service Performance service types support snapshots.
- In the Google Cloud console, go to the Snapshots page.
Click Create.
On the Create Snapshot page, complete the following fields:
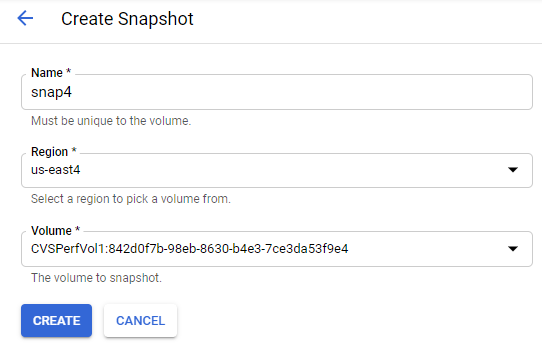
- Name: Enter a unique name that describes the snapshot.
- Region: Specify the region where the volume you want to snapshot resides. If this is a CVS-service-type region, also select the zone.
- Volume: Identify the volume you want to snapshot from the list of available volumes.
Click Create.
Create application-consistent snapshots
Operating systems and applications can keep data written in their caches for some time before the data is written to storage, so the current state of the data might not be in storage. Snapshots taken when some data in storage might not be current are called crash-consistent. Recovering data from crash-consistent snapshots works well for a majority of applications.
For some applications, like databases, it might be important to ensure that the application and the operating system write the current state of the data to storage before a snapshot is taken. Such snapshots are called application-consistent and provide a clean recovery point for the application.
To use Cloud Volumes Service snapshots to create application-consistent snapshots, do the following:
Flush all unwritten data from the application caches to storage. Many applications, such as databases, provide built-in mechanisms for this procedure. For details, see your application documentation.
An alternative is stopping the application briefly.
Take a snapshot of the volume, either manually or using a script.
Taking a snapshot takes a few seconds.
Return your application to its normal state of operation.
Scripting such a procedure allows you to create consistent snapshots of large application datasets within a few seconds. Such snapshots can also be used to create a consistent clone of the application.
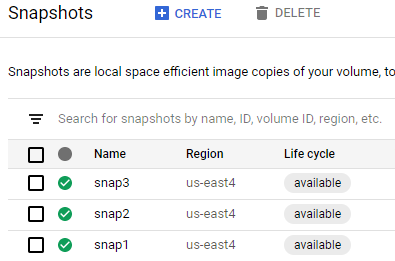
View snapshots
In projects with multiple volumes, hundreds or thousands of snapshots can
accumulate in hours or days. Use Cloud Volumes Service filters to view snapshots
by region (default is us-east4) and by volume in the region you selected.
In the Google Cloud console, go to the Snapshots page.
Select one or All Regions from the Region drop-down menu.
Select one or All Volumes from the Volume drop-down menu.

Create or modify a snapshot policy
When you use automatic snapshots, older snapshots are removed based on the number that you have specified to keep. If you change an existing schedule, you might need to manually delete snapshots created on the previous schedule.
- In the Google Cloud console, go to the Volumes page.
- On the volume you want to manage, click More, and then select Edit.
In the Edit File System page, click Show Snapshot Policy to expand the section.
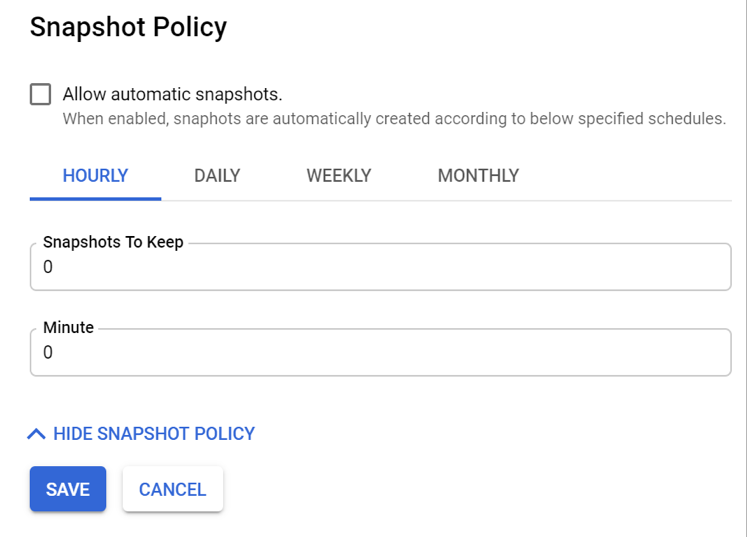
Select Allow automatic snapshots.
For each snapshot schedule (Hourly, Daily, Weekly, or Monthly), specify the number of snapshots to keep and the time during each period to take the snapshot.
For example, under Hourly, enter
5in the Minute field to take a snapshot at 5 minutes past the hour, every hour. Times are expressed as UTC (Coordinated Universal Time).Click Save.
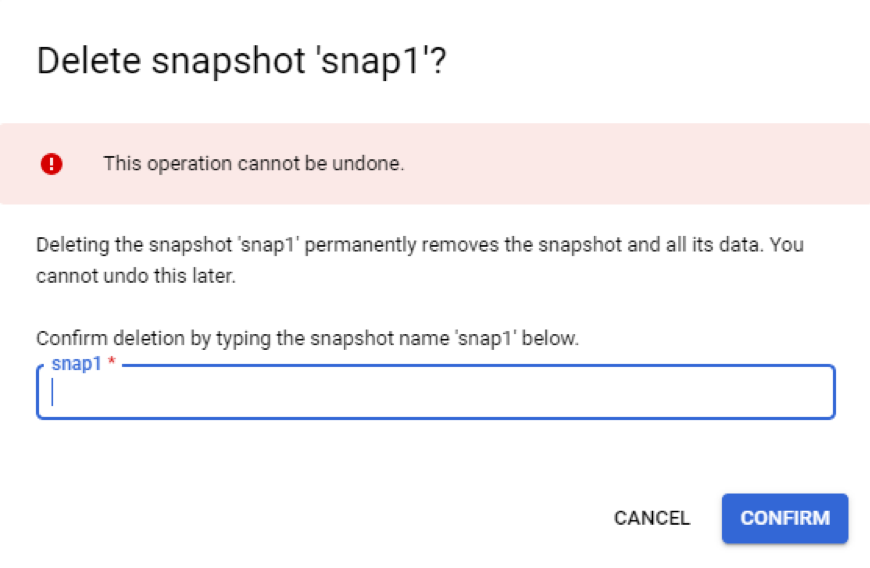
Delete a snapshot
If you no longer need a snapshot, you can delete it. Both the general-purpose CVS and the CVS-Performance service types support this functionality.
In the Google Cloud console, go to the Snapshots page.
- To delete individual snapshots, click More, and then select Delete.
- To delete multiple snapshots (up to 10), select the checkbox next to each snapshot you want to delete, and then click Delete.
The Delete Snapshot page displays information about the snapshot you are deleting. The page warns you that you cannot recover a snapshot after you delete it.

To complete the deletion of the snapshot, type the snapshot name and select Confirm.
What's next
- Restore data with snapshots
- Revert a volume using a snapshot
- Restore a snapshot to a new volume
- Security considerations
- FAQs about NetApp Cloud Volumes Service for Google Cloud