This tutorial demonstrates the best practice of shifting Google Kubernetes Engine (GKE) cost visibility left to your development team. This shift-left practice generates awareness of costs early in the process, helping you avoid surprises in your Google Cloud bill.
This tutorial is intended for developers, operators, and FinOps practitioners who want to optimize costs in GKE clusters and who use GitHub in production. If you use GitLab instead, see Estimate your GKE costs early in the development cycle using GitLab.
The tutorial assumes that you are familiar with Docker, GitHub Kubernetes, GKE, Cloud Build, and Linux.
Overview
Many teams embracing the public cloud are not used to the pay-as-you-go billing style. Frequently, they don't fully understand the environment their apps are running on—in this case, GKE. The FinOps operating model promotes this culture of financial accountability. A FinOps best practice is to provide teams with real-time information about their spending so that cost issues can be addressed as soon as they arise.
This document shows you how to go one step further by estimating cost before it becomes an expense in your bill. As highlighted in the GitHub website, "On GitHub, lightweight code review tools are built into every pull request." This lets you "evolve projects, propose new features, and discuss implementation details before changing your source code." The best time to estimate costs is early in the process during development and at code review time. This way, practitioners can understand and discuss alternatives for the cost impact of new features and bug fixes before it becomes a problem. The following diagram summarizes such a practice.
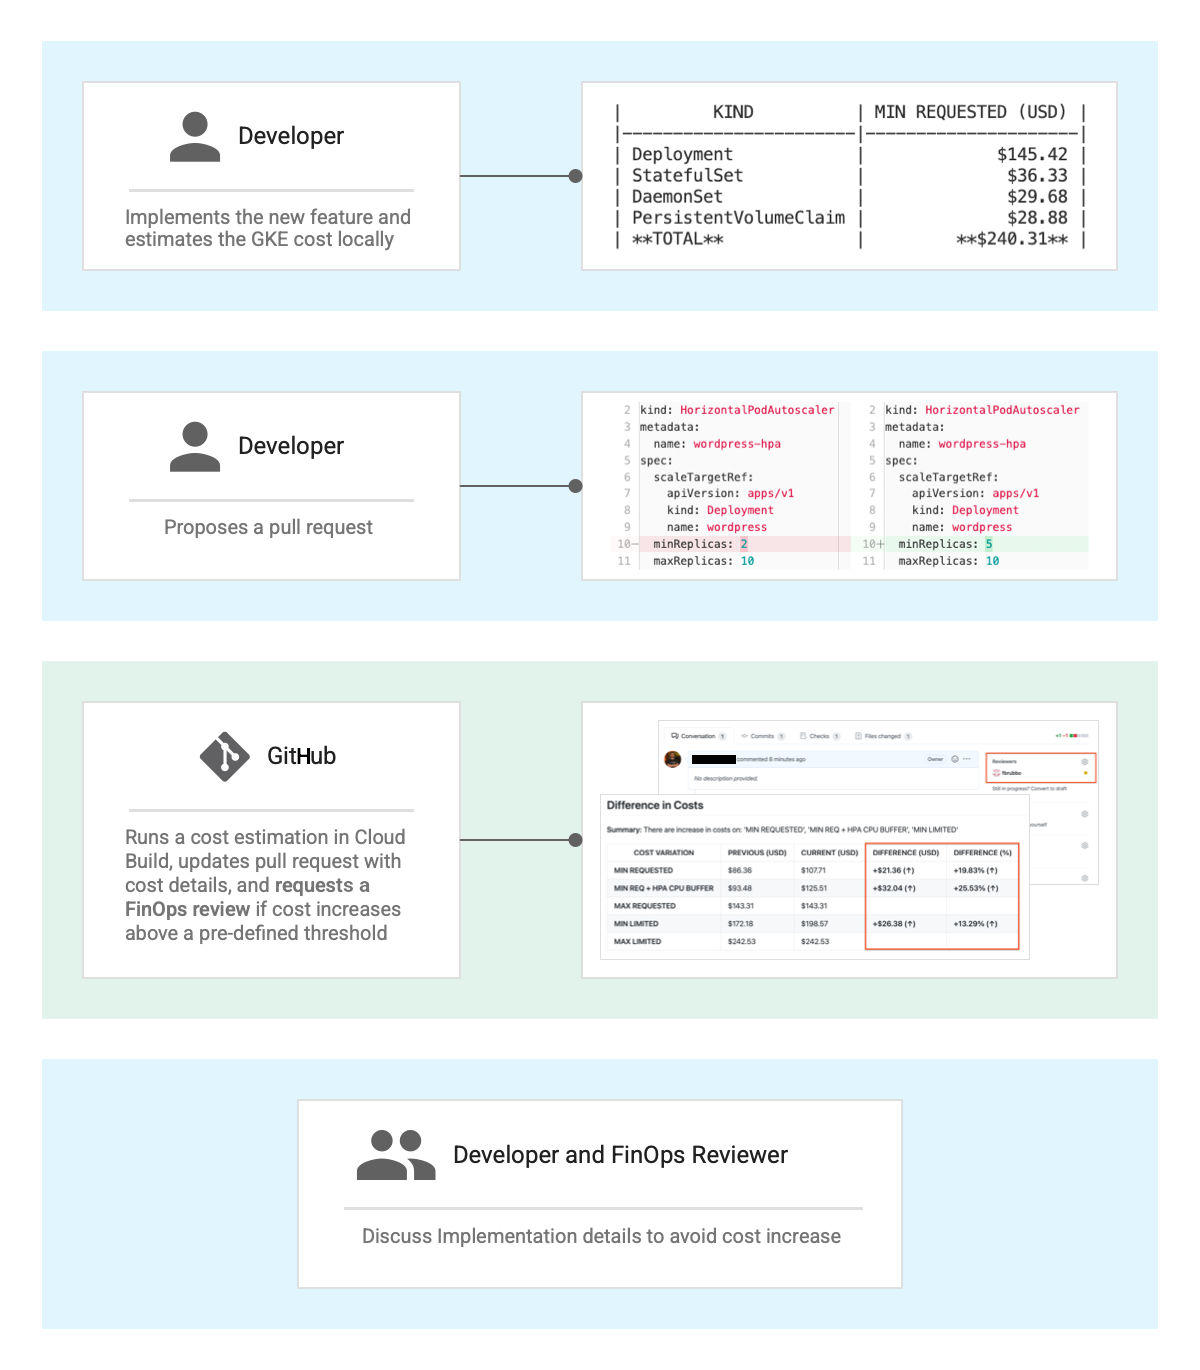
As the diagram shows, a developer estimates GKE costs in their local environment, ideally at build time. This estimate gives them a good understanding of the monthly production workload cost. When the feature or bug fix is code complete, they propose a pull request that triggers Cloud Build to check the difference between the old and the new cost. If there are increases above a predefined threshold, they can request a new code review. This practice helps developers become more aware of their workload capacity and proactively fix application issues instead of adding more resources each time an instability is found in production.
Objectives
- Build and push the Kubernetes cost-estimator image.
- Create a GitHub repository.
- Connect Cloud Build to your GitHub repository.
- Push the example code to your GitHub repository.
- Change the code and propose a pull request to see the cost estimation in action.
Costs
In this document, you use the following billable components of Google Cloud:
To generate a cost estimate based on your projected usage,
use the pricing calculator.
When you finish the tasks that are described in this document, you can avoid continued billing by deleting the resources that you created. For more information, see Clean up.
Before you begin
-
In the Google Cloud console, go to the project selector page.
-
Select or create a Google Cloud project.
-
Make sure that billing is enabled for your Google Cloud project.
-
In the Google Cloud console, activate Cloud Shell.
At the bottom of the Google Cloud console, a Cloud Shell session starts and displays a command-line prompt. Cloud Shell is a shell environment with the Google Cloud CLI already installed and with values already set for your current project. It can take a few seconds for the session to initialize.
Prepare your environment
In Cloud Shell, clone the
gke-shift-left-costGitHub repository:git clone https://github.com/GoogleCloudPlatform/gke-shift-left-cost cd gke-shift-left-costThe code in this repository is structured into the following folders:
- Root: Contains a Dockerfile file that is used to build the
cost-estimator image and the
main.gofile that implements the command-line logic for the estimator. api/: Contains the Golang API for manipulating Kubernetes objects and making the cost estimation.samples/: Contains examples of Kubernetes manifests so that you can experiment with the process before implementing it in your organization.
- Root: Contains a Dockerfile file that is used to build the
cost-estimator image and the
Set your Google Cloud project ID, your GitHub user and email address, and another GitHub user to act as the FinOps reviewer:
export GCP_PROJECT_ID=YOUR_PROJECT_ID
export GITHUB_USER=YOUR_GITHUB_USER
export GITHUB_EMAIL=YOUR_GITHUB_EMAIL_ADDRESS
export GITHUB_FINOPS_REVIEWER_USER=ANOTHER_GITHUB_USER
Replace the following:
YOUR_PROJECT_ID: the Google Cloud project ID for the project that you're using in this tutorial.YOUR_GITHUB_USER: the user that you use to log in to your GitHub account.YOUR_GITHUB_EMAIL_ADDRESS: the email that you use in your GitHub account.ANOTHER_GITHUB_USER: another GitHub user to act as the FinOps reviewer. Note that this tutorial requires that you add this user as a repository collaborator and therefore it cannot be yourself. To avoid getting stuck during the tutorial steps, make sure this user accepts your invitation as soon as you create the invite.
Set the Google Cloud project and enable required APIs:
gcloud config set project $GCP_PROJECT_ID

gcloud services enable cloudbilling.googleapis.com \
    artifactregistry.googleapis.com \
    cloudbuild.googleapis.com
Build and push the Kubernetes cost-estimator image
The Kubernetes cost-estimator tool that comes with this tutorial is just an example of what can be done. It offers the capability of estimating cost for DaemonSet, Deployment, StatefulSet, ReplicaSet, HorizontalPodAutoScaler, and PersistentVolumeClaim Kubernetes objects. You can also implement your own cost-estimation tool or propose pull requests with the improvements that you want.
In Cloud Shell, allow
application-defaultto use your credentials:gcloud auth application-default loginBuild the Kubernetes cost-estimator binary:
mkdir ./bin
go test ./api
go build -v -o ./bin/k8s-cost-estimator .
Test the binary by executing cost estimation in a sample folder:
./bin/k8s-cost-estimator \
    --k8s ./samples/k8s-cost-estimator-local/app-v1  \
    --config ./samples/k8s-cost-estimator-local/example-conf.yaml --v trace
In the output, you see a Markdown table detailing the monthly estimated costs for the
./samples/k8s-cost-estimator-local/app-v1/folder. To better understand the monthly production cost of their applications, developers can run this step before pushing to the remote repository.INFO[0000] Starting cost estimation (version v0.0.1)... ... | KIND | MIN REQUESTED (USD) | MIN REQ + HPA CPU BUFFER (USD) | MAX REQUESTED (USD) | MIN LIMITED (USD) | MAX LIMITED (USD) | |-----------------------|---------------------|--------------------------------|---------------------|-------------------|-------------------| | Deployment | $133.31 | $198.71 | $266.54 | $312.83 | $579.29 | | StatefulSet | $36.33 | $36.33 | $36.33 | $72.67 | $72.67 | | DaemonSet | $29.68 | $29.68 | $29.68 | $53.19 | $53.19 | | PersistentVolumeClaim | $28.88 | $28.88 | $28.88 | $33.68 | $33.68 | | **TOTAL** | **$228.20** | **$293.60** | **$361.43** | **$472.38** | **$738.83** | INFO[0002] Finished cost estimation!Build the Kubernetes cost-estimator container image:
docker build . -t us-central1-docker.pkg.dev/$GCP_PROJECT_ID/docker-repo/k8s-cost-estimator:v0.0.1Create the Artifact Registry Docker repository to store the image:
gcloud artifacts repositories create docker-repo \
        --repository-format=docker \
        --location=us-central1 \
        --description="Docker repository"
Register
gcloudas the credential helper to Docker's configuration file. If prompted, confirm the file update.gcloud auth configure-docker us-central1-docker.pkg.devPush the image to the Artifact Registry:
docker push us-central1-docker.pkg.dev/$GCP_PROJECT_ID/docker-repo/k8s-cost-estimator:v0.0.1
Create a new GitHub repository
In Cloud Shell, change directories to the GitHub example:
cd samples/k8s-cost-estimator-githubIn GitHub, create an access token:
Go to the GitHub Personal Access Tokens page
- In the Note field, enter a token description.
- Under Select scopes, select the repo, admin:public_key, and delete_repo checkboxes.
- Click Generate token and copy the Your new personal access token value at the top of the page.
In Cloud Shell, save your personal access token in a variable.
GITHUB_TOKEN=YOUR_NEW_PERSONAL_ACCESS_TOKENReplace the following:
YOUR_NEW_PERSONAL_ACCESS_TOKEN: the personal access token that you just created.
Create a GitHub repository:
curl -X POST \
  -H "Accept: application/vnd.github.v3+json" \
  -H "Authorization: Bearer $GITHUB_TOKEN" \
  https://api.github.com/user/repos \
  -d '{"name":"k8s-cost-estimator-github"}' | jq
The output is similar to the following:
{
  "id": 36099474,
  "node_id": "MDEwOldfsdjA5OTQ3Njc=",
  "name": "k8s-cost-estimator-github",
  ...
}
Add the FinOps reviewer as a collaborator in your repository:
curl -X PUT \
  -H "Accept: application/vnd.github.v3+json" \
  -H "Authorization: Bearer $GITHUB_TOKEN" \
  https://api.github.com/repos/$GITHUB_USER/k8s-cost-estimator-github/collaborators/$GITHUB_FINOPS_REVIEWER_USER  | jq -r .html_url
The output is similar to the following:
https://github.com/your-user/k8s-cost-estimator-github/invitationsShare the output URL with the user you set in the
GITHUB_FINOPS_REVIEWER_USERvariable so that they can accept the invitation. Before continuing to the next step, visit the same URL to make sure the invitation was accepted.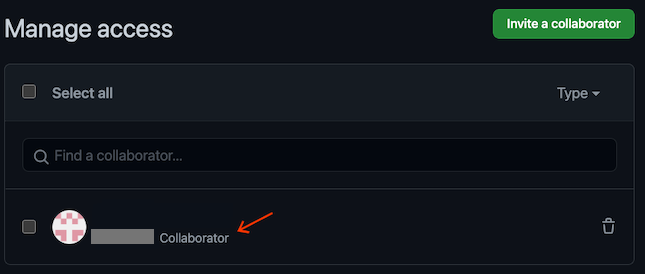
Connect Cloud Build to your GitHub repository
This section shows you how to install the Cloud Build GitHub app. This installation lets you connect your GitHub repository with your Google Cloud project so that Cloud Build can automatically run the Kubernetes estimator tool at each pull request.
Go to the GitHub Marketplace page for the Cloud Build app:
Set up GitHub account access for the app:
- If this is your first time configuring an app in GitHub, click Setup with Google Cloud Build at the bottom of the page, and then click Grant this app access to your GitHub account.
- If you've previously set up an app in GitHub, click Configure access.
In the Applications page that opens, follow these steps:
- In the Google Cloud Build row, click Configure.
- Select the Only select repositories option.
- Select k8s-cost-estimator-github to connect to the repository that you just created.
- Click Save—or Install (the button label changes depending on the flow you are executing).
You are now redirected to Google Cloud to continue the installation. Sign in with your Google Cloud account. If prompted, authorize Cloud Build integration with GitHub.
In the Cloud Build page, select your project. A wizard appears.
In the Select repository section of the wizard, select your GitHub account and the k8s-cost-estimator-github repository.
If you agree with the terms and conditions, select the checkbox, and then click Connect.
In the Create a trigger section, click Create a trigger, and then follow these steps:
- Enter a trigger name.
- In the Event section, select Pull request (GitHub App only).
- In the Source section:
- Make sure the Repository field is auto-filled with your-github-user/k8s-cost-estimator-github (GitHub App).
- In the Base Branch dropdown, select
.*.
- In the Configuration Type section, select Cloud Build configuration file (yaml or json).
In the Advanced section, add the following substitution variables:
- _GITHUB_TOKEN =
YOUR_PERSONAL_ACCESS_TOKEN - _GITHUB_FINOPS_REVIEWER_USER =
THE_GITHUB_FINOPS_REVIEWER_USER - _GITHUB_FINOPS_COST_USD_THRESHOLD =
10
Replace the following:
YOUR_PERSONAL_ACCESS_TOKEN: the GitHub personal access token that you created. This token is available in theGITHUB_TOKENvariable in Cloud Shell.THE_GITHUB_FINOPS_REVIEWER_USER: the user that you invited as a collaborator in your GitHub repository. This username is available in theGITHUB_FINOPS_REVIEWER_USERvariable in Cloud Shell.
- _GITHUB_TOKEN =
Click Create.
The Cloud Build GitHub app is now configured, and your GitHub repository is linked to your Google Cloud project. Pull requests to your GitHub repository now trigger Cloud Build executions, which report the results back to GitHub using GitHub Checks.
Push the example code to your GitHub repository
Create an SSH keypair to allow you to push the sample code to your GitHub repository:
mkdir -p ssh && cd ssh
ssh-keygen -t rsa -b 4096 -N '' -f github-key
eval `ssh-agent` && ssh-add $(pwd)/github-key
curl -X POST \
  -H "Accept: application/vnd.github.v3+json" \
  -H "Authorization: Bearer $GITHUB_TOKEN" \
  https://api.github.com/user/keys \
  -d "{\"title\":\"k8s-cost-estimator-key\", \"key\":\"$(cat github-key.pub)\"}" | jq
cd ..
The output is similar to the following:
{
  "id": 52356205,
  "key": "ssh-rsa AAAAB3NzaC….wJICyt0yvWjGFZGCWBPUw==",
  "url": "https://api.github.com/user/keys/526205",
  "title": "k8s-cost-estimator-key",
  "verified": true,
  "created_at": "2021-04-23T16:22:58Z",
  "read_only": false
}
Push the content to your new GitHub repository:
sed "s/GCP_PROJECT_ID/$GCP_PROJECT_ID/g; s/GITHUB_USER/$GITHUB_USER/g; s/GITHUB_EMAIL/$GITHUB_EMAIL/g;" templates/cloudbuild.yaml.tpl > cloudbuild.yaml

GITHUB_SSH_URL_REPO=$(curl -X GET \
  -H "Accept: application/vnd.github.v3+json" \
  -H "Authorization: Bearer $GITHUB_TOKEN" \
  https://api.github.com/repos/$GITHUB_USER/k8s-cost-estimator-github | jq -r .ssh_url)
[ -z "$GITHUB_SSH_URL_REPO" ] && echo "GITHUB_SSH_URL_REPO is not exported" || echo "GITHUB_SSH_URL_REPO is $GITHUB_SSH_URL_REPO"

git init
git remote add origin $GITHUB_SSH_URL_REPO
git add -A .
git commit -m "Initial commit"
git checkout -b main
git push -u origin main
Change the code and create a pull request to test the cost estimation
In Cloud Shell, get the GitHub URL to the file
wordpress/wordpress_hpa.yaml:echo "https://github.com/$GITHUB_USER/k8s-cost-estimator-github/edit/main/wordpress/wordpress_hpa.yaml"Ctrl+click (Cmd+click for Mac users) the output URL to navigate to GitHub and edit the
wordpress/wordpress_hpa.yamlfile.In GitHub, change
minReplicasto5.Select Create a new branch for this commit and start a pull request, and then click Propose Changes.
In the Open a pull request screen, click Create pull request.
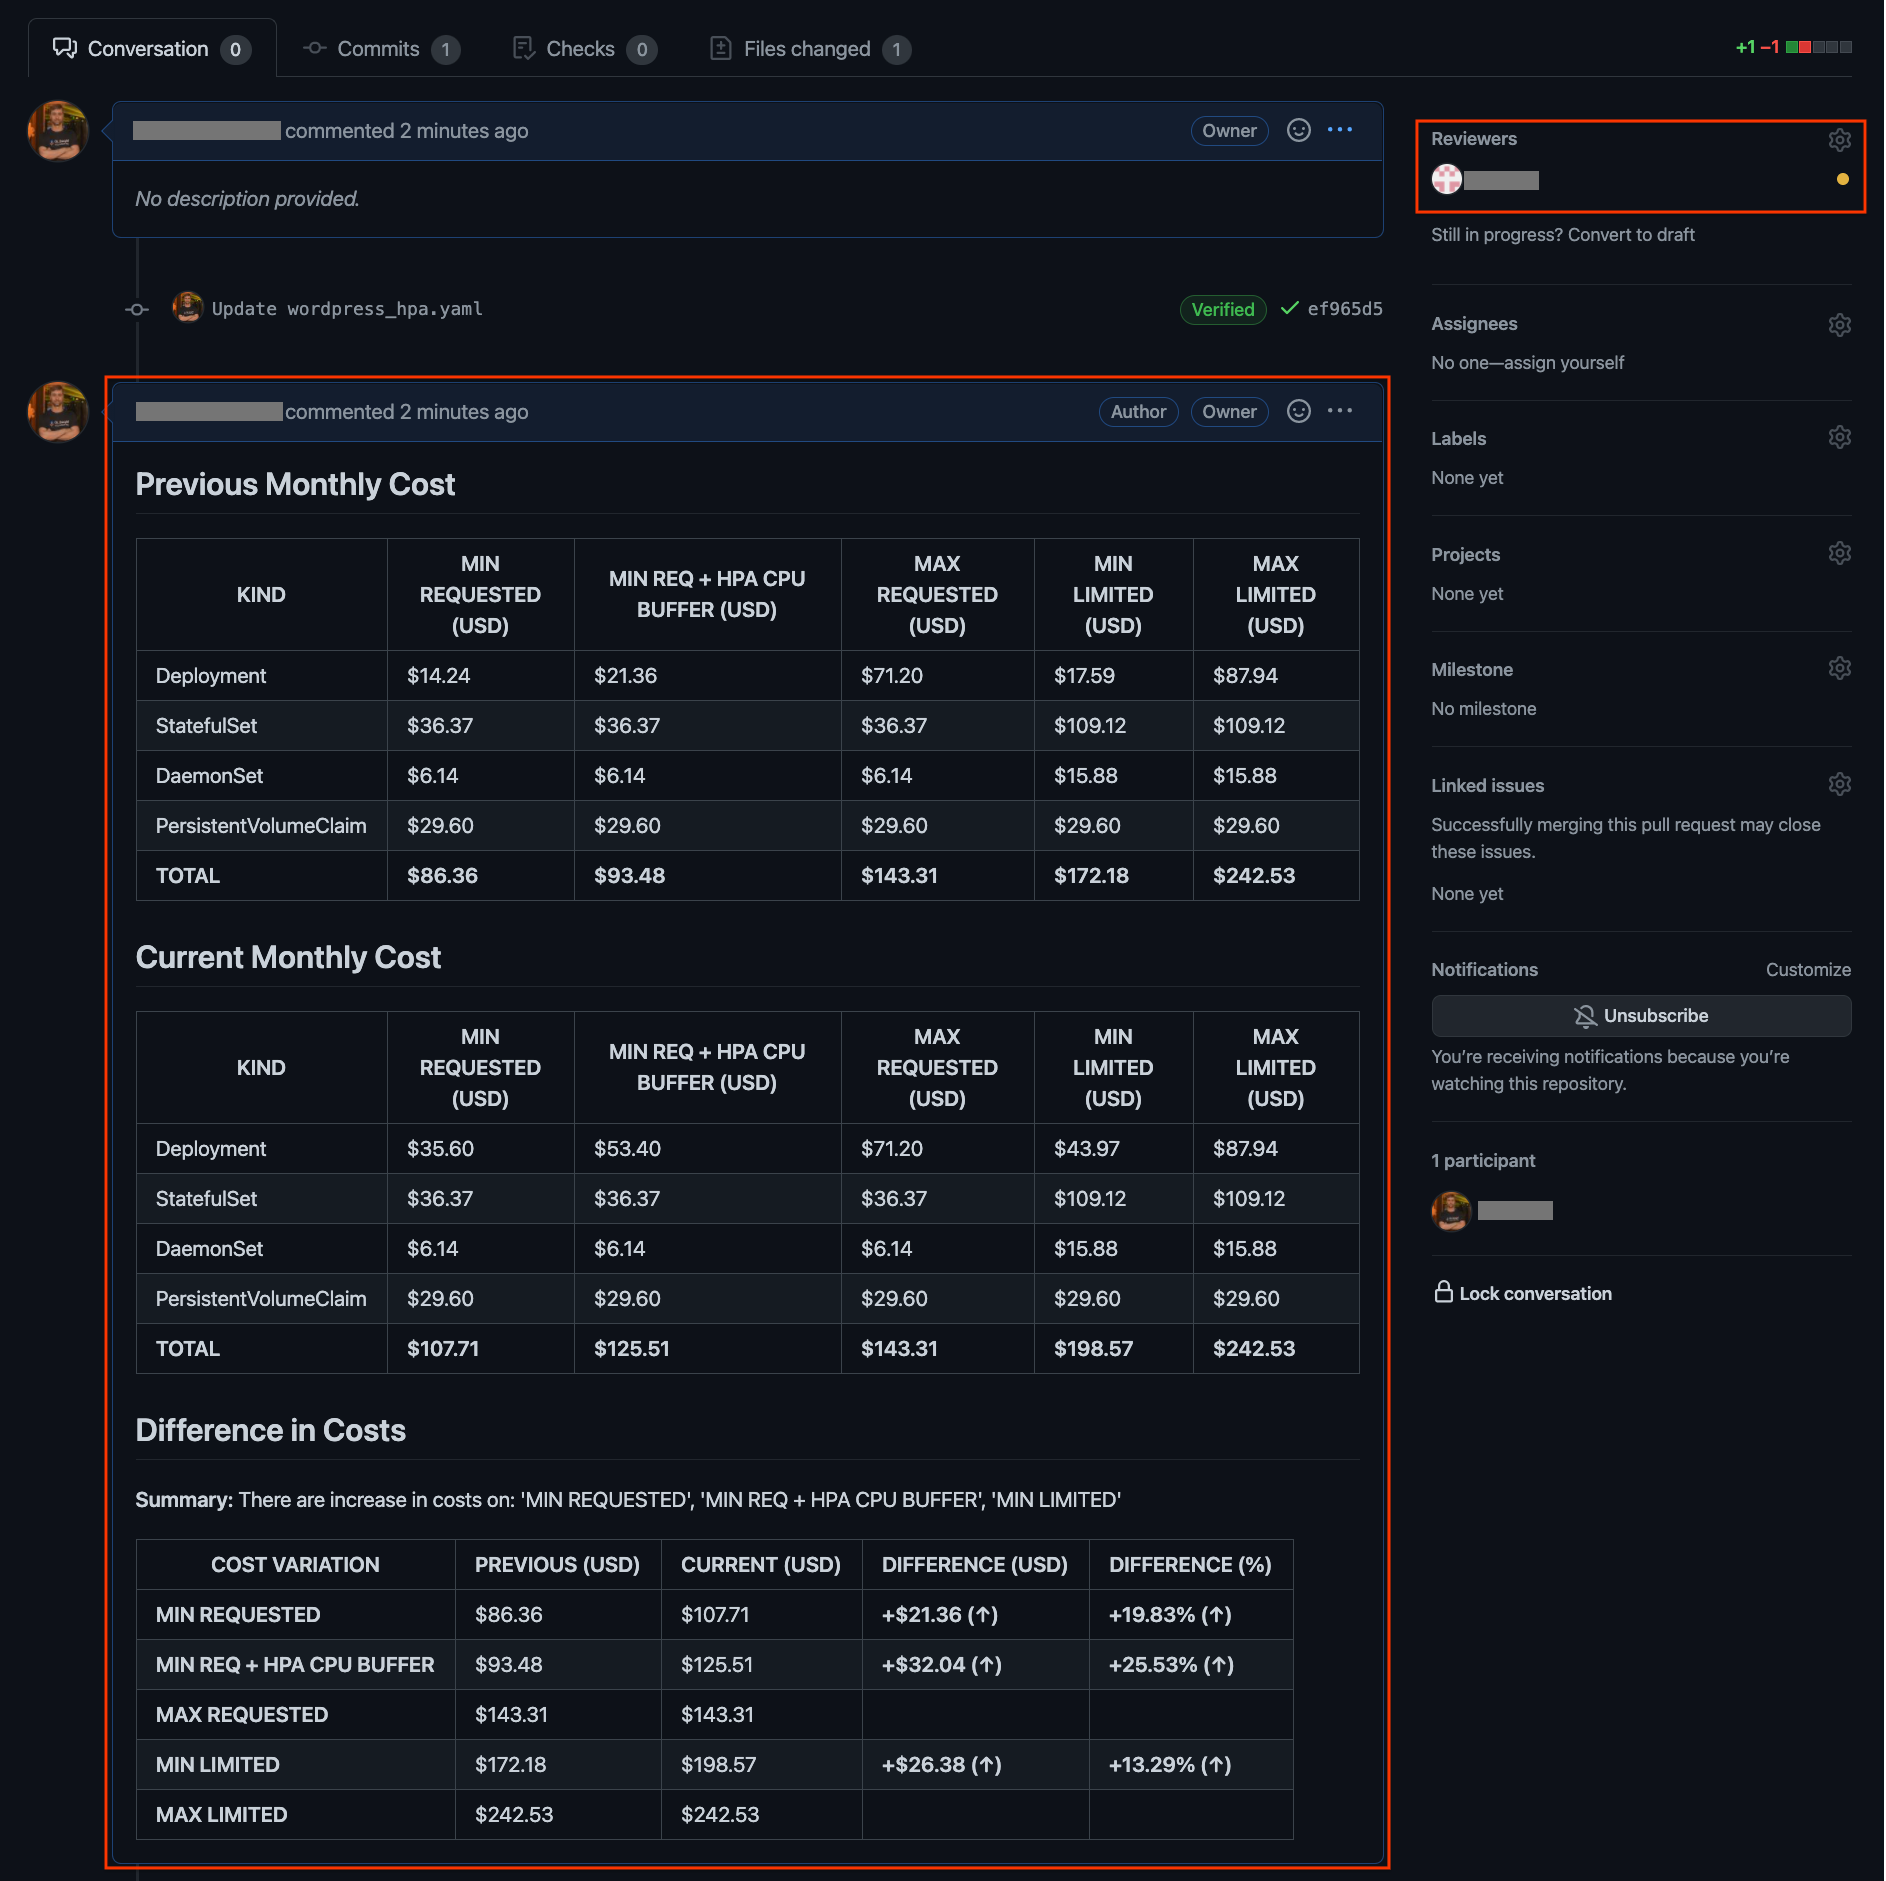
Beyond creating a new pull request, this step triggers a Cloud Build execution based on the
cloudbuild.yamlfile that you created previously. This Cloud Build execution uses the container image that you built in Building and pushing the Kubernetes cost-estimator image, and it makes the decision when a FinOps reviewer is required.Wait a minute or so for the pipeline to finish. When it finishes, a comment with cost details is added in the pull request, and because the increase in cost of the code you are proposing exceeded the $10 threshold, a FinOps reviewer is also requested.
The output is similar to the following:
You now know how to give your developers visibility into their spending early in the development cycle. This setup helps you and your organization avoid surprises in your Google Cloud bill.
Clean up
To avoid incurring charges to your Google Cloud account for the resources used in this tutorial, you can delete your project.
Delete the project
- In the Google Cloud console, go to the Manage resources page.
- In the project list, select the project that you want to delete, and then click Delete.
- In the dialog, type the project ID, and then click Shut down to delete the project.
Delete the GitHub repository
If you don't want to keep your GitHub repository, follow these steps:
In Cloud Shell, delete your GitHub repository:
curl -X DELETE \
  -H "Accept: application/vnd.github.v3+json" \
  -H "Authorization: Bearer $GITHUB_TOKEN" \
  https://api.github.com/repos/$GITHUB_USER/k8s-cost-estimator-github
If you lose your connection with Cloud Shell, you need to reset the
GITHUB_TOKENandGITHUB_USERvariables.
What's next
- If you use GitLab, take a look at Estimate your GKE costs early in the development cycle using GitLab.
- Learn more about GKE cost optimization in Best practices for running cost-optimized Kubernetes applications on GKE.
- Find design recommendations and best practices to optimize the cost of Google Cloud workloads in Google Cloud Architecture Framework: Cost optimization.
- Explore reference architectures, diagrams, and best practices about Google Cloud. Take a look at our Cloud Architecture Center.