This tutorial describes how to deploy and manage a Microsoft SQL Server database system across two Google Cloud regions as a disaster recovery (DR) solution and how to fail over from a failed database instance to a normally operating instance. For the purposes of this document, a disaster is an event in which a primary database fails or becomes unavailable.
A primary database can fail when the region it's located in fails or becomes inaccessible. Even if a region is available and operating normally, a primary database can fail because of a system error. In these cases, disaster recovery is the process of making a secondary database available to clients for continued processing.
This tutorial is intended for database architects, administrators, and engineers.
Objectives
- Deploy a multi-regional disaster-recovery environment on Google Cloud by using Microsoft SQL Server's AlwaysOn Availability Groups.
- Simulate a disaster event and perform a complete disaster-recovery process to validate the disaster-recovery configuration.
Costs
In this document, you use the following billable components of Google Cloud:
To generate a cost estimate based on your projected usage,
use the pricing calculator.
When you finish the tasks that are described in this document, you can avoid continued billing by deleting the resources that you created. For more information, see Clean up.
Before you begin
For this tutorial, you need a Google Cloud project. You can create a new one, or select a project you already created:
-
In the Google Cloud console, on the project selector page, select or create a Google Cloud project.
-
Make sure that billing is enabled for your Google Cloud project.
-
In the Google Cloud console, activate Cloud Shell.
Understanding disaster recovery
In Google Cloud, disaster recovery (DR) is about providing continuity of processing, especially when a region fails or becomes inaccessible. For systems such as a database management system, you implement DR by deploying the system in at least two regions. With this setup, the system continues to operate if one region becomes unavailable.
Database system disaster recovery
The process of making a secondary database available when the primary database instance fails is called database disaster recovery (or database DR). For a detailed discussion about this concept, see Disaster recovery for Microsoft SQL Server. Ideally, the state of the secondary database is consistent with the primary database at the point the primary becomes unavailable, or the secondary database is missing only a small set of recent transactions from the primary database.
Disaster recovery architecture
For Microsoft SQL Server, the following diagram shows a minimal architecture that supports database DR.

Figure 1. Standard disaster recovery architecture with Microsoft SQL Server.
This architecture works as follows:
- Two instances of Microsoft SQL Server (a primary instance and a standby instance) are located in the same region (R1) but different zones (zones A and B). The two instances in R1 coordinate their states by using the synchronous-commit mode. Synchronous mode is used because it supports high availability and maintains a consistent data state.
- One instance of Microsoft SQL Server (the secondary or disaster recovery instance) is located in a second region (R2). For DR, the secondary instance in R2 synchronizes with the primary instance in R1 by using the asynchronous-commit mode. Asynchronous mode is used because of its performance (it doesn't slow down the commit processing in the primary instance).
In the preceding diagram, the architecture shows an availability group. The availability group, if used with a listener, provides the same connect string to clients if the clients are served by the following:
- The primary instance
- The standby instance (after a zone failure)
- The secondary instance (after a region failure and after the secondary instance becomes the new primary instance)
In a variant of the above architecture, you deploy the two instances that are in the first region (R1) into the same zone. This approach might improve performance but is not highly available; a single zone outage might be required to initiate the DR process.
Basic disaster recovery process
The DR process starts when a region becomes unavailable and the primary database fails over to resume processing in another operational region. The DR process prescribes the operational steps that must be taken, either manually or automatically, to mitigate the region failure and establish a running primary instance in an available region.
A basic database DR process consists of the following steps:
- The first region (R1), which is running the primary database instance, becomes unavailable.
- The operations team recognizes and formally acknowledges the disaster and decides whether a failover is required.
- If a failover is required, the secondary database instance in the second region (R2) is made the new primary instance.
- Clients resume processing on the new primary database and access the primary instance in R2.
Although this basic process establishes a working primary database again, it doesn't establish a complete DR architecture, where the new primary has a standby and a secondary database instance.
Complete disaster recovery process
A complete DR process extends the basic DR process by adding steps to establish a complete DR architecture after a failover. The following diagram shows a complete database DR architecture.
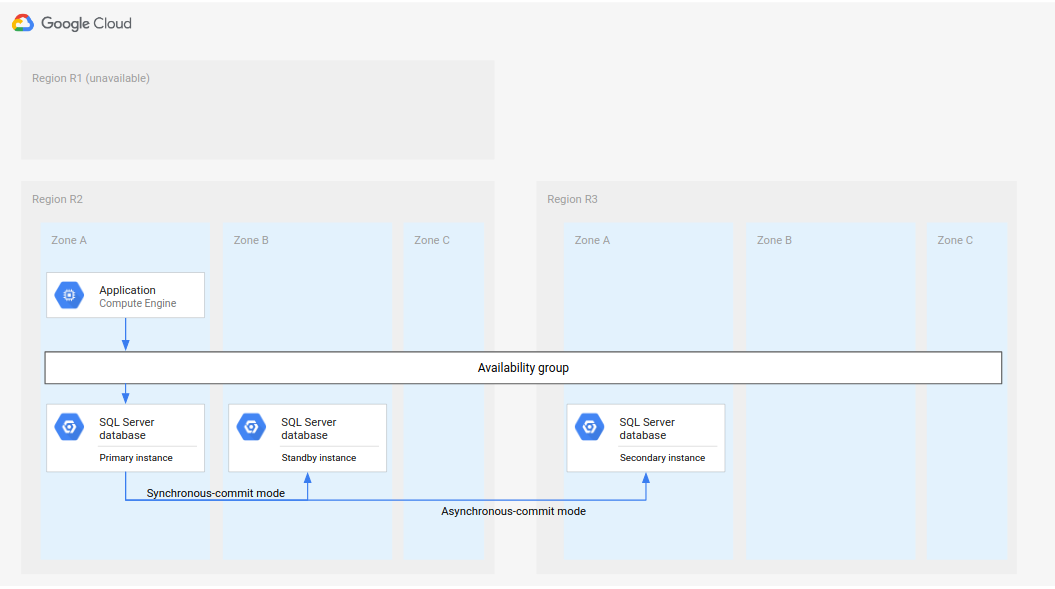
Figure 2. Disaster recovery with an unavailable primary region (R1).
This complete database DR architecture works as follows:
- The first region (R1), which is running the primary database instance, becomes unavailable.
- The operations team recognizes and formally acknowledges the disaster and decides whether a failover is required..
- If a failover is required, the secondary database instance in the second region (R2) is made the primary instance.
- Another secondary instance, the new standby instance, is created and started in R2 and added to the primary instance. The standby instance is in a different zone from the primary instance. The primary database now consists of two instances (primary and standby) that are highly available.
- In a third region (R3), a new secondary (standby) database instance is created and started. This secondary instance is asynchronously connected to the new primary instance in R2. At this point, the original disaster-recovery architecture is recreated and operational.
Fallback to a recovered region
After the first region (R1) is brought back online, it can host the new secondary database. If R1 becomes available soon enough, you can implement step 5 in the complete recovery process in R1 instead of R3 (the third region). In this case, a third region is not needed.
The following diagram shows the architecture if R1 becomes available in time.
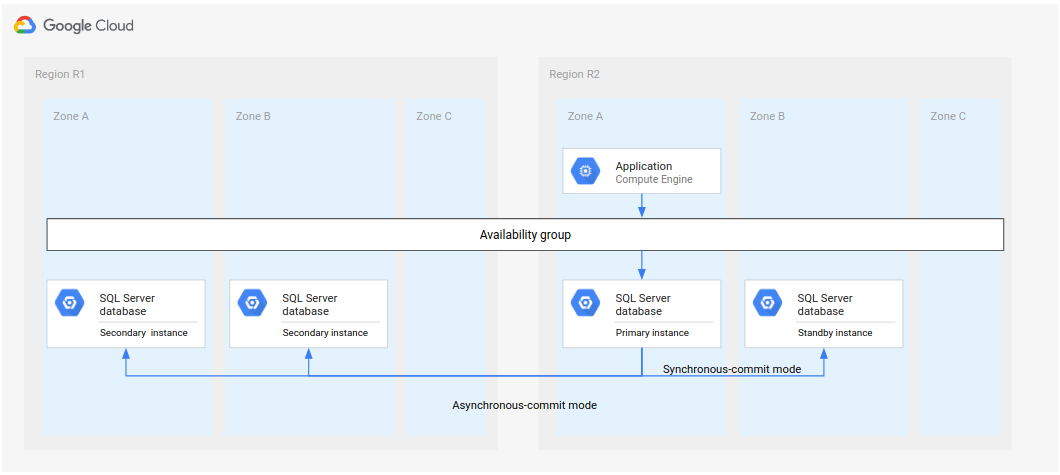
Figure 3. Disaster recovery after failed region R1 becomes available again.
In this architecture, the recovery steps are the same as those outlined earlier in Complete disaster recovery process, with the difference that R1 becomes the location for the secondary instances instead of R3.
Choosing a SQL Server edition
This tutorial supports the following versions of Microsoft SQL Server:
- SQL Server 2016 Enterprise Edition
- SQL Server 2017 Enterprise Edition
- SQL Server 2019 Enterprise Edition
The tutorial uses the AlwaysOn Availability Groups feature in SQL Server.
If you don't require a highly available (HA) Microsoft SQL Server primary database, and a single database instance suffices as your primary, you can use the following versions of SQL Server:
- SQL Server 2016 Standard Edition
- SQL Server 2017 Standard Edition
- SQL Server 2019 Standard Edition
The 2016, 2017, and 2019 versions of SQL Server have Microsoft SQL Server Management Studio installed in the image; you don't need to install it separately. However, in a production environment, we recommend that you install one instance of Microsoft SQL Server Management Studio on a separate VM in each region. If you set up an HA environment, you should install Microsoft SQL Server Management Studio once for each zone to ensure that it remains available if another zone becomes unavailable.
Setting up Microsoft SQL Server for multi-regional DR
This section uses the sql-ent-2016-win-2016 image for Microsoft SQL Server
2016 Enterprise Edition. If you install Microsoft SQL Server 2017 Enterprise
Edition, then use sql-ent-2017-win-2016. For Microsoft SQL Server 2019
Enterprise Edition, use sql-ent-2019-win-2019. For a complete list of images,
see
Images.
Set up a two-instance high availability cluster
To set up a multi-regional database DR architecture for SQL Server, you first
create a two-instance high availability (HA) cluster in a region. One instance
serves as the primary, and the other instance serves as the secondary. To
accomplish this step, follow the instructions in
Configuring SQL Server AlwaysOn Availability Groups.
This tutorial uses us-central1 for the primary region (referred to as R1).
Before you begin, review the following considerations.
First, if you follow the steps in
Configuring SQL Server AlwaysOn Availability Groups,
you create two SQL Server instances in the same zone (us-central1-f). This
setup doesn't protect you from a failure of us-central1-f. Therefore, to
provide HA support, you deploy one SQL Server instance (cluster-sql1) in
us-central1-c, and a second instance (cluster-sql2) in us-central1-f. The
steps in the next section (on adding a secondary instance for disaster recovery)
assume this deployment setup.
Second, the steps in Configuring SQL Server AlwaysOn Availability Groups include running this statement:
BACKUP DATABASE TestDB to disk = '\\cluster-sql2\SQLBackup\TestDB.bak' WITH INIT
This statement causes the standby instance to fail. Instead, run the following command (the name of the backup file is different):
BACKUP DATABASE TestDB to disk = '\\cluster-sql2\SQLBackup\TestDB-backup.bak' WITH INIT
Third, the steps in Configuring SQL Server AlwaysOn Availability Groups create backup directories. You use these backups only when you initially synchronize the primary instance and the standby and not thereafter. An alternative approach to creating backup directories is to choose Automatic seeding in these steps. This approach simplifies the setup process.
Fourth, if the databases do not synchronize, run the following command in
cluster-sql2:
ALTER DATABASE [TestDB] SET HADR AVAILABILITY GROUP = [cluster-ag]
Fifth, for the purposes of this tutorial, you create one domain controller in
us-central1-f, as the following diagram shows.
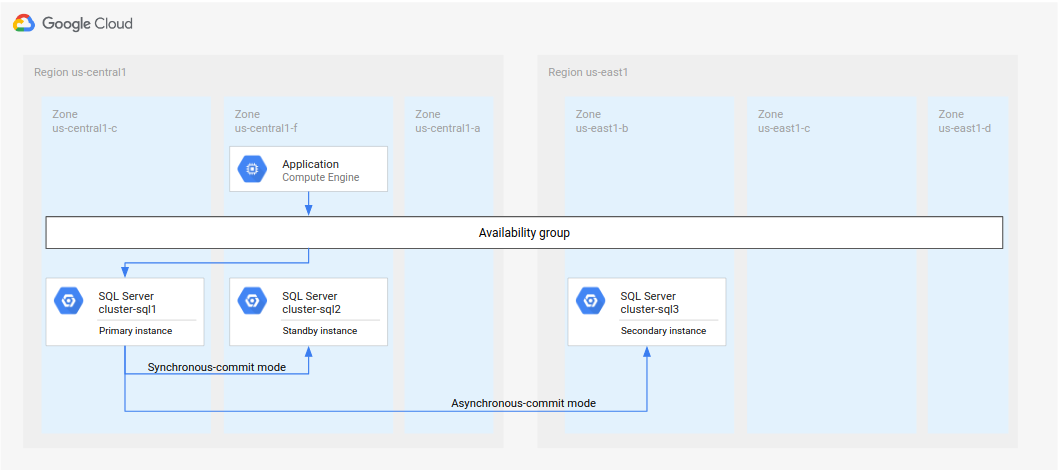
Figure 4. Standard disaster recovery architecture implemented in this tutorial.
Although you implement the preceding architecture for this tutorial, it's a best practice to set up a domain controller in more than one zone. This approach ensures that you establish an HA and DR-enabled database architecture. For example, if an outage occurs in one zone, that zone doesn't become a single point of failure for your deployed architecture.
Add a secondary instance for disaster recovery
Next, you set up a third SQL Server instance (a secondary instance that is
named cluster-sql3), along with the networking:
In Cloud Shell, under the same virtual private cloud (VPC) that you used for the primary region, create a subnet in the secondary region (
us-east1):gcloud compute networks subnets create wsfcsubnet4 --network wsfcnet \ --region us-east1 --range 10.3.0.0/24Modify the firewall rule called
allow-internal-portsto let the new subnet receive traffic:gcloud compute firewall-rules update allow-internal-ports \ --source-ranges 10.0.0.0/24,10.1.0.0/24,10.2.0.0/24,10.3.0.0/24The
allow-internal-portsrule is included in the steps from the instructions that you followed earlier.Create a SQL Server instance:
gcloud compute instances create cluster-sql3 --machine-type n1-highmem-4 \
    --boot-disk-type pd-ssd --boot-disk-size 200GB \
    --image-project windows-sql-cloud --image-family sql-ent-2016-win-2016 \
    --zone us-east1-b \
    --network-interface "subnet=wsfcsubnet4,private-network-ip=10.3.0.4,aliases=10.3.0.5;10.3.0.6" \
    --can-ip-forward --metadata sysprep-specialize-script-ps1="Install-WindowsFeature Failover-Clustering -IncludeManagementTools;"
Set a Windows password for the new SQL Server instance:
In the Google Cloud console, go to the Compute Engine page.
In the Connect column for the Compute Engine cluster
cluster-sql3, select the Set windows password drop-down list.Set the username and password. Note them for later use.
Click RDP to connect to the
cluster-sql3instance.Enter the username and password from step 4, and then click OK.
Open a Windows PowerShell window as an administrator, and then configure the DNS and open ports:
netsh interface ip set dns Ethernet static 10.2.0.100

netsh advfirewall firewall add rule name="Open Port 5022 for Availability Groups" dir=in action=allow protocol=TCP localport=5022

netsh advfirewall firewall add rule name="Open Port 1433 for SQL Server" dir=in action=allow protocol=TCP localport=1433
Add the instance to the Windows domain:
Add-Computer -DomainName "dbeng.com" -Credential "dbeng.com\Administrator" -Restart -ForceThis command terminates your RDP connection.
Add the secondary instance to the failover cluster
Next, you add the secondary instance (cluster-sql3) to the Windows failover
cluster:
Connect to the
cluster-sql1orcluster-sql2instances using RDP, and log in as administrator.Open a PowerShell window as an administrator and set variables for the cluster environment in this tutorial:
$node3 = "cluster-sql3"
$nameWSFC = "cluster-dbclus" # Name of cluster
Add the secondary instance to the cluster:
Get-Cluster | WHERE Name -EQ $nameWSFC | Add-ClusterNode -NoStorage -Name $node3This command might take a while to run. Because the process can stop responding and not return automatically, occasionally press
Enter.In the node, enable the AlwaysOn High Availability feature:
Enable-SqlAlwaysOn -ServerInstance $node3 -ForceCreate two folders at
C:\SQLDataandC:\SQLLogto store the database data and log files:New-item -ItemType Directory "C:\SQLData" New-item -ItemType Directory "C:\SQLLog"
The node is now joined to the failover cluster.
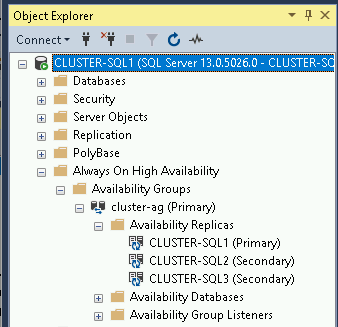
Add the secondary instance to the existing availability group
Next, add the SQL Server instance (the secondary instance) and database to the availability group:
In any of the three instance nodes (
cluster-sql1,cluster-sql2, orcluster-sql3), open Microsoft SQL Server Management Studio and connect to the primary instance (cluster-sql1):- Go to the Object Explorer.
- Select the Connect drop-down list.
- Select Database Engine.
- From the Server Name drop-down list, select
cluster-sql1. If the cluster is not listed, enter it in the field.
Click New Query.
Paste the following command to add an IP address to the listener that is used for the node, and then click Execute:
ALTER AVAILABILITY GROUP [cluster-ag] MODIFY LISTENER 'cluster-listene' (ADD IP ('10.3.0.6', '255.255.255.0'))In the Object Explorer, expand the AlwaysOn High Availability node, and then expand the Availability Groups node.
Right-click the availability group that is named
cluster-ag, and then select Add Replica.On the Introduction page, click the AlwaysOn High Availability node, and then click the Availability Groups node.
On the Connect to Replicas page, click Connect to connect to the existing secondary replica
cluster-sql2.On the Specify Replicas page, click Add Replica, and then add the new node
cluster-sql3. Don't select Automatic Failover because automatic failover causes a synchronous commit. Such a setup crosses regional boundaries, which we don't recommend.On the Select Data Synchronization page, select Automatic seeding.
Because there is no listener, the Validation page generates a warning, which you can ignore.
Complete the wizard steps.
The failover mode for cluster-sql1 and cluster-sql2 is automatic, whereas
it's manual for cluster-sql3. This difference is one way to distinguish high
availability from disaster recovery.
The availability group is now ready. You configured two nodes for high availability and a third node for disaster recovery.
Simulating a disaster recovery
In this section, you test the disaster recovery architecture for this tutorial and consider optional DR implementations.
Simulate an outage and execute a DR failover
Simulate a failure (outage) in the primary region:
In Microsoft SQL Server Management Studio on
cluster-sql1, connect tocluster-sql1.Create a table. After you add replicas in later steps, you verify the replica works by checking whether this table is present.
USE TestDB
GO
CREATE TABLE dbo.TestTable_Before_DR (ID INT NOT NULL)
GO
In Cloud Shell, shut down both servers in the primary region (
us-central1):gcloud compute instances stop cluster-sql2 --zone us-central1-f --quiet gcloud compute instances stop cluster-sql1 --zone us-central1-c --quiet
In Microsoft SQL Server Management Studio on
cluster-sql3, connect tocluster-sql3.Execute a failover, and set the availability mode to synchronous-commit. Forcing a failover is necessary because the node is in asynchronous-commit mode.
ALTER AVAILABILITY GROUP [cluster-ag] FORCE_FAILOVER_ALLOW_DATA_LOSS
GO
ALTER AVAILABILITY GROUP [cluster-ag]
MODIFY REPLICA ON 'CLUSTER-SQL3' WITH (AVAILABILITY_MODE = SYNCHRONOUS_COMMIT)
GO
You can resume processing;
cluster-sql3is now the primary instance.(Optional) Create a new table in
cluster-sql3. After you synchronize the replicas with the new primary, you check whether this table is replicated to the replicas.USE TestDB GO CREATE TABLE dbo.TestTable_After_DR (ID INT NOT NULL) GO
Although cluster-sql3 is the primary at this point, you might want to fall
back to the original region or set up a new secondary instance and standby
instance in order to recreate a complete DR architecture again. The next section
discusses these options.
(Optional) Recreate a DR architecture that completely replicates transactions
This use case addresses a failure in which all transactions are replicated from the primary to the secondary database before the primary fails. In this ideal scenario, no data is lost; the state of the secondary is consistent with the primary at the point of failure.
In this scenario, you can recreate a complete DR architecture in two ways:
- Fall back to the original primary and the original standby (if those are available).
- Create a new standby and secondary for
cluster-sql3in case the original primary and standby are unavailable.
Approach 1: Fall back to the original primary and standby
In the Cloud Shell, start up the original (old) primary and standby:
gcloud compute instances start cluster-sql1 --zone us-central1-c --quiet
gcloud compute instances start cluster-sql2 --zone us-central1-f --quiet
In Microsoft SQL Server Management Studio, add
cluster-sql1andcluster-sql2back as secondary replicas:On
cluster-sql3, add the two servers in asynchronous-commit mode:USE [master] GO ALTER AVAILABILITY GROUP [cluster-ag] MODIFY REPLICA ON 'CLUSTER-SQL1' WITH (FAILOVER_MODE = MANUAL) GO ALTER AVAILABILITY GROUP [cluster-ag] MODIFY REPLICA ON 'CLUSTER-SQL1' WITH (AVAILABILITY_MODE = ASYNCHRONOUS_COMMIT) GO ALTER AVAILABILITY GROUP [cluster-ag] MODIFY REPLICA ON 'CLUSTER-SQL2' WITH (FAILOVER_MODE = MANUAL) GO ALTER AVAILABILITY GROUP [cluster-ag] MODIFY REPLICA ON 'CLUSTER-SQL2' WITH (AVAILABILITY_MODE = ASYNCHRONOUS_COMMIT) GOOn
cluster-sql1, start synchronizing the databases again:USE [master] GO ALTER DATABASE [TestDB] SET HADR RESUME; GOOn
cluster-sql2, start synchronizing the databases again:USE [master] GO ALTER DATABASE [TestDB] SET HADR RESUME; GO
Make
cluster-sql1the primary again:On
cluster-sql3, change the availability mode ofcluster-sql1to synchronous-commit. The instancecluster-sql1becomes the primary again.USE [master] GO ALTER AVAILABILITY GROUP [cluster-ag] MODIFY REPLICA ON 'CLUSTER-SQL1' WITH (AVAILABILITY_MODE = SYNCHRONOUS_COMMIT) GOOn
cluster-sql1, changecluster-sql1to be the primary and the two other nodes to be the secondaries:USE [master] GO -- Node 1 becomes primary ALTER AVAILABILITY GROUP [cluster-ag] FAILOVER; GO -- Node 2 has synchronous commit ALTER AVAILABILITY GROUP [cluster-ag] MODIFY REPLICA ON 'CLUSTER-SQL2' WITH (AVAILABILITY_MODE = SYNCHRONOUS_COMMIT) GO -- Node 3 has asynchronous commit ALTER AVAILABILITY GROUP [cluster-ag] MODIFY REPLICA ON 'CLUSTER-SQL3' WITH (AVAILABILITY_MODE = ASYNCHRONOUS_COMMIT) GO
After all commands succeed, cluster-sql1 is the primary, and the other nodes
are secondary, as the following diagram shows.
Approach 2: Set up a new primary and standby
It is possible that you cannot recover the original primary and standby
instances from the failure, or it takes too long to recover them, or the region
is inaccessible. One approach is to keep cluster-sql3 as the primary and then
create a new standby and a new secondary instance, as the following diagram
shows.
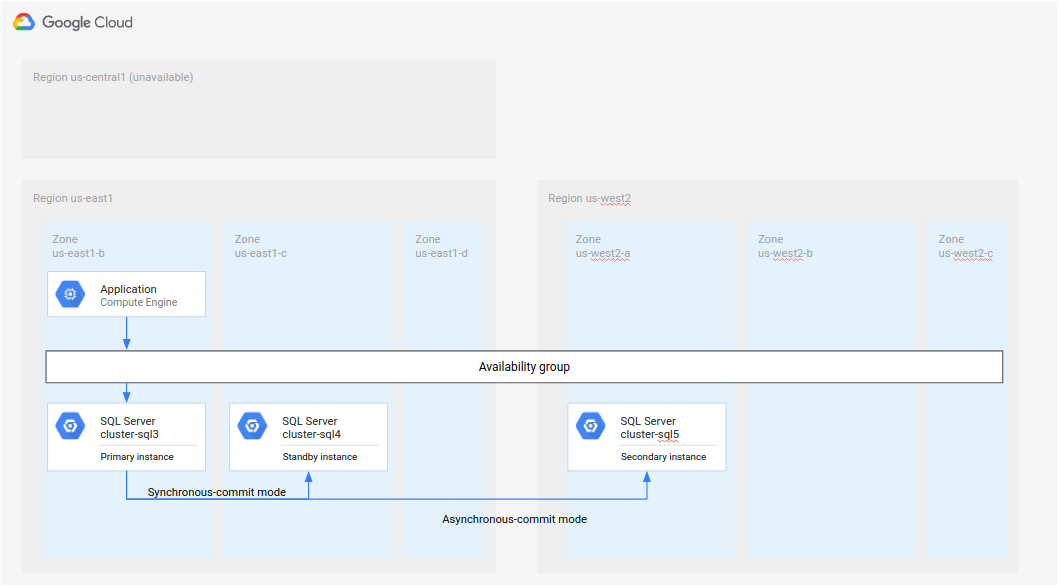
Figure 5. Disaster recovery with unavailable original primary region R1.
This implementation requires you to do the following:
Keep
cluster-sql3as the primary inus-east1.Add a new standby instance (
cluster-sql4) in a different zone inus-east1. This step establishes the new deployment as highly available.Create a new secondary instance (
cluster-sql5) in a separate region, for example,us-west2. This step sets up the new deployment for disaster recovery. The overall deployment is now completed. The database architecture fully supports HA and DR.
(Optional) Execute a fallback when transactions are missing
A less-than-ideal failure is when one or more transactions committed on the primary are not replicated to the secondary at the point of failure (also known as a hard failure). In a failover, all committed transactions that are not replicated are lost.
To test failover steps for this scenario, you need to generate a hard failure. The best approach for generating a hard failure is the following:
- Change the network so that there is no connectivity between the primary and the secondary instances.
- Change the primary in some way—for example, add a table or insert some data.
- Step through the failover process as outlined earlier so that the secondary becomes the new primary.
The steps for the failover process are identical to the ideal scenario, except that the table added to the primary after network connectivity is interrupted isn't visible in the secondary.
Your only option for dealing with a hard failure is to remove the replicas
(cluster-sql1 and cluster-sql2) from the availability group and synchronize
the replicas again. The synchronization changes their state to match the
secondary. Any transaction that was not replicated before the failure is lost.
To add cluster-sql1 as a secondary instance, you can follow the same steps
for adding cluster-sql3 earlier (see
Add the secondary instance to the failover cluster
earlier) with the following difference: cluster-sql3 is now
the primary, not cluster-sql1. You need to replace any instance of
cluster-sql3 with the name of the server you add to the availability group. If
you re-use the same VM (cluster-sql1 and cluster-sql2), you don't need to
add the server to the Windows Server Failover Cluster; only add the SQL Server
instance back to the availability group.
At this point, cluster-sql3 is the primary, and cluster-sql1 and
cluster-sql2 are secondaries. It's now possible to fall back to
cluster-sql1, to make cluster-sql2 the standby, and to make cluster-sql3
the secondary. The system now has the same state it had before the failure.
Automatic failover
Automatically failing over to a secondary instance as the primary can create problems. After the original primary becomes available again, a split-brain situation can occur if some clients access the secondary while others write to the restored primary. In this case, the primary and the secondary are possibly updated in parallel, and their states diverge. To avoid this situation, this tutorial provides instructions for a manual failover in which you decide whether (or when) to fail over.
If you implement an automatic failover, you must ensure that only one of the configured instances is the primary and can be modified. Any standby or secondary instance must not provide write access to any client (except the primary for state replication). Furthermore, you must avoid a rapid chain of subsequent failovers in a short time. For example, a failover every five minutes would not be a dependable disaster recovery strategy. For automated failover processes, you can build in safeguards against problematic scenarios such as these, and even involve a database administrator for complex decisions, if necessary.
Alternative deployment architecture
This tutorial sets up a disaster recovery architecture with a secondary instance that becomes the primary instance in a failover, as shown in the following diagram.

Figure 6. Standard disaster recovery architecture using Microsoft SQL Server.
This means that in case of a failover, the resulting deployment has a single instance until a fallback is possible, or until you configure a standby (for HA) and a secondary (for DR).
An alternative deployment architecture is to configure two secondary instances. Both instances are replicas of the primary. If a failover occurs, you can reconfigure one of the secondaries as a standby. The following diagrams show the deployment architecture before and after a failover.

Figure 7. Standard disaster recovery architecture with two secondary instances.

Figure 8. Standard disaster recovery architecture with two secondary instances after failover.
While you must still make one of the two secondaries a standby (Figure 8), this process is a lot faster than creating and configuring a new standby from scratch.
You can also address DR with a setup that is analogous to this architecture of using two secondary instances. In addition to having two secondaries in a second region (Figure 7), you can deploy another two secondaries in a third region. This setup lets you efficiently create an HA and DR-enabled deployment architecture after a primary region failure.
Clean up
To avoid incurring charges to your Google Cloud account for the resources used in this tutorial:
Delete the project
- In the Google Cloud console, go to the Manage resources page.
- In the project list, select the project that you want to delete, and then click Delete.
- In the dialog, type the project ID, and then click Shut down to delete the project.
What's next
- Explore reference architectures, diagrams, and best practices about Google Cloud. Take a look at our Cloud Architecture Center.