The document describes how to deploy a cold failover topology for a web server by using a managed instance group and persistent disk snapshots. This document is intended for architects and people who work in operations and administrative teams.
You create a managed instance group that runs a single VM with a persistent disk that stores data. Scheduled snapshots of the persistent disk minimize data loss in a failover scenario. An external Application Load Balancer directs users to the VM that runs in the managed instance group, as shown in the following diagram:

If there's an instance failure, the managed instance group tries to recreate the VM in the same zone. If the failure is at the zone level, Cloud Monitoring or similar can let you know there's a problem and you manually create another managed instance group in another zone or region. In either failover scenario, the platform uses the latest persistent disk snapshot to create a replacement disk and attach it to the new VM in the instance group.
In this document, you use the external IP address of the VM or the load balancer to view a basic page on the web server. This approach lets you test the cold failover pattern if you don't have a registered domain name, and without any DNS changes. In a production environment, create and configure a Cloud DNS zone and record that resolves to the external IP address assigned to the load balancer.
This pattern balances the cost difference of running multiple VMs or regional persistent disks with maintaining a certain level of data protection. Your costs are lower as you run one VM and persistent disk, but there's a risk of data loss as the persistent disk snapshots are only taken at a set interval. To reduce your potential data loss, consider deploying a cold recoverable web server that uses regional persistent disks instead.
The following table outlines some high-level differences in data protection options for cold recoverable approaches that use regional persistent disks or persistent disk snapshots. For more information, see High availability options using persistent disks.
| Regional persistent disks | Persistent disk snapshots | |
|---|---|---|
| Data loss - recovery point objective (RPO) | Zero for a single failure, such as sustained outage in a zone or network disconnect. | Any data since the last snapshot was taken, which is typically one hour or
more. The potential data loss depends on your snapshot schedule that controls how frequently snapshots are taken. |
| Recovery time objective (RTO) | Deployment time for a new VM, plus several seconds for the regional persistent disk to be reattached. | Deployment time for a new VM, plus time to create a new persistent disk from
the latest snapshot. The disk create time depends on the size of the snapshot, and could take tens of minutes or hours. |
| Cost | Storage costs double as the regional persistent disk is replicated continuously to another zone. | You only pay for the amount of snapshot space consumed. |
| For more information, see Disks and images pricing. | ||
Objectives
- Create a managed instance group to run a VM with a persistent disk.
- Configure a snapshot schedule to take regular snapshots of the persistent disk.
- Create an instance template and startup script.
- Create and configure an external Application Load Balancer.
- Test the cold web server failover with a replacement managed instance group.
Costs
In this document, you use the following billable components of Google Cloud:
To generate a cost estimate based on your projected usage,
use the pricing calculator.
Before you begin
- Sign in to your Google Cloud account. If you're new to Google Cloud, create an account to evaluate how our products perform in real-world scenarios. New customers also get $300 in free credits to run, test, and deploy workloads.
-
In the Google Cloud console, on the project selector page, select or create a Google Cloud project.
-
Make sure that billing is enabled for your Google Cloud project.
-
Enable the Compute Engine API.
- Install the Google Cloud CLI.
-
To initialize the gcloud CLI, run the following command:
gcloud init
-
In the Google Cloud console, on the project selector page, select or create a Google Cloud project.
-
Make sure that billing is enabled for your Google Cloud project.
-
Enable the Compute Engine API.
- Install the Google Cloud CLI.
-
To initialize the gcloud CLI, run the following command:
gcloud init
You can run the Google Cloud CLI in the Google Cloud console without installing the Google Cloud CLI. To run the gcloud CLI in the Google Cloud console, use Cloud Shell.
Prepare the environment
In this section, you define some variables for your resource names and locations. These variables are used by the Google Cloud CLI commands as you deploy the resources.
Throughout this document, unless otherwise noted, you enter all commands in Cloud Shell or your local development environment.
Replace
PROJECT_IDwith your own project ID. If required, provide your own name suffix for resources, such asapp.Specify a region, such as
us-central1, and two zones within that region, such asus-central1-aandus-central1-f. These zones define where the initial persistent disk and managed instance group is deployed and where you can manually fail over to if needed.PROJECT_ID=PROJECT_ID NAME_SUFFIX=app REGION=us-central1 ZONE1=us-central1-a ZONE2=us-central1-f
Create a VPC and subnet
To provide network access to the VMs, create a Virtual Private Cloud (VPC) and subnet. As the managed instance group works across zones within a single region, only one subnet is created. For more information on the advantages of the custom subnet mode to manage IP address ranges in use in your environment, see Use custom mode VPC networks.
Create the VPC with a custom subnet mode:
gcloud compute networks create network-$NAME_SUFFIX \
    --subnet-mode=custom
If you see a Cloud Shell prompt, authorize this first request to make API calls.
Create a subnet in the new VPC. Define your own address range, such as
10.1.0.0/20, that fits in your network range:gcloud compute networks subnets create subnet-$NAME_SUFFIX-$REGION \ --network=network-$NAME_SUFFIX \ --range=10.1.0.0/20 \ --region=$REGION
Create firewall rules
Create firewall rules to allow web traffic and health checks for the load balancer and managed instance groups:
gcloud compute firewall-rules create allow-http-$NAME_SUFFIX \
    --network=network-$NAME_SUFFIX \
    --direction=INGRESS \
    --priority=1000 \
    --action=ALLOW \
    --rules=tcp:80 \
    --source-ranges=0.0.0.0/0 \
    --target-tags=http-server

gcloud compute firewall-rules create allow-health-check-$NAME_SUFFIX \
    --network=network-$NAME_SUFFIX \
    --action=allow \
    --direction=ingress \
    --source-ranges=130.211.0.0/22,35.191.0.0/16 \
    --target-tags=allow-health-check \
    --rules=tcp:80
The HTTP rule allows traffic to any VM where the
http-servertag is applied, and from any source using the0.0.0.0/0range. For the health check rule, default ranges for Google Cloud are set to allow the platform to correctly check the health of resources.To allow SSH traffic for the initial configuration of a base VM image, scope the firewall rule to your environment using the
--source-rangeparameter. You might need to work with your network team to determine what source ranges your organization uses.Replace
IP_ADDRESS_SCOPEwith your own IP address scopes:gcloud compute firewall-rules create allow-ssh-$NAME_SUFFIX \ --network=network-$NAME_SUFFIX \ --direction=INGRESS \ --priority=1000 \ --action=ALLOW \ --rules=tcp:22 \ --source-ranges=IP_ADDRESS_SCOPEAfter you create the firewall rules, verify that the three rules have been added:
gcloud compute firewall-rules list \
    --project=$PROJECT_ID \
    --filter="NETWORK=network-$NAME_SUFFIX"
The following example output shows the three rules have been correctly created:
NAME                    NETWORK      DIRECTION  PRIORITY  ALLOW
allow-health-check-app  network-app  INGRESS    1000      tcp:80
allow-http-app          network-app  INGRESS    1000      tcp:80
allow-ssh-app           network-app  INGRESS    1000      tcp:22
Create and configure a base VM image
To create identical VMs that you deploy without additional configuration, you use a custom VM image. This image captures the OS and Apache configuration, and is used to create each VM in the managed instance group in the next steps.
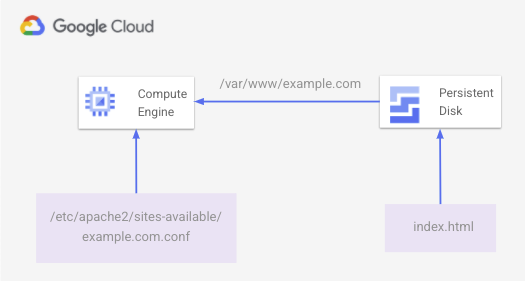
You use a persistent disk to store the application data. In this document, you use a basic Apache website to serve the application. Later in this document, you create a snapshot schedule that's attached to this persistent disk to create automated disk snapshots.
On the VM, you create a basic index.html file on the persistent disk and
mount it to /var/www/example.com. An Apache configuration file at
/etc/apache2/sites-available/example.com.conf serves web content from the
mounted persistent disk location.
The following diagram shows the basic HTML page served by Apache that's stored on the persistent disk:
You build this environment in the following steps.
Create a 10 GiB SSD. Understand your storage needs and the associated costs of paying for the provisioned space, not consumed space. For more information, see persistent disk pricing.
gcloud compute disks create disk-$NAME_SUFFIX \
    --zone $ZONE1 \
    --size=10 \
    --type=pd-ssd
Create a base VM with the attached persistent disk:
gcloud compute instances create vm-base-$NAME_SUFFIX \
    --zone=$ZONE1 \
    --machine-type=n1-standard-1 \
    --subnet=subnet-$NAME_SUFFIX-$REGION \
    --tags=http-server \
    --image=debian-10-buster-v20210721 \
    --image-project=debian-cloud \
    --boot-disk-size=10GB \
    --boot-disk-type=pd-balanced \
    --boot-disk-device-name=vm-base-$NAME_SUFFIX \
    --disk=mode=rw,name=disk-$NAME_SUFFIX,device-name=disk-$NAME_SUFFIX
You use parameters defined at the start of this document to name the VM and connect to the correct subnet. Names are also assigned from the parameters for the boot disk and data disk.
To install and configure the simple website, first connect to the base VM using SSH:
gcloud compute ssh vm-base-$NAME_SUFFIX --zone=$ZONE1In your SSH session to the VM, create a script to configure the VM in an editor of your choice. The following example uses Nano as the editor:
nano configure-vm.shPaste the following configuration script into the file. Update the
NAME_SUFFIXvariable to match the value set at the start of this document, such as app:#!/bin/bash NAME_SUFFIX=app # Create directory for the basic website files sudo mkdir -p /var/www/example.com sudo chmod a+w /var/www/example.com sudo chown -R www-data: /var/www/example.com # Find the disk name, then format and mount it DISK_NAME="google-disk-$NAME_SUFFIX" DISK_PATH="$(find /dev/disk/by-id -name "${DISK_NAME}" | xargs -I '{}' readlink -f '{}')" sudo mkfs.ext4 -m 0 -E lazy_itable_init=0,lazy_journal_init=0,discard $DISK_PATH sudo mount -o discard,defaults $DISK_PATH /var/www/example.com # Install Apache, additional utilities, and cloud-init sudo apt-get update && sudo apt-get -y install apache2 moreutils cloud-init # Write out a basic HTML file to the mounted persistent disk sudo tee -a /var/www/example.com/index.html >/dev/null <<'EOF' <!doctype html> <html lang=en> <head> <meta charset=utf-8> <title>HA / DR example</title> </head> <body> <p>Welcome to a test web server with persistent disk snapshots!</p> </body> </html> EOF # Write out an Apache configuration file sudo tee -a /etc/apache2/sites-available/example.com.conf >/dev/null <<'EOF' <VirtualHost *:80> ServerName www.example.com ServerAdmin webmaster@localhost DocumentRoot /var/www/example.com ErrorLog ${APACHE_LOG_DIR}/error.log CustomLog ${APACHE_LOG_DIR}/access.log combined </VirtualHost> EOF # Enable the Apache configuration file and reload service sudo a2dissite 000-default sudo a2ensite example.com.conf sudo systemctl reload apache2Write out the file and exit your editor. For example, in Nano you use
Ctrl-Oto write out the file, then exit withCtrl-X.Make the configuration script executable, then run it:
chmod +x configure-vm.sh
./configure-vm.sh
If there's an instance failure and the managed instance group needs to create a replacement from this base VM, the application data must be available. The following steps should automatically run on each new VM:
- Get some info from the metadata server.
- Get the latest snapshot for the persistent disk.
- Create a disk from this latest snapshot.
- Attach the new disk to the VM.
- Mount the disk within the VM.
Create a startup script named
app-startup.shthat performs these steps required for the VM. This startup script is applied to an instance template in a following step.sudo mkdir /opt/cloud-init-scripts sudo tee -a /opt/cloud-init-scripts/app-startup.sh >/dev/null <<'EOF' #!/bin/bash # Install jq and get an access token for API requests apt-get install -y jq OAUTH_TOKEN=$(curl "http://metadata.google.internal/computeMetadata/v1/instance/service-accounts/default/token" \ -H "Metadata-Flavor: Google" --silent | jq -r '.access_token') # Make a request against the metadata server to determine the project name, # instance name, and what zone it's running in ZONE_INFO=$(curl http://metadata.google.internal/computeMetadata/v1/instance/zone \ -H "Metadata-Flavor: Google" --silent) PROJECT_NAME=$(curl http://metadata.google.internal/computeMetadata/v1/instance/zone \ -H "Metadata-Flavor: Google" --silent | awk -v FS="/" '{print $2}') ZONE_NAME=$(curl http://metadata.google.internal/computeMetadata/v1/instance/zone \ -H "Metadata-Flavor: Google" --silent | sed 's:.*/::') INSTANCE_NAME=$(curl http://metadata.google.internal/computeMetadata/v1/instance/name \ -H "Metadata-Flavor: Google" --silent) # Get the latest snapshot of the app disk LATEST_SNAPSHOT=$(curl -X GET -H "Authorization: Bearer $OAUTH_TOKEN" \ https://compute.googleapis.com/compute/v1/projects/$PROJECT_NAME/global/snapshots \ --silent | jq -s '.[].items[] | select(.name | contains("disk-$NAME")) | .name' \ | sort -r | head -n 1 | tr -d '"') # Create a persistent disk using the latest persistent disk snapshot curl -X POST -H "Authorization: Bearer $OAUTH_TOKEN" -H "Content-Type: application/json; charset=utf-8" \ https://compute.googleapis.com/compute/v1/$ZONE_INFO/disks \ --data '{"name":"'$LATEST_SNAPSHOT'-restored","sizeGb":"10","type":"zones/'$ZONE_NAME'/diskTypes/pd-ssd","sourceSnapshot":"https://www.googleapis.com/compute/v1/projects/'$PROJECT_NAME'/global/snapshots/'$LATEST_SNAPSHOT'"}' # Wait for the persistent disk to be created from the disk snapshot DISK_STATUS=$(curl -X GET -H "Authorization: Bearer $OAUTH_TOKEN" \ https://compute.googleapis.com/compute/v1/projects/$PROJECT_NAME/zones/$ZONE_NAME/disks/$LATEST_SNAPSHOT-restored \ --silent | jq -r .status) while [ $DISK_STATUS != "READY" ] do sleep 2 DISK_STATUS=$(curl -X GET -H "Authorization: Bearer $OAUTH_TOKEN" \ https://compute.googleapis.com/compute/v1/projects/$PROJECT_NAME/zones/$ZONE_NAME/disks/$LATEST_SNAPSHOT-restored \ --silent | jq -r .status) done # Attach the new persistent disk created from the snapshot to the VM curl -X POST -H "Authorization: Bearer $OAUTH_TOKEN" -H "Content-Type: application/json; charset=utf-8" \ https://compute.googleapis.com/compute/v1/$ZONE_INFO/instances/$INSTANCE_NAME/attachDisk \ --data '{ "source": "/compute/v1/'$ZONE_INFO'/disks/'$LATEST_SNAPSHOT'-restored"}' # Wait for the persistent disk to be attached before mounting ATTACH_STATUS=$(curl -X GET -H "Authorization: Bearer $OAUTH_TOKEN" \ https://compute.googleapis.com/compute/v1/projects/$PROJECT_NAME/zones/$ZONE_NAME/instances/$INSTANCE_NAME \ --silent | jq '.disks[] | select(.source | contains("disk-"))') while [ -z "$ATTACH_STATUS" ] do sleep 2 ATTACH_STATUS=$(curl -X GET -H "Authorization: Bearer $OAUTH_TOKEN" GET \ https://compute.googleapis.com/compute/v1/projects/$PROJECT_NAME/zones/$ZONE_NAME/instances/$INSTANCE_NAME \ --silent | jq '.disks[] | select(.source | contains("disk-"))') done # With the disk attached, mount the disk and restart Apache echo UUID=`blkid -s UUID -o value /dev/sdb` /var/www/example.com ext4 discard,defaults,nofail 0 2 \ | tee -a /etc/fstab mount -a systemctl reload apache2 # Remove jq so it's not left on the VM apt-get remove -y jq EOFTo apply the
NAME_SUFFIXvariable you defined at the start of the document into the startup script, such asapp, use theenvsubstcommand:export NAME=app envsubst '$NAME' < "/opt/cloud-init-scripts/app-startup.sh" \ | sudo sponge "/opt/cloud-init-scripts/app-startup.sh"Exit the SSH session to the VM:
exitGet the IP address of the VM and use
curlto see the basic web page:curl $(gcloud compute instances describe vm-base-$NAME_SUFFIX \ --zone $ZONE1 \ --format="value(networkInterfaces.accessConfigs.[0].natIP)")The basic website is returned, as shown in the following example output:
<!doctype html>

<html lang=en>
<head>
<meta charset=utf-8>
    <title>HA / DR example</title>
</head>
<body>
    <p>Welcome to a test web server with persistent disk snapshots!</p>
</body>
</html>
This step confirms that Apache is configured correctly, and the page is loaded from the attached persistent disk. In the following sections, you create an image using this base VM and configure an instance template with a startup script.
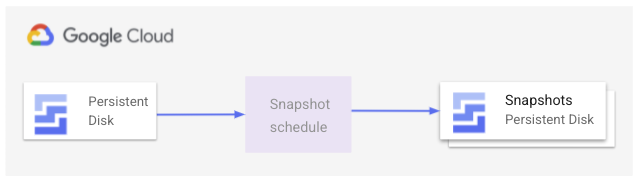
Create a persistent disk snapshot schedule
To make sure that VMs created in the managed instance group always have the latest data from the persistent disk, you create a snapshot schedule. This schedule takes automatic snapshots of a persistent disk at defined times, and controls how long to retain the snapshots. The following image shows how this snapshot process works:
Think about your application needs and business goals in how often you should take snapshots - for example, a static website needs less frequent snapshots than an active application writing data to disk.
For more information on how to determine the best approach for your own applications and which recovery method to use, see the disaster recovery planning guide.
In this scenario, you use a snapshot schedule to create regular persistent disk snapshots. You define this snapshot schedule in a resource policy. Resource policies let you define actions to run, and attach them to resources in your environment.
In this resource policy, you define a schedule to create a snapshot with the following settings:
- Take a snapshot every 4 hours, starting at 22:00 UTC
- Retain the snapshots for 1 day
Configure this schedule as needed for your environment, such as the start time and how often you want to take the snapshots:
gcloud compute resource-policies create snapshot-schedule snapshot-schedule-$NAME_SUFFIX \
    --description "Snapshot persistent disk every 4 hours" \
    --max-retention-days 1 \
    --start-time 22:00 \
    --hourly-schedule 4 \
    --region $REGION
For more information, see how to use scheduled snapshots for persistent disks.
To use the snapshot schedule, attach the resource policy to your persistent disk. Specify the name of your persistent disk and the resource policy created in the previous step:
gcloud compute disks add-resource-policies disk-$NAME_SUFFIX \
    --resource-policies snapshot-schedule-$NAME_SUFFIX \
    --zone $ZONE1
You can't complete the rest of this document and see the managed instance group in action until the first disk snapshot has been created. Manually create a disk snapshot now, and let the resource policy snapshot schedule create additional snapshots as defined:
gcloud compute disks snapshot disk-$NAME_SUFFIX \
    --zone=$ZONE1 \
    --snapshot-names=disk-$NAME_SUFFIX-$(date "+%Y%m%d%H%M%S")
Create a service account
Each VM in the managed instance group created in the next steps needs to run a startup script. This startup script creates a persistent disk from a snapshot, then attaches it to the VM. As a best security practice, create a new service account with only the permissions required to perform these disk operations. You then assign this service account to the VM.
Create a service account to use with the VMs in the managed instance group:
gcloud iam service-accounts create instance-sa-$NAME_SUFFIX \
    --description="Service account for HA/DR example" \
    --display-name="HA/DR for VM instances"
Create a custom role and assign only the permissions required to perform the disk management tasks. The following permissions are required:
compute.snapshots.listcompute.snapshots.useReadOnlycompute.disks.getcompute.disks.createcompute.instances.getcompute.instances.attachDiskcompute.disks.use
gcloud iam roles create instance_snapshot_management_$NAME_SUFFIX \
    --project=$PROJECT_ID \
    --title="Snapshot management for VM instances" \
    --description="Custom role to allow an instance to create a persistent disk from a snapshot and attach to VM." \
    --permissions=compute.snapshots.list,compute.snapshots.useReadOnly,compute.disks.get,compute.disks.create,compute.instances.get,compute.instances.attachDisk,compute.disks.use \
    --stage=GA
Add the required role bindings for the new service account:
gcloud projects add-iam-policy-binding $PROJECT_ID \
    --member="serviceAccount:instance-sa-$NAME_SUFFIX@$PROJECT_ID.iam.gserviceaccount.com" \
    --role="projects/$PROJECT_ID/roles/instance_snapshot_management_$NAME_SUFFIX"

gcloud projects add-iam-policy-binding $PROJECT_ID \
    --member="serviceAccount:instance-sa-$NAME_SUFFIX@$PROJECT_ID.iam.gserviceaccount.com" \
    --role="roles/iam.serviceAccountUser"
Create a VM image and instance template
To create identical VMs that can be automatically deployed without additional configuration required, you use a custom VM image. This image captures the OS and Apache configuration. Each VM created in the managed instance group in the next steps uses this image.
Before you can create an image, you must stop the VM:
gcloud compute instances stop vm-base-$NAME_SUFFIX --zone=$ZONE1Create an image of the base VM configured in the previous section:
gcloud compute images create image-$NAME_SUFFIX \
    --source-disk=vm-base-$NAME_SUFFIX \
    --source-disk-zone=$ZONE1 \
    --storage-location=$REGION
You use cloud-init to run the previous startup script the first time a VM in the managed instance groups boots. A regular startup script applied to the VM runs every time the VM boots, such as if you the VM reboots after updates.
Create a cloud-init configuration file to use with the instance template:
tee -a cloud-init.yaml >/dev/null <<'EOF'
#cloud-config

runcmd:
 - [ bash, /opt/cloud-init-scripts/app-startup.sh ]
EOF
Create an instance template that applies the cloud-init configuration to run the startup script that creates a disk from snapshot then attaches and mounts the disk to the VM:
gcloud compute instance-templates create template-$NAME_SUFFIX \
    --machine-type=n1-standard-1 \
    --subnet=projects/$PROJECT_ID/regions/$REGION/subnetworks/subnet-$NAME_SUFFIX-$REGION \
    --tags=http-server \
    --image=image-$NAME_SUFFIX \
    --scopes cloud-platform \
    --service-account="instance-sa-$NAME_SUFFIX@$PROJECT_ID.iam.gserviceaccount.com" \
    --metadata-from-file user-data=cloud-init.yaml
Create a managed instance group
A managed instance group runs the VMs. The managed instance group runs in a defined zone, and monitors the health of the VMs. If there's a failure and the VM stops running, the managed instance group tries to recreate another VM in the same zone and creates a persistent disk from the latest snapshot. If the failure is at the zone level, you must manually perform the cold failover and create another managed instance group in a different zone. The same custom image and instance template automatically configures the VM in an identical way.
Create a health check to monitor the VMs in the managed instance group. This health check makes sure the VM responds on port 80. For your own applications, monitor the appropriate ports to check the VM health.
gcloud compute health-checks create http http-basic-check-$NAME_SUFFIX --port 80Create a managed instance group with only one VM. This single VM boots and creates a persistent disk from the latest snapshot, then mounts it and starts to serve web traffic.
gcloud compute instance-groups managed create instance-group-$NAME_SUFFIX-$ZONE1 \
    --base-instance-name=instance-vm-$NAME_SUFFIX \
    --template=template-$NAME_SUFFIX \
    --size=1 \
    --zone=$ZONE1 \
    --health-check=http-basic-check-$NAME_SUFFIX
Create and configure a load balancer
For users to access your website, you need to allow traffic through to the VMs that run in the managed instance group. You also want to automatically redirect traffic to new VMs if there's a zone failure in a managed instance group.
In the following section, you create an external load balancer with a backend service for HTTP traffic on port 80, use the health check created in the previous steps, and map an external IP address through to the backend service.
For more information, see How to set up a simple external HTTP load balancer.
Create and configure the load balancer for your application:
# Configure port rules for HTTP port 80
gcloud compute instance-groups set-named-ports \
    instance-group-$NAME_SUFFIX-$ZONE1 \
    --named-ports http:80 \
    --zone $ZONE1

# Create a backend service and add the managed instance group to it
gcloud compute backend-services create \
    web-backend-service-$NAME_SUFFIX \
    --protocol=HTTP \
    --port-name=http \
    --health-checks=http-basic-check-$NAME_SUFFIX \
    --global

gcloud compute backend-services add-backend \
    web-backend-service-$NAME_SUFFIX \
    --instance-group=instance-group-$NAME_SUFFIX-$ZONE1 \
    --instance-group-zone=$ZONE1 \
    --global

# Create a URL map for the backend service
gcloud compute url-maps create web-map-http-$NAME_SUFFIX \
    --default-service web-backend-service-$NAME_SUFFIX

# Configure forwarding for the HTTP traffic
gcloud compute target-http-proxies create \
    http-lb-proxy-$NAME_SUFFIX \
    --url-map web-map-http-$NAME_SUFFIX

gcloud compute forwarding-rules create \
    http-content-rule-$NAME_SUFFIX \
    --global \
    --target-http-proxy=http-lb-proxy-$NAME_SUFFIX \
    --ports=80
Get the IP address of the forwarding rule for the web traffic:
IP_ADDRESS=$(gcloud compute forwarding-rules describe http-content-rule-$NAME_SUFFIX \
    --global \
    --format="value(IPAddress)")
Use
curl, or open your web browser, to view the website using the IP address of the load balancer from the previous step:curl $IP_ADDRESSIt takes a few minutes for the load balancer to finish deploying and to correctly direct traffic to your backend. An HTTP 404 or 502 error is returned if the load balancer is still deploying. If needed, wait a few minutes and try to access the website again.
The basic website is returned, as shown in the following example output:
<!doctype html>

<html lang=en>
<head>
<meta charset=utf-8>
    <title>HA / DR example</title>
</head>
<body>
    <p>Welcome to a Compute Engine website with warm failover to Cloud Storage!</p>
</body>
</html>
Simulate a zone failure and recovery
Review the resource deployments before simulating a failure at the zone level. All of the resources have been created to support the following environment:
- One VM runs in a managed instance group with an attached persistent disk that stores a basic website.
- Snapshots are regularly taken of the persistent disk using a resource policy snapshot schedule.
- A startup script is applied to an instance template so any VMs created in the managed instance group create a persistent disk from the last disk snapshot and attach it.
- A health check monitors the status of the VM inside the managed instance group.
- The external Application Load Balancer directs users to the VM that runs in the managed instance group.
- If the VM fails, the managed instance group tries to recreate a VM in the same zone. If the failure is at the zone level, you must manually create a replacement managed instance group in another, working zone.
In a production environment, you might get an alert using Cloud Monitoring or other monitoring solution when there's a problem. This alert prompts a human to understand the scope of the failure before you manually create a replacement managed instance group in another, working zone. An alternative approach is to use your monitoring solution to automatically respond to outages with the managed instance group.
When you or your monitoring solution determine the most appropriate action is to fail over, create a replacement managed instance group. In this document, you manually create this replacement resource.
To simulate a failure at the zone level, delete the load balancer backend and managed instance group:
gcloud compute backend-services remove-backend \
    web-backend-service-$NAME_SUFFIX \
    --instance-group=instance-group-$NAME_SUFFIX-$ZONE1 \
    --instance-group-zone=$ZONE1 \
    --global

gcloud compute instance-groups managed delete instance-group-$NAME_SUFFIX-$ZONE1 \
      --zone=$ZONE1
When prompted, confirm the request to delete the managed instance group.
In a production environment, your monitoring system generates an alert to now prompt for cold failover action.
Use
curlor your web browser again to access the IP address of the load balancer:curl $IP_ADDRESS --max-time 5The
curlrequest fails as there are no healthy targets for the load balancer.To simulate the cold failover, create a managed instance group in a different zone:
gcloud compute instance-groups managed create instance-group-$NAME_SUFFIX-$ZONE2 \
    --template=template-$NAME_SUFFIX \
    --size=1 \
    --zone=$ZONE2 \
    --health-check=http-basic-check-$NAME_SUFFIX
The VM image, instance template, and persistent disk maintain all the configuration for the application instance.
Update the load balancer to add the new managed instance group and VM:
gcloud compute instance-groups set-named-ports \
    instance-group-$NAME_SUFFIX-$ZONE2 \
    --named-ports http:80 \
    --zone $ZONE2

gcloud compute backend-services add-backend \
    web-backend-service-$NAME_SUFFIX \
    --instance-group=instance-group-$NAME_SUFFIX-$ZONE2 \
    --instance-group-zone=$ZONE2 \
    --global
Use
curlor your web browser one more time to access the IP address of the load balancer that directs traffic to the VM that runs in the managed instance group:curl $IP_ADDRESSIt takes a few minutes for the VM to finish deploying and restore data from the latest persistent disk snapshot. An HTTP 404 or 502 error is returned if the VM is still deploying, and the default Apache is displayed if still restoring data. If needed, wait a few minutes and try to access the website again.
The following example response shows the web page correctly running on the VM:
<!doctype html>
<html lang=en>
<head>
<meta charset=utf-8>
    <title>HA / DR example</title>
</head>
<body>
    <p>Welcome to a test web server with persistent disk snapshots!</p>
</body>
</html>
Check the health status of the managed instance group:
gcloud compute instance-groups managed list-instances instance-group-$NAME_SUFFIX-$ZONE2 \
    --zone $ZONE2
The following example output shows the status of the VM as
RUNNINGandHEALTHY:NAME ZONE STATUS HEALTH_STATE ACTION instance-vm-app us-central1-f RUNNING HEALTHY NONETo verify the attached persist disk was created from a snapshot, look at the the source. Specify the instance
NAMEdisplayed from the previouslist-instancescommand.gcloud compute instances describe NAME \ --zone=$ZONE2 \ --format="value(disks.[1].source)"The following example output shows the persistent disk is named disk-app-us-central1-a-20210630165529-umopkt17-restored. The -restored suffix is added by the startup script to the name of the latest disk snapshot:
https://www.googleapis.com/compute/v1/projects/project/zones/us-central1-f/disks/disk-app-us-central1-a-20210630165529-umopkt17-restored
Clean up
To avoid incurring charges to your Google Cloud account for the resources used in this tutorial, either delete the project that contains the resources, or keep the project and delete the individual resources.
To delete the individual resources created in this document, complete the following steps.
Delete the load balancer configuration:
gcloud compute forwarding-rules delete \
    http-content-rule-$NAME_SUFFIX --global --quiet

gcloud compute target-http-proxies delete \
    http-lb-proxy-$NAME_SUFFIX --quiet

gcloud compute url-maps delete web-map-http-$NAME_SUFFIX --quiet

gcloud compute backend-services delete \
    web-backend-service-$NAME_SUFFIX --global --quiet
Delete the managed instance group and health check:
gcloud compute instance-groups managed delete instance-group-$NAME_SUFFIX-$ZONE2 \
    --zone=$ZONE2 --quiet

gcloud compute health-checks delete http-basic-check-$NAME_SUFFIX --quiet
Delete the instance template, cloud-init configuration, images, base VM, persistent disk, and snapshot schedule.
gcloud compute instance-templates delete template-$NAME_SUFFIX --quiet

rm cloud-init.yaml

gcloud compute images delete image-$NAME_SUFFIX --quiet

gcloud compute instances delete vm-base-$NAME_SUFFIX --zone=$ZONE1 --quiet

gcloud compute disks delete disk-$NAME_SUFFIX --zone=$ZONE1 --quiet

gcloud compute resource-policies delete \
    snapshot-schedule-$NAME_SUFFIX --region $REGION --quiet
List and then delete snapshots and disks created by the instances:
gcloud compute disks list --filter="name:disk-$NAME_SUFFIX" \
    --uri | xargs gcloud compute disks delete

gcloud compute snapshots list --filter="name:disk-$NAME_SUFFIX" \
    --uri | xargs gcloud compute snapshots delete
Delete the custom role and service account:
gcloud iam roles delete instance_snapshot_management_$NAME_SUFFIX \
  --project=$PROJECT_ID --quiet

gcloud iam service-accounts delete \
    instance-sa-$NAME_SUFFIX@$PROJECT_ID.iam.gserviceaccount.com --quiet
Delete the firewall rules:
gcloud compute firewall-rules delete allow-health-check-$NAME_SUFFIX --quiet

gcloud compute firewall-rules delete allow-ssh-$NAME_SUFFIX --quiet

gcloud compute firewall-rules delete allow-http-$NAME_SUFFIX --quiet
Delete the subnet and VPC:
gcloud compute networks subnets delete \
    subnet-$NAME_SUFFIX-$REGION --region=$REGION --quiet

gcloud compute networks delete network-$NAME_SUFFIX --quiet
What's next
- For an alternative approach to reduce your potential data loss, see Deploy cold recoverable application that uses regional persistent disks.
- To learn how how to determine the best approach for your own applications and which recovery method to use, see the Disaster recovery planning guide.
- To see other patterns for applications, such as cold and hot failover, see Disaster recovery scenarios for applications.
- For more ways to handle scale and availability, see the Patterns for scalable and resilient apps.
- Explore reference architectures, diagrams, and best practices about Google Cloud. Take a look at our Cloud Architecture Center.