This guide helps you understand, deploy, and use the Data warehouse with BigQuery Jump Start Solution. This solution demonstrates how you can build a data warehouse in Google Cloud using BigQuery as your data warehouse, with Looker Studio as a dashboard and visualization tool. The solution also uses the generative AI capabilities of Vertex AI to generate text that summarizes the analysis.
Common use cases for building a data warehouse include the following:
- Aggregating and creating marketing analytics warehouses to improve revenue or other customer metrics.
- Building financial reports and analyses.
- Building operational dashboards to improve corporate performance.
This document is intended for developers who have some background with data analysis and have used a database to perform an analysis. It assumes that you're familiar with basic cloud concepts, though not necessarily Google Cloud. Experience with Terraform is helpful but not required in order to deploy this solution through the console.
Objectives
- Learn how data flows into a cloud data warehouse, and how the data can be transformed using SQL.
- Build dashboards from the data to perform data analysis.
- Schedule SQL statements to update data on a common recurrence.
- Create a machine learning model to predict data values over time.
- Use generative AI to summarize the results of your machine learning model.
Products used
The solution uses the following Google Cloud products:
- BigQuery: A fully managed, highly scalable data warehouse with built-in machine learning capabilities.
- Cloud Storage: An enterprise-ready service that provides low-cost, no-limit object storage for diverse data types. Data is accessible from within and outside of Google Cloud and is replicated geo-redundantly.
- Looker Studio: Self-service business intelligence platform that helps you create and share data insights.
- Vertex AI: A machine learning (ML) platform that lets you train and deploy ML models and AI applications.
The following Google Cloud products are used to stage data in the solution for first use:
- Workflows: A fully managed orchestration platform that executes services in a specified order as a workflow. Workflows can combine services, including custom services hosted on Cloud Run or Cloud Functions, Google Cloud services such as BigQuery, and any HTTP-based API.
- Cloud Functions: A serverless execution environment for building and connecting cloud services.
Architecture
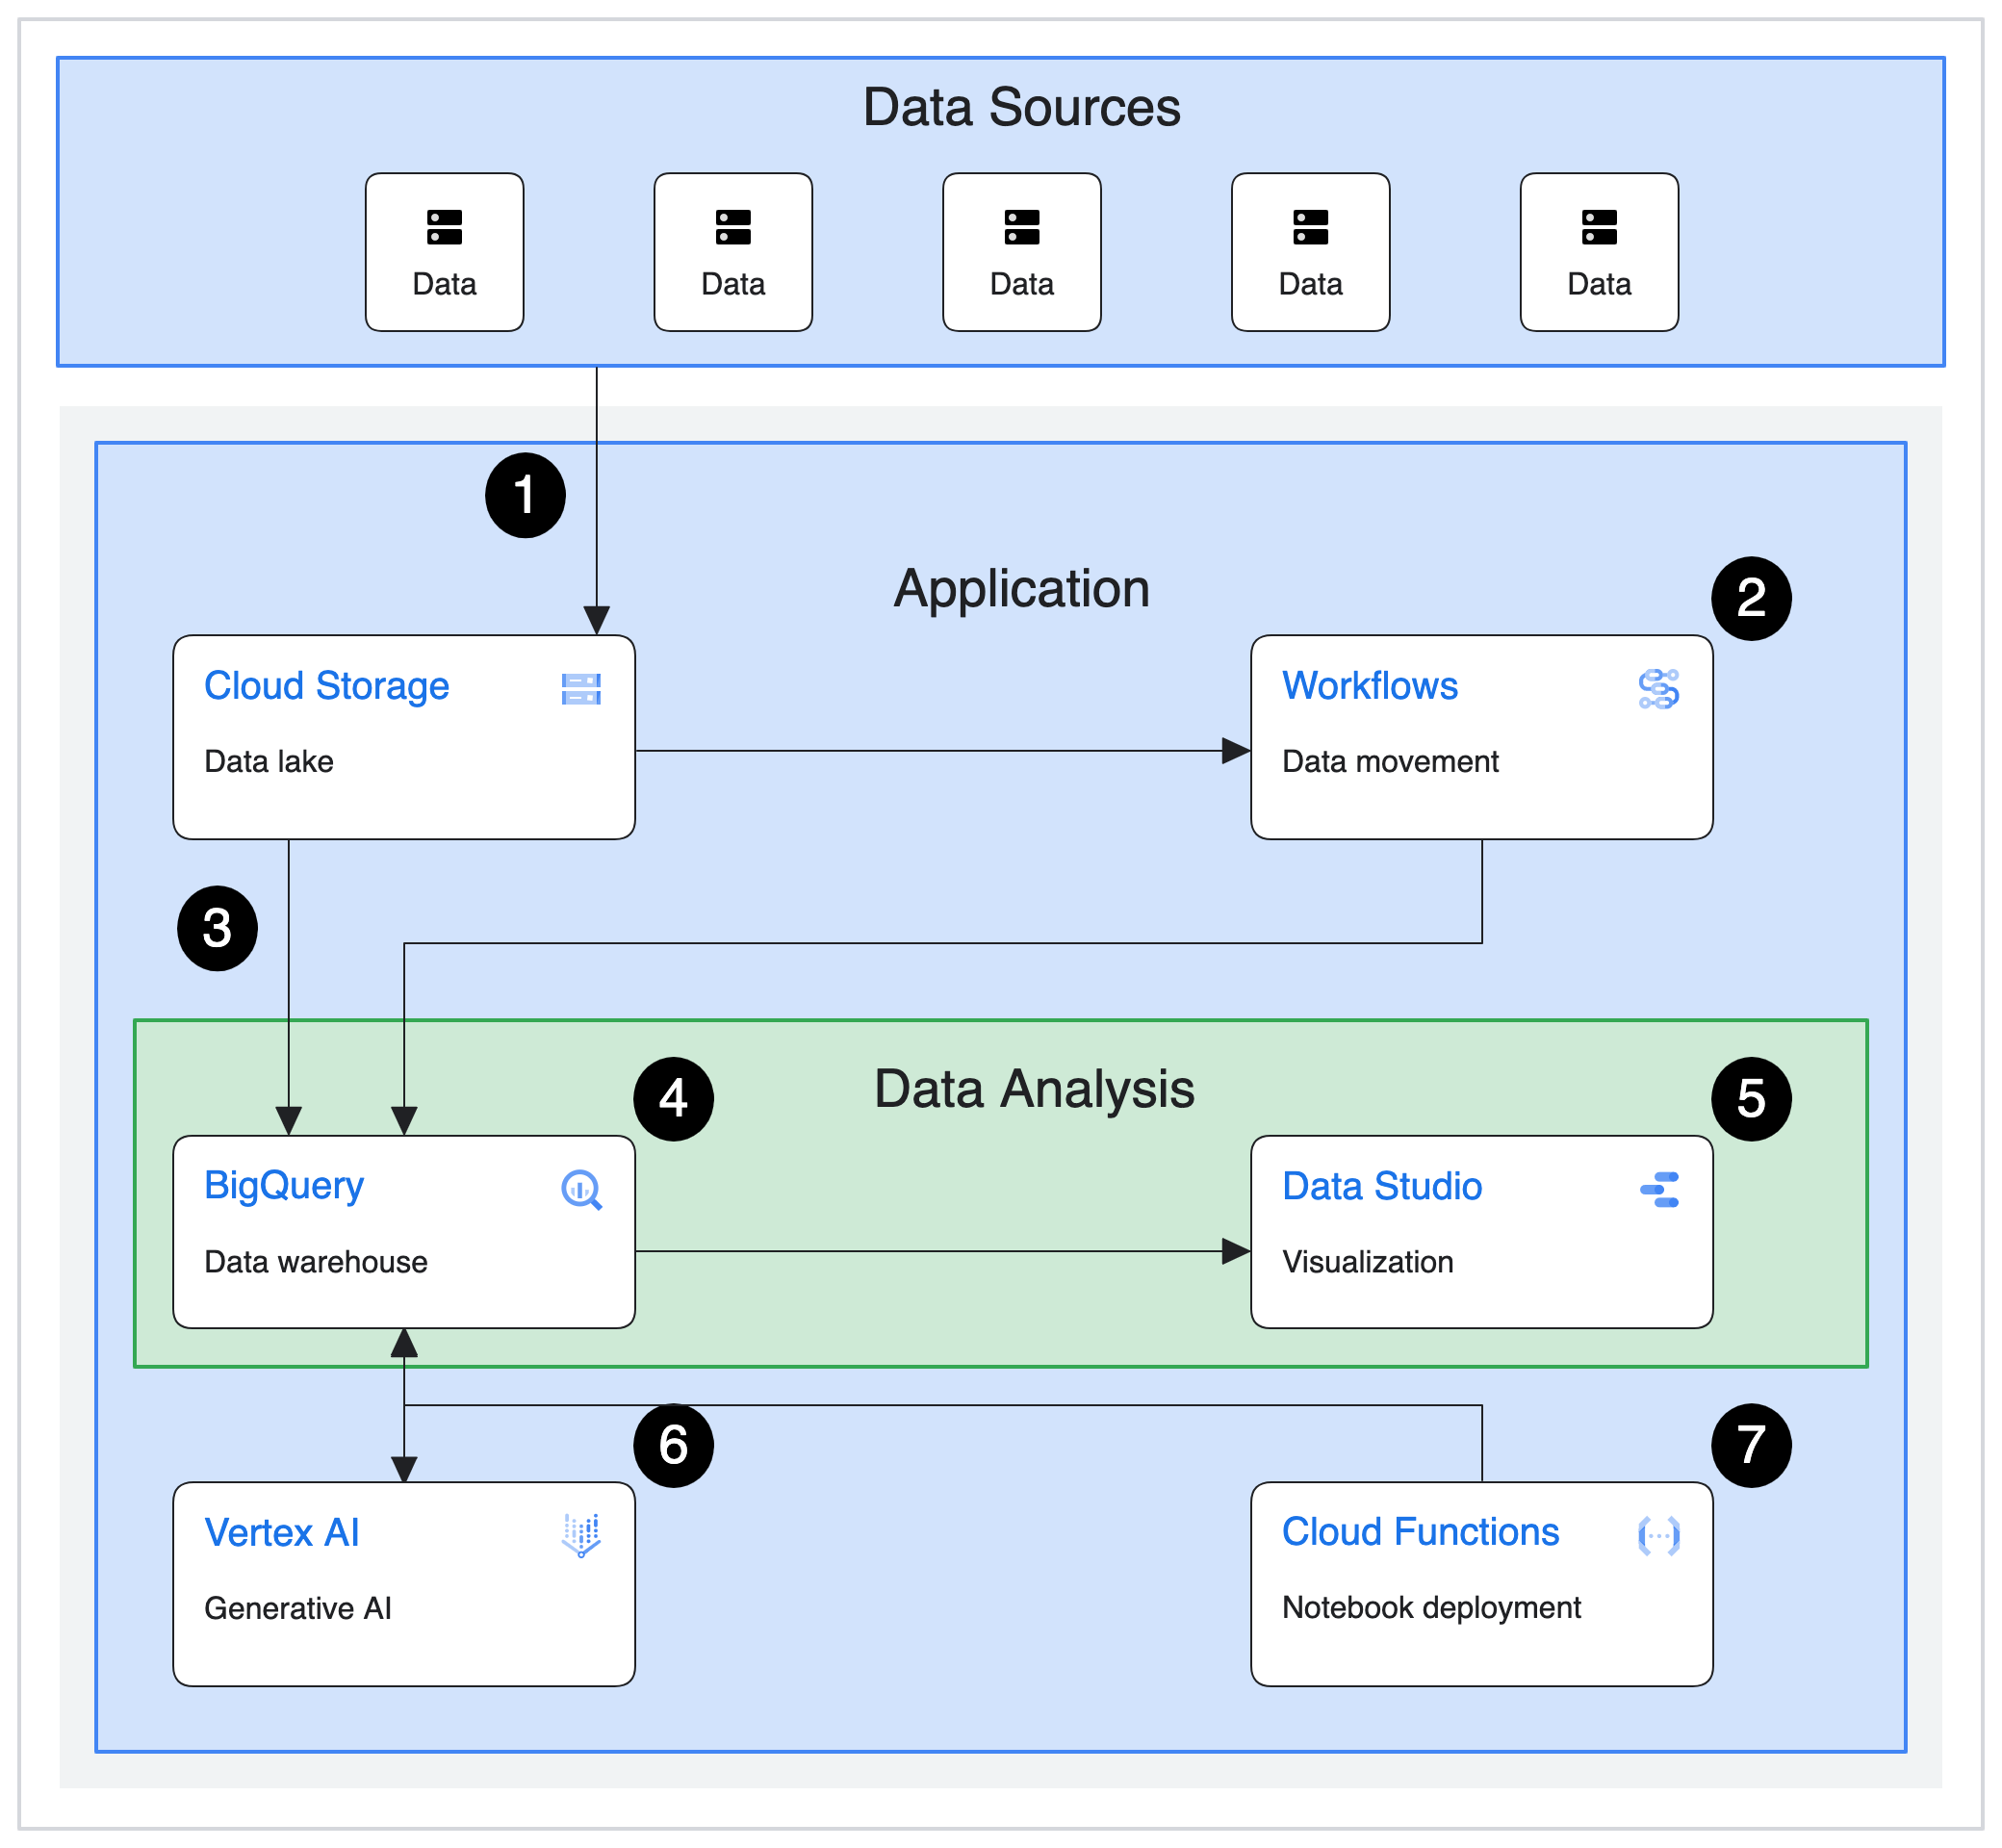
The example warehouse that this solution deploys analyzes fictional ecommerce data from TheLook to understand company performance over time. The following diagram shows the architecture of the Google Cloud resources that the solution deploys.
Solution flow
The architecture represents a common data flow to populate and transform data for a data warehouse:
- Data is sent to a Cloud Storage bucket.
- Workflows facilitates the data movement.
- Data is loaded into BigQuery as a BigLake table using a SQL stored procedure.
- Data is transformed in BigQuery by using a SQL stored procedure.
- Dashboards are created from the data to further analyze with Looker Studio.
- Data is analyzed using a k-means model built with BigQuery ML. The analysis identifies common patterns, which are summarized by using the generative AI capabilities from Vertex AI through BigQuery.
- Cloud Functions creates Python notebooks with additional learning content.
Cost
For an estimate of the cost of the Google Cloud resources that the data warehouse with BigQuery solution uses, see the precalculated estimate in the Google Cloud Pricing Calculator.
Use the estimate as a starting point to calculate the cost of your deployment. You can modify the estimate to reflect any configuration changes that you plan to make for the resources that are used in the solution.
The precalculated estimate is based on assumptions for certain factors, including the following:
- The Google Cloud locations where the resources are deployed.
The amount of time that the resources are used.
The data region where the data is staged to.
Deploy the solution
This section guides you through the process of deploying the solution.
Create or choose a Google Cloud project
When you deploy the solution, you choose the Google Cloud project where the resources are deployed. When you're deciding whether to use an existing project or to create a new project, consider the following factors:
- If you create a project for the solution, then when you no longer need the deployment, you can delete the project and avoid continued billing. If you use an existing project, you must delete the deployment when you no longer need it.
- Using a new project can help avoid conflicts with previously provisioned resources, such as resources that are used for production workloads.
If you want to deploy the solution in a new project, create the project before you begin the deployment.
To create a project, complete the following steps:
-
In the Google Cloud console, go to the project selector page.
-
To begin creating a Google Cloud project, click Create project.
-
Name your project. Make a note of your generated project ID.
-
Edit the other fields as needed.
-
To create the project, click Create.
Get the required IAM permissions
To start the deployment process, you need the Identity and Access Management (IAM)
permissions that are listed in the following table. If you have the
roles/owner
basic role
for the project in which you plan to deploy the solution, then you
already have all the necessary permissions. If you don't have the roles/owner
role, then ask your administrator to grant these permissions (or the roles that
include these permissions) to you.
| IAM permission required | Predefined role that includes the required permissions |
|---|---|
|
Service Usage Admin ( roles/serviceusage.serviceUsageAdmin) |
|
Service Account Admin ( roles/iam.serviceAccountAdmin) |
|
Project IAM Admin ( roles/resourcemanager.projectIamAdmin) |
config.deployments.createconfig.deployments.list |
Cloud Infrastructure Manager Admin ( roles/config.admin) |
Service account created for the solution
If you start the deployment process through the console, Google creates a service account to deploy the solution on your behalf (and to delete the deployment later if you choose). This service account is assigned certain IAM permissions temporarily; that is, the permissions are revoked automatically after the solution deployment and deletion operations are completed. Google recommends that after you delete the deployment, you delete the service account, as described later in this guide.
View the roles that are assigned to the service account
These roles are listed here in case an administrator of your Google Cloud project or organization needs this information.
roles/aiplatform.adminroles/bigquery.adminroles/cloudfunctions.adminroles/config.agentroles/datalineage.viewerroles/dataform.adminroles/iam.serviceAccountAdminroles/iam.serviceAccountUserroles/iam.serviceAccountTokenCreatorroles/logging.configWriterroles/resourcemanager.projectIamAdminroles/run.invokerroles/serviceusage.serviceUsageAdminroles/storage.adminroles/workflows.admin
Choose a deployment method
To help you deploy this solution with minimal effort, a Terraform configuration is provided in GitHub. The Terraform configuration defines all the Google Cloud resources that are required for the solution.
You can deploy the solution by using one of the following methods:
Through the console: Use this method if you want to try the solution with the default configuration and see how it works. Cloud Build deploys all the resources that are required for the solution. When you no longer need the deployed solution, you can delete it through the console. Any resources that you create after you deploy the solution might need to be deleted separately.
To use this deployment method, follow the instructions in Deploy through the console.
Using the Terraform CLI: Use this method if you want to customize the solution or if you want to automate the provisioning and management of the resources by using the infrastructure as code (IaC) approach. Download the Terraform configuration from GitHub, optionally customize the code as necessary, and then deploy the solution by using the Terraform CLI. After you deploy the solution, you can continue to use Terraform to manage the solution.
To use this deployment method, follow the instructions in Deploy using the Terraform CLI.
Deploy through the console
Complete the following steps to deploy the preconfigured solution.
In the Google Cloud Jump Start Solutions catalog, go to the Data warehouse with BigQuery solution.
Review the information that's provided on the page, such as the estimated cost of the solution and the estimated deployment time.
When you're ready to start deploying the solution, click Deploy.
A step-by-step interactive guide is displayed.
Complete the steps in the interactive guide.
Note the name that you enter for the deployment. This name is required later when you delete the deployment.
When you click Deploy, the Solution deployments page is displayed. The Status field on this page shows Deploying.
Wait for the solution to be deployed.
If the deployment fails, the Status field shows Failed. You can use the Cloud Build log to diagnose the errors. For more information, see Errors when deploying through the console.
After the deployment is completed, the Status field changes to Deployed.
To verify the resources that are deployed, click the Actions menu, and then select View resources.
The Asset Inventory page of the Google Cloud console is opened in a new browser tab. The page lists the BigQuery objects, the Cloud Function, the Workflows workflow, the Pub/Sub topic, and the Eventarc trigger resources that are deployed by the solution.
To view the details of each resource, click the name of the resource in the Display name column.
To view and use the solution, return to the Solution deployments page in the console.
- Click the Actions menu.
- Select View Looker Studio Dashboard to open a dashboard that's built on top of the sample data that's transformed by using the solution.
- Select Open BigQuery Editor to run queries and build machine learning (ML) models using the sample data in the solution.
When you no longer need the solution, you can delete the deployment to avoid continued billing for the Google Cloud resources. For more information, see Delete the deployment.
Deploy using the Terraform CLI
This section describes how you can customize the solution or automate the provisioning and management of the solution by using the Terraform CLI. Solutions that you deploy by using the Terraform CLI are not displayed in the Solution deployments page in the Google Cloud console.
Set up the Terraform client
You can run Terraform either in Cloud Shell or on your local host. This guide describes how to run Terraform in Cloud Shell, which has Terraform preinstalled and configured to authenticate with Google Cloud.
The Terraform code for this solution is available in a GitHub repository.
Clone the GitHub repository to Cloud Shell.

A prompt is displayed to confirm downloading the GitHub repository to Cloud Shell.
Click Confirm.
Cloud Shell is launched in a separate browser tab, and the Terraform code is downloaded to the
$HOME/cloudshell_opendirectory of your Cloud Shell environment.In Cloud Shell, check whether the current working directory is
$HOME/cloudshell_open/terraform-google-bigquery/modules/data_warehouse. This is the directory that contains the Terraform configuration files for the solution. If you need to change to that directory, run the following command:cd $HOME/cloudshell_open/terraform-google-bigquery/modules/data_warehouseInitialize Terraform by running the following command:
terraform initWait until you see the following message:
Terraform has been successfully initialized!
Configure the Terraform variables
The Terraform code that you downloaded includes variables that you can use to customize the deployment based on your requirements. For example, you can specify the Google Cloud project and the region where you want the solution to be deployed.
Make sure that the current working directory is
$HOME/cloudshell_open/terraform-google-bigquery/modules/data_warehouse. If it isn't, go to that directory.In the same directory, create a text file named
terraform.tfvars.In the
terraform.tfvarsfile, copy the following code snippet, and set values for the required variables.- Follow the instructions that are provided as comments in the code snippet.
- This code snippet includes only the variables for which you must set
values. The Terraform configuration includes other variables that have
default values. To review all the variables and the default values, see
the
variables.tffile that's available in the$HOME/cloudshell_open/terraform-google-bigquery/modules/data_warehousedirectory. - Make sure that each value that you set in the
terraform.tfvarsfile matches the variable type as declared in thevariables.tffile. For example, if the type that’s defined for a variable in thevariables.tffile isbool, then you must specifytrueorfalseas the value of that variable in theterraform.tfvarsfile.
# This is an example of the terraform.tfvars file.
# The values in this file must match the variable types declared in variables.tf.
# The values in this file override any defaults in variables.tf.

# ID of the project in which you want to deploy the solution
project_id = "PROJECT_ID"

# Google Cloud region where you want to deploy the solution
# Example: us-central1
region = "REGION"

# Whether or not to enable underlying apis in this solution.
# Example: true
enable_apis = true

# Whether or not to protect BigQuery resources from deletion when solution is modified or changed.
# Example: false
force_destroy = false

# Whether or not to protect Cloud Storage resources from deletion when solution is modified or changed.
# Example: true
deletion_protection = true

# Name of the BigQuery ML GenAI remote model used for text generation
# Example: "text_generate_model"
text_generation_model_name = "text_generate_model"
For information about the values that you can assign to the required variables, see the following:
project_id: Identifying projectsregion: Available regions and zones
Validate and review the Terraform configuration
Make sure that the current working directory is
$HOME/cloudshell_open/terraform-google-bigquery/modules/data_warehouse. If it isn't, go to that directory.Verify that the Terraform configuration has no errors:
terraform validateIf the command returns any errors, make the required corrections in the configuration and then run the
terraform validatecommand again. Repeat this step until the command returns the following message:Success! The configuration is valid.Review the resources that are defined in the configuration:
terraform planIf you didn't create the
terraform.tfvarsfile as described earlier, Terraform prompts you to enter values for the variables that don't have default values. Enter the required values.The output of the
terraform plancommand is a list of the resources that Terraform provisions when you apply the configuration.If you want to make any changes, edit the configuration and then run the
terraform validateandterraform plancommands again.
Provision the resources
When no further changes are necessary in the Terraform configuration, deploy the resources.
Make sure that the current working directory is
$HOME/cloudshell_open/terraform-google-bigquery/modules/data_warehouse. If it isn't, go to that directory.Apply the Terraform configuration:
terraform applyIf you didn't create the
terraform.tfvarsfile as described earlier, Terraform prompts you to enter values for the variables that don't have default values. Enter the required values.Terraform displays a list of the resources that will be created.
When you're prompted to perform the actions, enter
yes.Terraform displays messages showing the progress of the deployment.
If the deployment can't be completed, Terraform displays the errors that caused the failure. Review the error messages and update the configuration to fix the errors. Then run the
terraform applycommand again. For help with troubleshooting Terraform errors, see Errors when deploying the solution using the Terraform CLI.After all the resources are created, Terraform displays the following message:
Apply complete!The Terraform output also lists the following additional information that you'll need:
- The Looker Studio URL of the dashboard that was deployed.
- The link to open the BigQuery editor for some sample queries.
The following example shows what the output looks like:
lookerstudio_report_url = "https://lookerstudio.google.com/reporting/create?c.reportId=8a6517b8-8fcd-47a2-a953-9d4fb9ae4794&ds.ds_profit.datasourceName=lookerstudio_report_profit&ds.ds_profit.projectId=my-cloud-project&ds.ds_profit.type=TABLE&ds.ds_profit.datasetId=ds_edw&ds.ds_profit.tableId=lookerstudio_report_profit&ds.ds_dc.datasourceName=lookerstudio_report_distribution_centers&ds.ds_dc.projectId=my-cloud-project&ds.ds_dc.type=TABLE&ds.ds_dc.datasetId=ds_edw&ds.ds_dc.tableId=lookerstudio_report_distribution_centers"
bigquery_editor_url = "https://console.cloud.google.com/bigquery?project=my-cloud-project&ws=!1m5!1m4!6m3!1smy-cloud-project!2sds_edw!3ssp_sample_queries"
To view and use the dashboard and to run queries in BigQuery, copy the output URLs from the previous step and open the URLs in new browser tabs.
The dashboard and the BigQuery editor appear in the new tabs.
To see all of the Google Cloud resources that are deployed, take an interactive tour.
When you no longer need the solution, you can delete the deployment to avoid continued billing for the Google Cloud resources. For more information, see Delete the deployment.
Customize the solution
This section provides information that Terraform developers can use to modify the data warehouse with BigQuery solution in order to meet their own technical and business requirements. The guidance in this section is relevant only if you deploy the solution by using the Terraform CLI.
After you've seen how the solution works with the sample data, you might want to
work with your own data. To use your own data, you put it into the
Cloud Storage bucket named edw-raw-hash. The
hash is a random set of 8 characters that's generated during the deployment. You
can change the Terraform code in the following ways:
- Dataset ID. Change the Terraform code so that when the code creates the BigQuery dataset, it uses the dataset ID that you want to use for your data.
- Schema. Change the Terraform code so that it creates the BigQuery table ID that you want to use to store your data. This includes the external table schema so that BigQuery can read the data from Cloud Storage.
- Scheduled queries. Add stored procedures that perform the analysis that you're interested in.
- Looker dashboards. Change the Terraform code that creates a Looker dashboard so that the dashboard reflects the data that you're using.
The following are common data warehouse objects, showing the Terraform example code in main.tf.
-
BigQuery dataset: The schema where database objects are grouped and stored.
resource "google_bigquery_dataset" "ds_edw" { project = module.project-services.project_id dataset_id = "DATASET_PHYSICAL_ID" friendly_name = "DATASET_LOGICAL_NAME" description = "DATASET_DESCRIPTION" location = "REGION" labels = var.labels delete_contents_on_destroy = var.force_destroy } -
BigQuery table: A database object that represents data that's stored in BigQuery or that represents a data schema that's stored in Cloud Storage.
resource "google_bigquery_table" "tbl_edw_inventory_items" { dataset_id = google_bigquery_dataset.ds_edw.dataset_id table_id = "TABLE_NAME" project = module.project-services.project_id deletion_protection = var.deletion_protection ... } -
BigQuery stored procedure: A database object that represents one or more SQL statements to be executed when called. This could be to transform data from one table to another or to load data from an external table into a standard table.
resource "google_bigquery_routine" "sp_sample_translation_queries" { project = module.project-services.project_id dataset_id = google_bigquery_dataset.ds_edw.dataset_id routine_id = "sp_sample_translation_queries" routine_type = "PROCEDURE" language = "SQL" definition_body = templatefile("${path.module}/assets/sql/sp_sample_translation_queries.sql", { project_id = module.project-services.project_id }) } -
BigQuery scheduled query: A utility to schedule a query or stored procedure to run at a specified frequency.
resource "google_bigquery_data_transfer_config" "dts_config" { display_name = "TRANSFER_NAME" project = module.project-services.project_id location = "REGION" data_source_id = "scheduled_query" schedule = "every day 00:00" params = { query = "CALL${module.project-services.project_id}.ds_edw.sp_lookerstudio_report()" } }
To customize the solution, complete the following steps in Cloud Shell:
Verify that the current working directory is
$HOME/cloudshell_open/terraform-google-bigquery/modules/data_warehouse. If it isn't, go to that directory:cd $HOME/cloudshell_open/terraform-google-bigquery/modules/data_warehouseOpen
main.tfand make the changes you want to make.For more information about the effects of such customization on reliability, security, performance, cost, and operations, see Design recommendations.
Design recommendations
This section provides recommendations for using the data warehouse with BigQuery solution to develop an architecture that meets your requirements for security, reliability, cost, and performance.
As you begin to scale with BigQuery, you have available a number of ways to help improve your query performance and to reduce your total spend. These methods include changing how your data is physically stored, modifying your SQL queries, and using slot reservations to ensure cost performance. For more information about ways to help scale and run your data warehouse, see Introduction to optimizing query performance.
Note the following:
- Before you make any design changes, assess the cost impact and consider potential trade-offs with other features. You can assess the cost impact of design changes by using the Google Cloud Pricing Calculator.
- To implement design changes in the solution, you need expertise in Terraform coding and advanced knowledge of the Google Cloud services that are used in the solution.
- If you modify the Google-provided Terraform configuration and if you then experience errors, create issues in GitHub. GitHub issues are reviewed on a best-effort basis and are not intended for general usage questions.
- For more information about designing and setting up production-grade environments in Google Cloud, see Landing zone design in Google Cloud and Google Cloud setup checklist.
Delete the deployment
When you no longer need the solution deployment, to avoid continued billing for the resources that you created, delete the deployment.
Delete through the console
Use this procedure if you deployed the solution through the console.
In the Google Cloud console, go to the Solution deployments page.
Select the project that contains the deployment that you want to delete.
Locate the deployment that you want to delete.
Click Actions and then select Delete.
Enter the name of the deployment and then click Confirm.
The Status field shows Deleting.
If the deletion fails, see the troubleshooting guidance in Error when deleting a deployment.
When you no longer need the Google Cloud project that you used for the solution, you can delete the project. For more information, see Optional: Delete the project.
Delete using the Terraform CLI
Use this procedure if you deployed the solution by using the Terraform CLI.
In Cloud Shell, make sure that the current working directory is
$HOME/cloudshell_open/terraform-google-bigquery/modules/data_warehouse. If it isn't, go to that directory.Remove the resources that were provisioned by Terraform:
terraform destroyTerraform displays a list of the resources that will be destroyed.
When you're prompted to perform the actions, enter
yes.Terraform displays messages showing the progress. After all the resources are deleted, Terraform displays the following message:
Destroy complete!If the deletion fails, see the troubleshooting guidance in Error when deleting a deployment.
When you no longer need the Google Cloud project that you used for the solution, you can delete the project. For more information, see Optional: Delete the project.
Optional: Delete the project
If you deployed the solution in a new Google Cloud project, and if you no longer need the project, then delete it by completing the following steps:
- In the Google Cloud console, go to the Manage resources page.
- In the project list, select the project that you want to delete, and then click Delete.
- At the prompt, type the project ID, and then click Shut down.
If you decide to retain the project, then delete the service account that was created for this solution, as described in the next section.
Optional: Delete the service account
If you deleted the project that you used for the solution, then skip this section.
As mentioned earlier in this guide, when you deployed the solution, a service account was created on your behalf. The service account was assigned certain IAM permissions temporarily; that is, the permissions were revoked automatically after the solution deployment and deletion operations were completed, but the service account isn't deleted. Google recommends that you delete this service account.
If you deployed the solution through the Google Cloud console, go to the Solution deployments page. (If you're already on that page, refresh the browser.) A process is triggered in the background to delete the service account. No further action is necessary.
If you deployed the solution by using the Terraform CLI, complete the following steps:
In the Google Cloud console, go to the Service accounts page.
Select the project that you used for the solution.
Select the service account that you want to delete.
The email ID of the service account that was created for the solution is in the following format:
goog-sc-DEPLOYMENT_NAME-NNN@PROJECT_ID.iam.gserviceaccount.comThe email ID contains the following values:
- DEPLOYMENT_NAME: the name of the deployment.
- NNN: a random 3-digit number.
- PROJECT_ID: the ID of the project in which you deployed the solution.
Click Delete.
Troubleshoot errors
The actions that you can take to diagnose and resolve errors depend on the deployment method and the complexity of the error.
Errors when deploying through the console
If the deployment fails when you use the console, do the following:
Go to the Solution deployments page.
If the deployment failed, the Status field shows Failed.
View the details of the errors that caused the failure:
Click Actions.
Select View Cloud Build logs.
Review the Cloud Build log and take appropriate action to resolve the issue that caused the failure.
Errors when deploying using the Terraform CLI
If the deployment fails when you use Terraform, the output of the terraform
apply command includes error messages that you can review to diagnose the
problem.
The examples in the following sections show deployment errors that you might encounter when you use Terraform.
API not enabled error
If you create a project and then immediately attempt to deploy the solution in the new project, the deployment might fail with an error like the following:
Error: Error creating Network: googleapi: Error 403: Compute Engine API has not
been used in project PROJECT_ID before or it is disabled. Enable it by visiting
https://console.developers.google.com/apis/api/compute.googleapis.com/overview?project=PROJECT_ID
then retry. If you enabled this API recently, wait a few minutes for the action
to propagate to our systems and retry.
If this error occurs, wait a few minutes and then run the terraform apply
command again.
Cannot assign requested address error
When you run the terraform apply command, a cannot assign requested address
error might occur, with a message like the following:
Error: Error creating service account:
 Post "https://iam.googleapis.com/v1/projects/PROJECT_ID/serviceAccounts:
 dial tcp [2001:db8:ffff:ffff::5f]:443:
 connect: cannot assign requested address
If this error occurs, run the terraform apply command again.
Errors accessing data in BigQuery or Looker Studio
There is a provisioning step that runs after the Terraform provisioning steps that loads data to the environment. If you get an error when the data is being loaded into the Looker Studio dashboard, or if there are no objects when you start exploring BigQuery, wait a few minutes and try again.
Error when deleting a deployment
In certain cases, attempts to delete a deployment might fail:
- After deploying a solution through the console, if you change any resource that was provisioned by the solution, and if you then try to delete the deployment, the deletion might fail. The Status field on the Solution deployments page shows Failed, and the Cloud Build log shows the cause of the error.
- After deploying a solution by using the Terraform CLI, if you change any
resource by using a non-Terraform interface (for example,
the console), and if you then try to delete the deployment,
the deletion might fail. The messages in the output of the
terraform destroycommand show the cause of the error.
Review the error logs and messages, identify and delete the resources that caused the error, and then try deleting the deployment again.
If a console-based deployment doesn't get deleted and if you can't diagnose the error by using the Cloud Build log, then you can delete the deployment by using the Terraform CLI, as described in the next section.
Delete a console-based deployment by using the Terraform CLI
This section describes how to delete a console-based deployment if errors occur when you try to delete it through the console. In this approach, you download the Terraform configuration for the deployment that you want to delete and then use the Terraform CLI to delete the deployment.
Identify the region where the deployment's Terraform code, logs, and other data are stored. This region might be different from the region that you selected while deploying the solution.
In the Google Cloud console, go to the Solution deployments page.
Select the project that contains the deployment that you want to delete.
In the list of deployments, identify the row for the deployment that you want to delete.
Click View all row content.
In the Location column, note the second location, as highlighted in the following example:
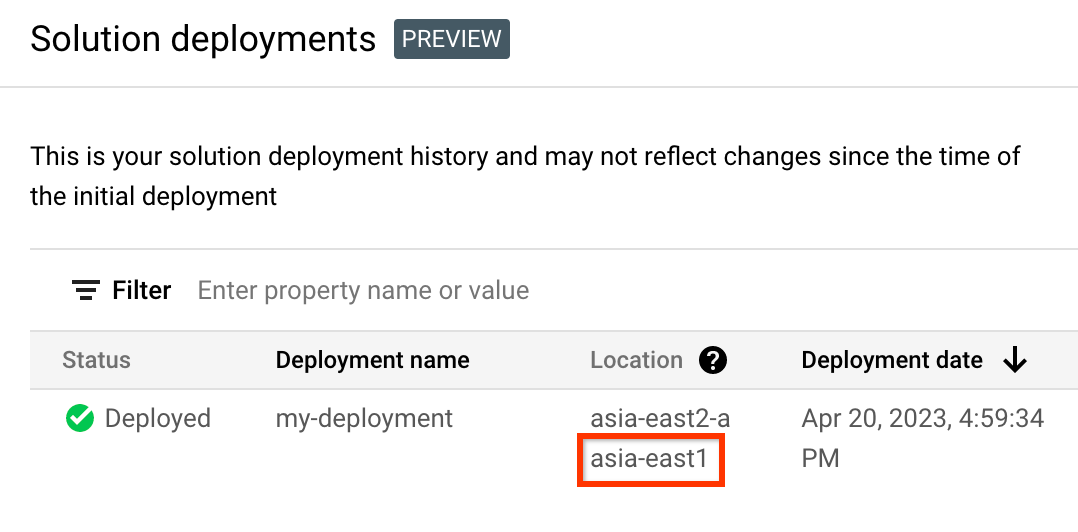
In the Google Cloud console, activate Cloud Shell.
At the bottom of the Google Cloud console, a Cloud Shell session starts and displays a command-line prompt. Cloud Shell is a shell environment with the Google Cloud CLI already installed and with values already set for your current project. It can take a few seconds for the session to initialize.
Create environment variables for the project ID, region, and name of the deployment that you want to delete:
export REGION="REGION"
export PROJECT_ID="PROJECT_ID"
export DEPLOYMENT_NAME="DEPLOYMENT_NAME"
In these commands, replace the following:
- REGION: the location that you noted earlier in this procedure.
- PROJECT_ID: the ID of the project where you deployed the solution.
- DEPLOYMENT_NAME: the name of the deployment that you want to delete.
Get the ID of the latest revision of the deployment that you want to delete:
export REVISION_ID=$(curl \
    -H "Authorization: Bearer $(gcloud auth print-access-token)" \
    -H "Content-Type: application/json" \
    "https://config.googleapis.com/v1alpha2/projects/${PROJECT_ID}/locations/${REGION}/deployments/${DEPLOYMENT_NAME}" \
    | jq .latestRevision -r)
    echo $REVISION_ID
The output is similar to the following:
projects/PROJECT_ID/locations/REGION/deployments/DEPLOYMENT_NAME/revisions/r-0Get the Cloud Storage location of the Terraform configuration for the deployment:
export CONTENT_PATH=$(curl \
    -H "Authorization: Bearer $(gcloud auth print-access-token)" \
    -H "Content-Type: application/json" \
    "https://config.googleapis.com/v1alpha2/${REVISION_ID}" \
    | jq .applyResults.content -r)
    echo $CONTENT_PATH
The following is an example of the output of this command:
gs://PROJECT_ID-REGION-blueprint-config/DEPLOYMENT_NAME/r-0/apply_results/contentDownload the Terraform configuration from Cloud Storage to Cloud Shell:
gsutil cp -r $CONTENT_PATH $HOME
cd $HOME/content/modules/data_warehouse
Wait until the
Operation completedmessage is displayed, as shown in the following example:Operation completed over 45 objects/268.5 KiBInitialize Terraform:
terraform initWait until you see the following message:
Terraform has been successfully initialized!Remove the deployed resources:
terraform destroyTerraform displays a list of the resources that will be destroyed.
If any warnings about undeclared variables are displayed, ignore the warnings.
When you're prompted to perform the actions, enter
yes.Terraform displays messages showing the progress. After all the resources are deleted, Terraform displays the following message:
Destroy complete!Delete the deployment artifact:
curl -X DELETE \
    -H "Authorization: Bearer $(gcloud auth print-access-token)" \
    -H "Content-Type: application/json" \
    "https://config.googleapis.com/v1alpha2/projects/${PROJECT_ID}/locations/${REGION}/deployments/${DEPLOYMENT_NAME}?force=true&delete_policy=abandon"
Wait a few seconds and then verify that the deployment artifact was deleted:
curl -H "Authorization: Bearer $(gcloud auth print-access-token)" \
    -H "Content-Type: application/json" \
    "https://config.googleapis.com/v1alpha2/projects/${PROJECT_ID}/locations/${REGION}/deployments/${DEPLOYMENT_NAME}" \
    | jq .error.message
If the output shows
null, wait a few seconds and then run the command again.After the deployment artifact is deleted, a message as shown in the following example is displayed:
Resource 'projects/PROJECT_ID/locations/REGION/deployments/DEPLOYMENT_NAME' was not found
Submit feedback
Jump Start Solutions are for informational purposes only and are not officially supported products. Google may change or remove solutions without notice.
To troubleshoot errors, review the Cloud Build logs and the Terraform output.
To submit feedback, do the following:
- For documentation, in-console tutorials, or the solution, use the Send Feedback button on the page.
- For unmodified Terraform code, create issues in the GitHub repository. GitHub issues are reviewed on a best-effort basis and are not intended for general usage questions.
- For issues with the products that are used in the solution, contact Cloud Customer Care.