This document provides best practices for tuning Google Cloud resources for optimal Message Passing Interface (MPI) performance. Tightly coupled High Performance Computing (HPC) workloads often use MPI to communicate between processes and instances. Proper tuning of the underlying systems and network infrastructure is essential for optimal MPI performance. If you run MPI-based code in Google Cloud, use these practices to get the best possible performance.
Assumptions and requirements
Typically, workload schedulers such as Slurm or HTCondor are used to manage instances. The recommendations and best practices in this document apply for all schedulers and workflow managers.
Implementation of these best practices using the various schedulers or workflow tools is beyond the scope of this document. Other documents and tutorials provide tools for implementation and the guidelines for those tools.
The guidelines in this document are general and might not benefit all applications. We recommend that you benchmark your applications to find the most efficient or cost-effective configuration.
Apply configurations using a Bash or Ansible script
Google provides an option to apply these optimizations and best practices on a Compute Engine instance using a Bash script or Ansible script, which are available from the Cloud MPI repository.
Use a pre-configured HPC VM image
Instead of manually applying the best practices presented in this document, you can use the HPC Virtual Machine (VM) Image (CentOS or Rocky Linux based), which is optimized for MPI and tightly coupled workloads. The HPC VM Image packages these best practices, and is made available at no additional cost through Google Cloud Marketplace. For details, see Creating an HPC-ready VM instance.
Compute Engine configuration
Best practices:
Use compact placement policyUse compute-optimized instances
Disable Simultaneous Multithreading
Adjust user limits
Set up SSH host keys
This section includes best practices to get best compute performance for your application. Using the right machine type and settings inside the system can have a significant impact on the MPI performance.
Use compact placement policy
Placement policy gives you control over the placement of your virtual machines (VMs) in data centers. Compact placement policy provides lower-latency topologies for VM placement in a single availability zone. Current APIs let you create up to 150 compute-optimized (C2, C2D, or H3) VMs that are physically close to each other. If you need more than 150 VMs, divide your VMs into multiple placement policies. We recommend using the minimum number of placement policies that accommodates your workload.
To use placement policies, first create a colocated placement policy with the required number of VMs in a given region:
gcloud compute resource-policies create group-placement \
  PLACEMENT_POLICY_NAME \
  --collocation=collocated \
  --vm-count=NUMBER_OF_VMs
Then create VMs using the policy in the required zone:
gcloud compute instances create

  INSTANCE1 INSTANCE2 INSTANCEn

  --zone=us-central1-a --resource-policies=PLACEMENT_POLICY_NAME

  --maintenance-policy=TERMINATE
In some cases, you might not have direct control over how VMs are created. For example, the VMs might be created through the use of some unintegrated third-party tools. To apply a placement policy to existing VMs, complete the following steps:
Stop the VMs for which you want to apply the placement policy:
gcloud compute instances stop \
   INSTANCE1 INSTANCE2 INSTANCEn
Configure the VMs to terminate during host maintenance and not restart automatically on failure, by updating the availability policy of each VM:
gcloud compute instances set-scheduling INSTANCE_NAME \
   --maintenance-policy TERMINATE --no-restart-on-failure
Apply the placement policy:
gcloud compute instances add-resource-policies \
   INSTANCE1 INSTANCE2 INSTANCEn \
   --zone=us-central1-a --resource-policies=PLACEMENT_POLICY_NAME
Use compute-optimized instances
We recommend using C2, C2D, or H3 VMs to run HPC applications. These VMs have fixed virtual-to-physical core mapping and expose NUMA cell architecture to guest OS, both of which are critical for performance of tightly coupled HPC applications.
H3 VMs are powered by two 4th generation Intel Xeon Scalable processors (Sapphire Rapids), with a total of 88 cores, up to 352 GB of DDR5 memory, and an all-core frequency of 3.0 GHz. These VMs use Google's custom Intel Infrastructure Processing Engine (IPU) for faster networking performance. The H3 VMs are available in one size (88 virtual cores or vCPUs), which consists of an entire host server, and support up to 200 Gbps of network throughput. To ensure optimal performance consistency, there is no overcommitting of the CPUs for H3 VMs.
C2 VMs have up to 60 vCPUs (30 physical cores) and 240 GB of RAM. They can also have up to 3 TiB of Local SSD storage and can support up to 100 Gbps of network throughput. C2 instances also leverage 2nd generation Intel Xeon Scalable Processors (Cascade Lake), which provides more memory bandwidth and a higher clock speed (up to 3.8 GHz) compared to other instance types. C2 instances typically provide up to 40% improvement in performance compared to N1 instance types.
C2D VMs are based on the 3rd generation AMD EPYC Milan. Compared to C2 VMs, C2D VMs leverage advances in processor architecture from AMD (Milan), higher CPU frequency, a larger L3 cache, CCX architecture, and higher memory bandwidth. C2D VMs have the following specifications:
- Up to 112 vCPUs (56 cores)
- Up to 448 GB of memory
- Up to 3 TiB of Local SSD storage
- Support for up to 100 Gbps of network throughput with per VM Tier_1 networking performance.
To reduce the communication overhead between machines, we recommend
consolidating your workload into a smaller number of c2-standard-60,
c2d-standard-112, or h3-standard-88 VMs (with the same total core count)
instead of launching a larger number of smaller C2, C2D, or H3 VMs.
Disable Simultaneous Multithreading
Some HPC applications get better performance by disabling Simultaneous multithreading (SMT) in the guest operating system. Simultaneous multithreading, also known as Intel Hyper-threading, allocates two vCPUs per physical core on the node. For many general computing tasks or tasks that require lots of I/O, SMT can increase application throughput significantly. For compute-bound jobs in which both virtual cores are compute-bound, SMT can hinder overall application performance and can add unpredictable variance to jobs. Turning off SMT allows more predictable performance and can decrease job times.
You can disable SMT at VM creation on all VM types with the following exceptions:
SMT is disabled on H3 VMs by default and you can't enable it.
VMs that run on machine types that have fewer than 2 vCPUs (such as
n1-standard-1) or shared-core machines (such ase2-small).VMs that run on the Tau T2D machine type.
To disable SMT when creating a VM, include the
--threads-per-core flag set to 1 in the command, for
example:
gcloud beta compute instances create VM_NAME
    --zone=ZONE
    --machine-type=MACHINE_TYPE
    --threads-per-core=1
Read more in the documentation about configuring Simultaneous Multithreading.
Adjust user limits
Unix systems have default limits on system resources like open files and numbers of processes that any one user can use. These limits prevent one user from monopolizing the system resources and affecting other users' work. In the context of HPC, however, these limits are typically unnecessary because the compute nodes in the cluster aren't directly shared between users.
You can adjust user limits by editing the /etc/security/limits.conf file and
logging in to the node again. For automation, you can bake these changes into a
VM image, or adjust limits at the time of deployment by using tools like
Deployment Manager, Terraform, or Ansible.
When you adjust user limits, change the values for the following limits:
nproc- maximum number of processesmemlock- maximum locked-in-memory address space (KB)stack- maximum stack size (KB)nofile- maximum number of open filescpu- maximum CPU time (minutes)rtprio- maximum real-time priority allowed for non-privileged processes (Linux 2.6.12 and higher)
These limits are configured in the /etc/security/limits.conf system
configuration file for most Unix and Linux systems, including Debian, CentOS,
Rocky Linux, and Red Hat.
To change user limits, use a text editor to change the following values:
In
/etc/security/limits.conf:* - nproc unlimited * - memlock unlimited * - stack unlimited * - nofile 1048576 * - cpu unlimited * - rtprio unlimitedIn
/etc/security/limits.d/20-nproc.conf:* - nproc unlimited
Enable zone reclaim mode
Zone reclaim mode allows someone to set aggressive approaches to reclaim memory when a zone runs out of memory. If the mode is set to zero, then no zone reclaim occurs. In that case, allocations are satisfied from other zones or nodes in the system.
Jobs that exceed the memory of a NUMA node and multi-cored jobs that extend
outside the NUMA node can benefit from enabling zone reclaim mode. We recommend
setting this value to 1.
sudo sysctl vm.zone_reclaim_mode=1
Enable transparent huge pages
HPC applications often benefit from transparent huge pages.
To enable transparent huge pages, use the following command:
echo ‘always’ > /sys/kernel/mm/transparent_hugepage/enabled
echo ‘always’ > /sys/kernel/mm/transparent_hugepage/defrag
Disable automatic NUMA balancing
Automatic NUMA balancing by operating system can cause overhead and we therefore don't recommend it for MPI applications.
To disable automatic NUMA balancing, use the following command:
sudo sysctl kernel.numa_balancing=0
Set up SSH host keys
Intel MPI requires host keys for all of the cluster nodes in the
~/.ssh/known_hosts file of the node that executes mpirun. You must also save
your SSH keys in authorized_keys.
To add host keys, run the following:
ssh-keyscan -H 'cat HOSTFILE' >> ~/.ssh/known_hosts
Another way to do this is to add StrictHostKeyChecking=no to the
~/.ssh/config file by running the following:
Host *
StrictHostKeyChecking no
Use Google Virtual NIC (gVNIC)
Using Google Virtual NIC (gVNIC) instead of Virtio-net can improve the scalability of MPI applications by providing better communication performance and higher throughput. Additionally, gVNIC is a prerequisite for VMs that use per VM Tier_1 networking performance. When you create a new VM, Virtio-net is the default virtual network interface for first or second generation machine series (such as C2 or C2D). Third generation machine series (such as C3 and H3) use only the gVNIC network interface. For information about how to enable gVNIC for first and second generation machine series, see Using Google Virtual NIC.
Use jumbo frames
Virtual Private Cloud (VPC) networks have a default maximum transmission unit (MTU) of 1460 bytes. You can configure your VPC networks to have a different MTU, up to 8896 (jumbo frames). However, MTUs greater than 1600 can be used only if the source and destination interfaces are in the same subnet and are communicating using internal IPv4 addresses from the primary IPv4 range of the subnet.
HPC applications can benefit from using jumbo frames for their internal communication or for accessing parallel file systems. To help minimize the processing overhead for network packets, we recommend using a larger packet size. You need to validate larger packet sizes for the specifics of your application. For information about the use of jumbo frames and packet sizes, see Maximum transmission unit guide.
Storage
Performance of many HPC applications strongly depends on the performance of the underlying storage system. This is especially true for applications that read or write a lot of data or that create or access many files or objects. It's also true when a lot of ranks access the storage system simultaneously.
Choose an NFS file system or parallel file system
Following are the primary storage choices for tightly coupled applications. Each choice has its own cost, performance profile, APIs, and consistency semantics:
- NFS-based solutions such as Filestore and NetApp Cloud Volumes are the easiest for deploying shared storage options. Both options are fully managed on Google Cloud, and are best when the application doesn't have extreme I/O requirements to a single dataset, and has limited to no data sharing between compute nodes during application execution and updates. For performance limits, see the Filestore and NetApp Cloud Volumes documentation.
- POSIX-based parallel file systems are more commonly used by MPI applications. POSIX-based options include open source Lustre and the fully supported Lustre offering, DDN Storage EXAScaler Cloud. When compute nodes generate and share data, they frequently rely on the extreme performance provided by parallel file systems and support for full POSIX semantics. Parallel file systems like Lustre deliver data to the largest supercomputers and can support thousands of clients. Lustre also supports data and I/O libraries such as NetCDF and HDF5, along with MPI-IO, enabling parallel I/O for a wide set of application domains.
Choose a storage infrastructure
Application performance requirements should guide the storage infrastructure or tier of storage for the file system you choose. For example, if you deploy SSDs for applications that don't need high I/O operations per second (IOPS), you might increase costs without much benefit.
The managed storage services Filestore and NetApp Cloud Volumes offer several performance tiers that scale based on capacity.
To determine the correct infrastructure for open source Lustre or DDN Storage EXAScaler Cloud, you must first understand the vCPU and capacity that is required to achieve the needed performance with standard persistent disk, SSD persistent disk, or local SSD. For more information about how to determine the correct infrastructure, see Block storage performance information and Optimizing persistent disk performance. For example, if you use Lustre, you can deploy low-cost and high-bandwidth solutions by using SSD persistent disk for the metadata server (MDS) and standard persistent disk for the storage servers (OSSs).
Network settings
MPI networking performance is critical for many HPC applications. This is especially true for tightly coupled applications in which MPI processes on different nodes communicate frequently or with large data volume. This section includes best practices to tune your network settings for optimal MPI performance.
Increase tcp_*mem settings
C2 and C2D VMs can support up to 32 Gbps bandwidth without Tier_1 networking. H3 VMs can reach up to 200 Gbps bandwidth without Tier_1 networking. Thus, the bandwidth usage for all three types of VMs requires more TCP memory than the default bandwidth setting that is enabled by Linux.
For better network performance, increase the tcp_mem value.
To increase TCP memory limits, update the following values in
/etc/sysctl.conf:
net.ipv4.tcp_rmem = 4096 87380 16777216
net.ipv4.tcp_wmem = 4096 16384 16777216
To load the new values in /etc/sysctl.conf, run sysctl -p.
Use network profiles
You can improve the performance of some applications by using network profiles that are appropriate for the applications. Some applications that are sensitive to network latency might be improved by enabling busy polling. Busy polling helps reduce latency in the network receive path by allowing socket layer code to poll the receive queue of a network device and by disabling network interrupts. Evaluate your application's latency to see if busy polling helps.
The network-latency profile persists across reboots. If your system has
tuned-adm installed, you can enable low network-latency profile by running the
following command:
tuned-adm profile network-latency
If your system doesn't have tuned-adm installed, you can enable busy polling
by adding the following to /etc/sysctl.conf:
net.core.busy_poll = 50
net.core.busy_read = 50
To load the new values in /etc/sysctl.conf, run sysctl -p.
If your application sends large packets and if it is bandwidth sensitive, you can enable the network-throughput profile by using the following command:
tuned-adm profile network-throughput
MPI libraries and user applications
Best practices:
Use Intel MPIUse mpitune to do MPI Collective tuning
Use MPI/OpenMP hybrid mode
Compile applications using vector instructions and the Math Kernel Library
Use appropriate CPU numbering
Use Open MPI
MPI library settings and HPC application configurations can affect application performance. To achieve the best performance for HPC applications, it's important to fine-tune those settings or configurations. This section includes best practices for running your MPI libraries and user applications on Google Cloud.
Use Intel MPI
For best performance, we recommend that you use Intel MPI 2021.
Google provides the google-hpc-compute utility to make the HPC MPI workloads
performant and easy to run on Google Cloud environment. The google-hpc-compute
utility is available across EL7 and EL8 distro, including Rhel 7, CentOS 7,
Rhel 8 and Rocky Linux 8. The google_install_impi script provides
commands to setup IntelMPI 2021.
Get the google-hpc-compute utility
The google-hpc-compute utility is shipped with the HPC-CentOS-7 image and the
HPC-RL8-VM image. Newly created VM instances using the HPC VM images come with
the utility.
Use one of the following method to get the utility on existing VM instances:
Existing VM instances created with the HPC-CentOS-7 image. You can update the existing
google-hpc-computeutility by issuing the following command:sudo yum update -y google-hpc-compute
Existing VM instances created with the EL7/EL8 image. Although we recommend that you use the HPC VM image for running the HPC MPI workloads on Google Cloud, you can gain access to the
google-hpc-computeutility by adding thegoogle-hpc-compute-el7-x86_64repo with the following commands:cat > /etc/yum.repos.d/google-hpc-compute.repo << EOF [google-hpc-compute] name=Google HPC Compute baseurl=https://packages.cloud.google.com/yum/repos/google-hpc-compute-el7-x86_64 enabled=1 gpgcheck=1 repo_gpgcheck=0 gpgkey=https://packages.cloud.google.com/yum/doc/yum-key.gpg https://packages.cloud.google.com/yum/doc/rpm-package-key.gpg EOFAfter the
google-hpc-compute-el7-x86_64repo is in the VM, you can download thegoogle-hpc-computeutility by using the following command:sudo yum install -y google-hpc-compute
Use the google-hpc-compute utility for IntelMPI 2021 support
The google_install_intelmpi tool installs the IntelMPI 2021.8 library. When
you install the library, set the following flags:
--install_dir <var>install_path</var>: Configures the prefix directory for installations. The default location is/opt/intel.--impi_2021: Installs Intel MPI 2021.8 which is the recommended version for running MPI jobs on Google Cloud.
The utility requires sudo mode in order to install the IntelMPI library.
The command installs the MPI library in the install_dir directory.
To source the MPI library, you use the following command:
source install_path/mpi/latest/env/vars.sh
Use mpitune to do MPI collective tuning
MPI implementations have many internal configuration parameters that are especially relevant for MPI Collective communication performance. IntelMPI lets you specify algorithms and configuration parameters based on the Google Cloud environment.
In IntelMPI 2021, there are built-in tune configuration parameters generally
applicable for the Google Cloud environment. You can generate customized
tune configuration parameters based on the deployed cluster environment and on
application characteristics. We recommend using the
mpitune or mpitune_fast utilities to generate the customized tuning profiles,
following the Intel official guide.
Compile applications using vector instructions and the Math Kernel Library
C2 VMs support AVX2, AVX512 vector instructions. You can improve the performance of many HPC applications by compiling them using AVX instructions. Some applications perform better if you use AVX2 instead of AVX512. We recommend trying both types of AVX instructions for your workload. For better performance of scientific computation, we also recommend using the Intel Math Kernel Library (Intel MKL).
We recommend using the Intel Compiler to build MPI binaries for C2 instances.
AMD specific optimizations
This section includes recommendations for AMD-based systems.
AMD Compilers/toolchain
The AMD Optimizing CPU Compiler
(AOCC)) is a
high-performance, production-quality, code-generation tool that offers various
options to developers who build and optimize C, C++, and Fortran applications
that target 32-bit and 64-bit Linux platforms. We recommend using AOCC for
compiling HPC applications in C2D. Use the -march=znver3 flag to generate
instructions that run on 3rd Gen AMD EPYC Series CPUs. You can also use the same
flag when compiling with the gcc tool.
Vector instructions and the Math Kernel Library
C2D VMs support vector instructions (AVX2). We have noticed significant performance improvement for many HPC applications when they are compiled with AVX2 instructions. We recommend using the AMD Math Kernel Library (BLIS) which is optimized using these instructions.
Applications linked to Intel Math Kernel Library might not take advantage of AVX2 on AMD EPYC.
Use MPI OpenMP hybrid mode
Many MPI applications support a hybrid mode that you can use to enable OpenMP in MPI applications. In hybrid mode, each MPI process can use a fixed number of threads to accelerate the execution of certain loop structures.
We recommend that you explore the hybrid mode option when you want to optimize application performance. Using hybrid mode can result in fewer MPI processes on each VM, leading to less inter-process communication and lower overall communication time.
Enabling hybrid mode or OpenMP is application dependent. In many cases, you can enable hybrid mode by setting the following environment variable:
export OMP_NUM_THREADS=NUM_THREADS
When you use this hybrid approach, we recommend that the total number of threads doesn't exceed the number of physical cores in the VM. The C2-standard-60 VMs have 2 NUMA sockets of 15 cores and 30 vCPUs each. We recommend that you don't have any MPI process with OpenMP threads spanning multiple NUMA nodes.
C2D-standard-112 has 56 cores in 2 sockets, with each socket containing 28 cores. These cores are grouped into 7 CCXs, each containing 4 cores. Each CCX has 32 MB of L3 cache. Each core has 512 KB L2 cache and 32 KB L1 instruction and data caches. Each socket is connected to 220 GB of DRAM. On C2D-standard-112, we recommend the use of two or four OMP threads so as for the process to fit into a CCX. Setting the number of OMP threads to 4 will create one MPI process per L3 cache.
export OMP_NUM_THREADS=4
CPULIST=$(seq -s , 0 4 55)

Open MPI:
mpirun –bind-to one –cpu-list $CPULIST …

Intel MPI:
export I_MPI_PIN_PROCESSOR_LIST=$CPULIST
Use appropriate CPU numbering
C2-standard-60 has two NUMA sockets, and the CPUs are numbered with respect to NUMA nodes as follows:
NUMA node0 CPU(s):     0-14,30-44
NUMA node1 CPU(s):     15-29,45-59
The following diagram illustrates the assignment of CPU numbers to each of the CPUs in a C2-standard-60 instance's NUMA nodes. Socket 0 corresponds to NUMA node0 with CPUs 0-14 and 30-44. Socket 1 corresponds to NUMA node1 with CPUs 15-29 and 45-59.
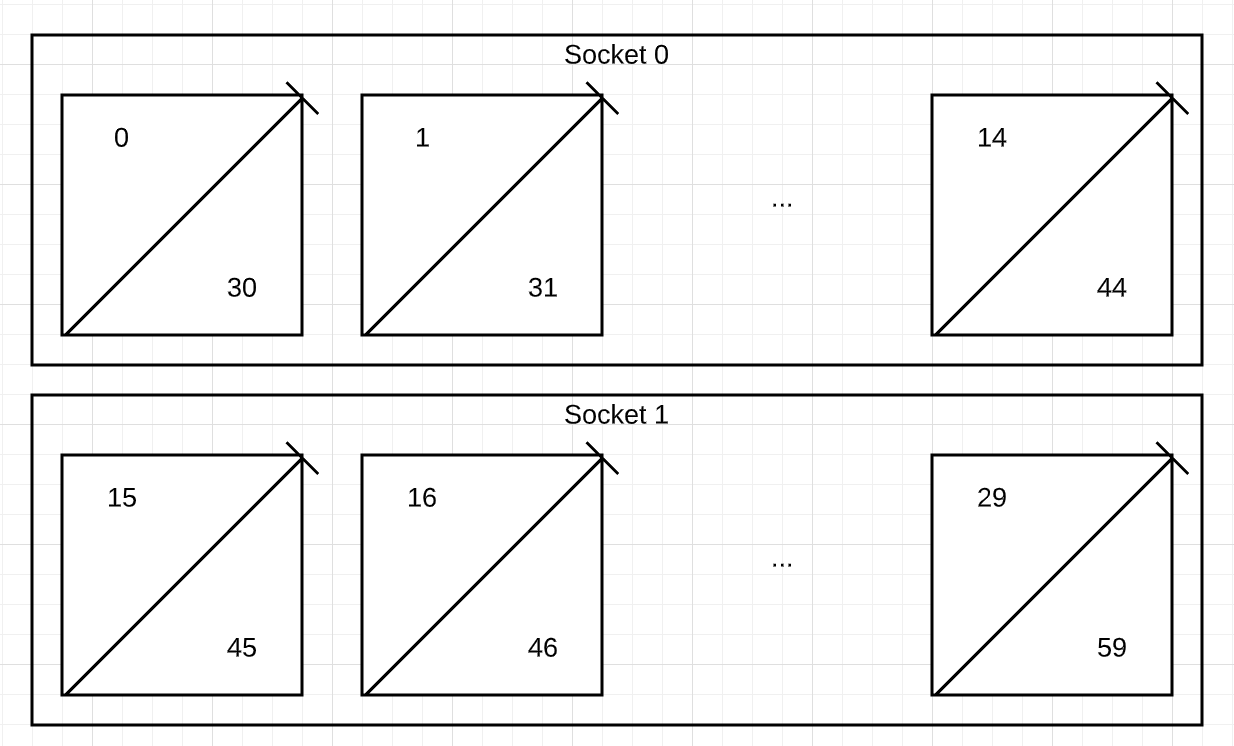
The hyper-thread siblings that map to a single core in the VM are
(0,30)(1,31)..(29,59).
Intel MPI uses the NUMA CPU numbers for processor pinning of MPI jobs. If you want to use a single hyper-thread per core across all nodes that is consistent across runs, use CPU numbers 0-29.
Open MPI uses logical CPU numbers as reported by Portable Hardware Locality (hwloc). If you use Open MPI, hyper-thread siblings are numbered consecutively as follows:
Socket 0: 0 (core 0 HT 0), 1 (core 0 HT 1), 2 (core 1 HT 0) ,...,28 (core 14 HT 0), 29 (core 14, HT 1)
Socket 1: 30 (core 0 HT 0), 31 (core 0 HT 1), 2 (core 1 HT 0) ,...,58 (core 14 HT 0), 59 (core 14, HT 1)
The output looks like the following:
lstopo-no-graphics
Machine (240GB total)
  NUMANode L#0 (P#0 120GB) + Package L#0 + L3 L#0 (25MB)
    L2 L#0 (1024KB) + L1d L#0 (32KB) + L1i L#0 (32KB) + Core L#0
      PU L#0 (P#0)
      PU L#1 (P#30)
    L2 L#1 (1024KB) + L1d L#1 (32KB) + L1i L#1 (32KB) + Core L#1
      PU L#2 (P#1)
      PU L#3 (P#31)
When you use Open MPI, you can use a single hyper-thread per core across all
nodes that is consistent across runs by using CPU numbers 0,2,4,..58. To force
MPI to pin a process to a core, use the option --bind-to core when you run
openMPI, and then validate the correct binding using the --report-bindings
option.
Use Open MPI
For customers using Open MPI, we recommend using the latest stable release of Open MPI.
In order to improve the performance of Open MPI on Google Cloud we recommend the following tuning options on both the operating system level and the Open MPI MCA level:
For operating system tuning we observed a better performance from Open MPI with busy polling turned off. To disable busy polling, use the following command:
tuned-adm profile network-throughput
To further improve Open MPI performance through tuning, use the following MCA parameters:
--mca opal_event_include epoll
Changes the default polling strategy used when polling for network events from poll to epoll. This change should improve performance when busy polling is enabled with no downside when it is disabled.--mca btl_tcp_progress_thread 1
In the TCP component under BTL (Byte Transfer Layer) framework, change the value ofprogress_threadfrom 0 (default) to 1.--mca coll_han_priority 100
Enables Hierarchical-Aware Networking (HAN) component under the COLL (collective) framework.
Use the following command to enable the MCA parameters suggested:
mpirun -hostfile HOSTFILE -np NUM_PROCESSES -npernode PROCESSES_PER_NODE \
    --mca opal_event_include epoll \
    --mca btl_tcp_progress_thread 1 \
    --mca coll_han_priority 100 APPLICATION
You can also enable these parameters by adding them into MCA file. For more information, see How do I set the value of MCA parameters.
Security settings
You can improve MPI performance by disabling some built-in Linux security features. The performance benefit for disabling each of these features varies. If you are confident that your systems are well protected, you can evaluate disabling the following security features.
Disable Linux firewalls
For Google Cloud CentOS or Rocky Linux images, the firewall is turned on
by default. To disable the firewall, stop and disable the firewalld daemon by
running the following commands:
sudo systemctl stop firewalld
sudo systemctl disable firewalld
sudo systemctl mask --now firewalld
Disable SELinux
SELinux in CentOS or Rocky Linux is turned on by default. To disable SELinux,
edit the /etc/selinux/config file, and replace the line SELINUX=enforcing
or SELINUX=permissive with SELINUX=disabled.
You must reboot for this change to take effect.
Turn off Meltdown and Spectre mitigation
The following security patches are enabled by default on Linux systems:
- Variant 1, Spectre: CVE-2017-5753
- Variant 2, Spectre: CVE-2017-5715
- Variant 3, Meltdown: CVE-2017-5754
- Variant 4, Speculative Store Bypass: CVE-2018-3639
The security vulnerabilities described in these CVEs might be found in modern
microprocessors, including the processors deployed in Google Cloud. You
can disable one or more of these mitigations—and incur the associated security
risks—by using the kernel command line at boot (persists across reboots), or by
using debugfs at runtime (doesn't persist on reboot).
To permanently disable the preceding security mitigations, follow these steps:
Modify the file
/etc/default/grub:sudo sed -i 's/^GRUB_CMDLINE_LINUX=\"\(.*\)\"/GRUB_CMDLINE_LINUX=\"\1 mitigations=off\"/' /etc/default/grubAfter you change the
grubfile, run the following to update the GRUB system configuration file, and then reboot the system:For CentOS:
sudo grub2-mkconfig -o /boot/efi/EFI/centos/grub.cfgFor Rocky Linux:
sudo grub2-mkconfig -o /boot/efi/EFI/rocky/grub.cfgIf your system has a legacy BIOS boot mode, run the following command instead:
sudo grub2-mkconfig -o /boot/grub2/grub.cfgReboot.
If a system is already running, you can disable the preceding security mitigations by running the following commands. This doesn't persist across reboots.
echo 0 > /sys/kernel/debug/x86/pti_enabled
echo 0 > /sys/kernel/debug/x86/retp_enabled
echo 0 > /sys/kernel/debug/x86/ibrs_enabled
echo 0 > /sys/kernel/debug/x86/ssbd_enabled
For information about how different mitigations can impact your systems and how to control them, see the Red Hat documentation for Controlling the performance impact of microcode and security patches and Kernel side-channel attack using speculative store bypass.
To find the affected vulnerabilities of a CPU, run the following:
grep . /sys/devices/system/cpu/vulnerabilities/*
To find which mitigations are enabled, run the following:
grep . /sys/kernel/debug/x86/*_enabled
Checklist summary
The following table summarizes the best practices for using MPI on Compute Engine.
| Area | Tasks |
|---|---|
| Compute Engine configuration | |
| Storage | |
| Network settings | |
| MPI libraries and user applications | |
| Security settings |
What's next
- Learn more about Google Compute-Optimized VMs.
- Deploy a Slurm cluster on Google Cloud.
- Learn more about High Performance Storage on Google Cloud.
- Read about HTCondor.
- Explore reference architectures, diagrams, and best practices about Google Cloud. Take a look at our Cloud Architecture Center.