App Engine 柔性环境中的 .NET 快速入门
区域 ID
REGION_ID 是 Google 根据您在创建应用时选择的区域分配的缩写代码。此代码不对应于国家/地区或省,尽管某些区域 ID 可能类似于常用国家/地区代码和省代码。对于 2020 年 2 月以后创建的应用,REGION_ID.r 包含在 App Engine 网址中。对于在此日期之前创建的现有应用,网址中的区域 ID 是可选的。
详细了解区域 ID。
本快速入门介绍了如何创建一个显示简短消息的 App Engine 小应用。
准备工作
- 登录您的 Google Cloud 账号。如果您是 Google Cloud 新手,请创建一个账号来评估我们的产品在实际场景中的表现。新客户还可获享 $300 赠金,用于运行、测试和部署工作负载。
-
在 Google Cloud Console 中的项目选择器页面上,选择或创建一个 Google Cloud 项目。
-
启用 Cloud Build API。
- 安装 Google Cloud CLI。
-
如需初始化 gcloud CLI,请运行以下命令:
gcloud init
-
在 Google Cloud Console 中的项目选择器页面上,选择或创建一个 Google Cloud 项目。
-
启用 Cloud Build API。
- 安装 Google Cloud CLI。
-
如需初始化 gcloud CLI,请运行以下命令:
gcloud init
其他前提条件
初始化您的项目的 App Engine 应用并选择应用的区域:
gcloud app create --project=[YOUR_PROJECT_ID]系统提示时,选择您希望自己的 App Engine 应用所在的区域。
安装以下必备组件:
如果您要使用 Visual Studio,必须使用 2015 或更高版本。映像适用于为 .NET Core 1.0、1.1、2.0 和 2.1 编写的 ASP.NET Core 应用。
要将应用直接从 Visual Studio 部署到 App Engine,请安装 Tools for Visual Studio。
App Engine 位置
App Engine 是区域级的,这意味着运行您的应用的基础架构位于特定区域并由 Google 代管,以使其在该区域内的所有可用区以冗余方式提供。
选择要在哪个区域运行应用时,首先要考虑该区域是否能满足您的延迟时间、可用性或耐用性要求。通常,您可以选择距离应用的用户最近的区域,但也要考虑提供 App Engine 的位置以及应用使用的其他 Google Cloud 产品和服务的位置。跨多个位置使用服务可能会影响应用的延迟时间及其价格。
应用的区域一经设置,便无法更改。
如果您已创建 App Engine 应用,则可以通过执行以下任一操作来查看其区域:
运行
gcloud app describe命令。在 Cloud Console 中打开 App Engine 信息中心。该区域会显示在页面顶部附近。
下载 Hello World 应用
我们创建了一个简单的 .NET 版 Hello World 应用,以便您快速了解如何将应用部署到 Google Cloud。Hello World 应用类似于在创建空 ASP.NET Core 应用时 Visual Studio 所创建的应用。该示例应用添加了一个 app.yaml 文件。app.yaml 文件是 App Engine 配置文件,用于指定运行时设置及其他 App Engine 设置。
将 Hello World 示例应用代码库克隆到本地机器。
git clone https://github.com/GoogleCloudPlatform/dotnet-docs-samples或者,您也可以下载该示例的 zip 文件并将其解压缩。
切换到包含示例代码的目录。
cd dotnet-docs-samples/appengine/flexible/HelloWorld
在本地机器上运行 Hello World
Visual Studio
如需在本地机器上运行 Hello World 应用,请执行以下操作:
- 使用 Visual Studio 打开
dotnet-docs-samples\appengine\flexible\HelloWorld\HelloWorld.sln。 -
按 F5。
此时您会在页面中看到示例应用发送的“Hello World”消息。
命令行
如需在本地机器上运行 Hello World 应用,请执行以下操作:
-
从
dotnet-docs-samples\appengine\flexible\HelloWorld目录运行以下命令:dotnet restore dotnet run
-
在网络浏览器中,转到 http://localhost:5000/
此时您会在页面中看到示例应用发送的“Hello World”消息。
- 在终端窗口中,按 Ctrl+C 退出 Web 服务器。
在 App Engine 上部署并运行 Hello World
Visual Studio
要部署 Hello World 应用,请执行以下操作:
- 使用 Visual Studio 打开
dotnet-docs-samples\appengine\flexible\HelloWorld\HelloWorld.sln。 - 在解决方案资源管理器中,右键点击 HelloWorld,然后选择 Publish to Google Cloud...(发布到 Google Cloud…)
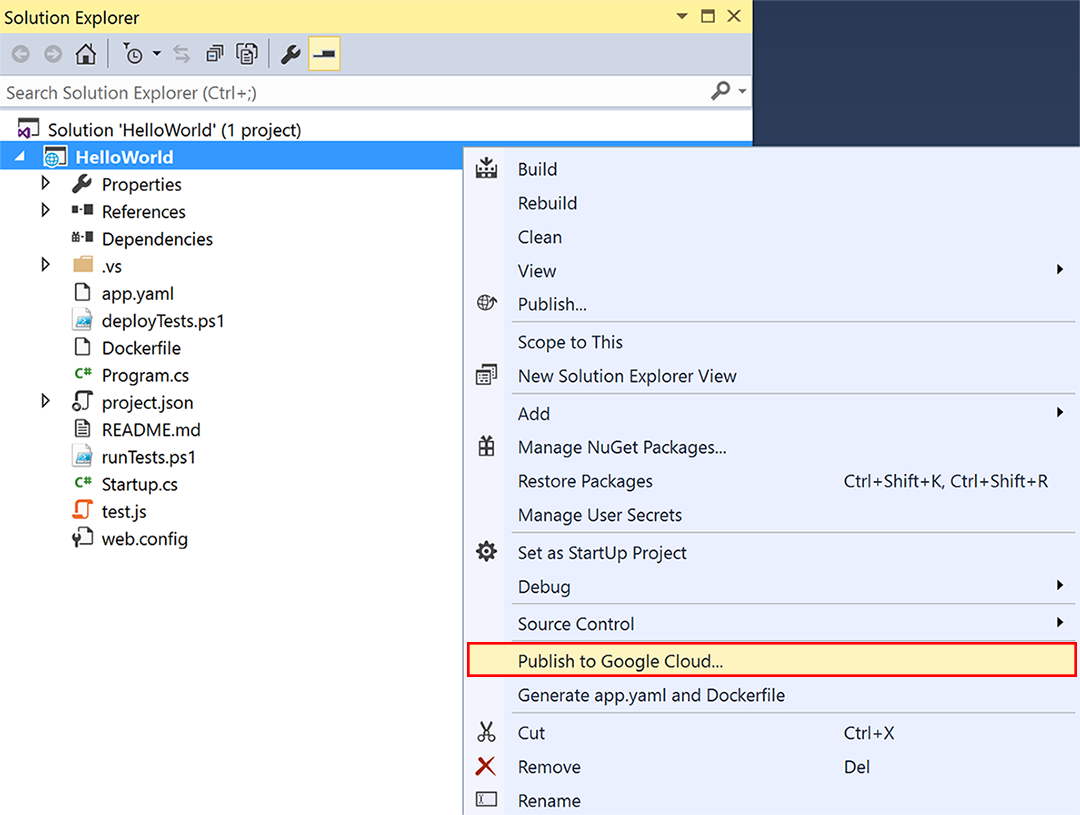
- 点击 App Engine Flex(App Engine 柔性环境)。
- 点击 Publish(发布)。
-
要查看已部署的应用,请在浏览器中转到以下地址:
https://PROJECT_ID.REGION_ID.r.appspot.com
命令行
-
从
dotnet-docs-samples\appengine\flexible\HelloWorld目录运行以下命令:dotnet restore dotnet publish -c Release gcloud app deploy .\bin\Release\netcoreapp2.1\publish\app.yaml
-
启动浏览器,并前往
https://PROJECT_ID.REGION_ID.r.appspot.com查看该应用。gcloud app browse
此时,在 App Engine 实例上运行的 Web 服务器提供显示 Hello World 消息的页面。
恭喜!您已将第一个 .NET 应用部署到 App Engine 柔性环境!
如果您在部署应用时遇到任何错误,请查看问题排查提示。如需了解有关清理的信息以及可执行的后续步骤的链接,请参阅以下部分。
清理
为避免产生费用,您可以删除 Cloud 项目,以停止对该项目中使用的所有资源计费。
- 在 Google Cloud 控制台中,进入管理资源页面。
- 在项目列表中,选择要删除的项目,然后点击删除。
- 在对话框中输入项目 ID,然后点击关闭以删除项目。
后续步骤
了解整个平台
现在,您已了解如何开发和部署 App Engine 应用,接下来您可以探索 Google Cloud 的其余部分。您已经安装了 Google Cloud CLI,它可为您提供与 Cloud SQL、Cloud Storage、Firestore 等产品交互的工具。
有关如何创建使用整个平台(而不仅仅是 App Engine)的应用的操作指南,请查看我们的创建 Bookshelf 应用快速入门。
了解 App Engine 柔性环境
以下主题有助于您继续了解 App Engine。
Hello World 代码讨论
Hello World 是最简单的 App Engine 应用,因为它只包含一项服务,只有一个版本,并且所有代码都位于应用的根目录中。本部分详细介绍每个应用文件。
Startup.cs
Hello World 应用是简单的 ASP.NET 应用:
app.yaml
app.yaml 文件描述应用的部署配置:
在以上示例中,app.yaml 指定了该应用使用的运行时,并设置了 env: flex 以指定该应用使用柔性环境。
如需详细了解 .NET 运行时环境的工作原理,请参阅 .NET 运行时。
如需详细了解如何设计应用以利用多个版本和多项服务,请参阅 App Engine 概览。
如需详细了解 App Engine 的配置设置,请参阅使用 app.yaml 配置应用。