This page applies to Apigee and Apigee hybrid.
View
Apigee Edge documentation.

Expose APIs on Apigee by implementing API proxies. API proxies decouple the app-facing API from your backend services, shielding those apps from backend code changes.
Develop your API proxies using Apigee in Cloud Code as described in the following sections. See also Managing folders and files in an Apigee workspace.
Creating an API proxy
To create an API proxy using Apigee in {code_name}}:
Perform one of the following actions:
In the Apigee section, position your cursor over the apiproxies folder and click
 .
.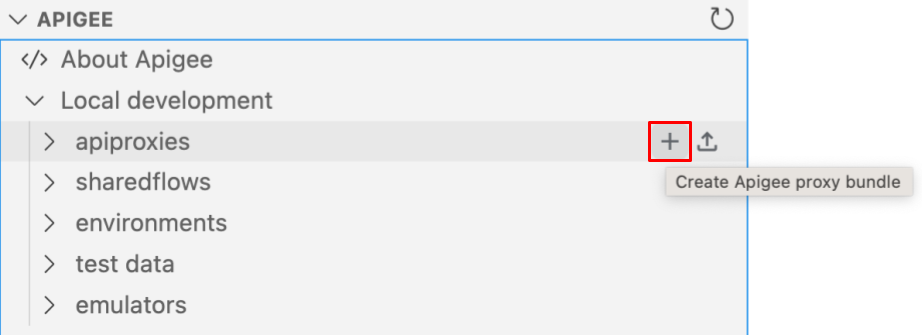
Select View > Command Palette to open the Command palette and select Cloud Code: Create Apigee proxy bundle.
The Create proxy wizard opens.
Select one of the following options:
Type Description Reverse proxyAn API proxy that routes inbound requests to existing HTTP backend services. Can be a JSON or XML API. See Creating a reverse proxy for an HTTP service later in this section.
No targetAn API proxy with no API backend ("no target"). Similar to Creating a reverse proxy for an HTTP service, except you will not specify an existing target URL when defining the API proxy details.
The following sections describe the additional steps required to create each API proxy type.
Creating a reverse proxy for an HTTP service
Apigee generates reverse API proxies based on the following information:
- URL of the backend service
- URI path that uniquely identifies the API that will be exposed by the API proxy to consumer apps
When you select Reverse proxy when creating an API proxy, you are prompted for the Security authentication and API proxy details described in the following tables.
For the Security authentication, select one of the following options:
| Security authentication | Description |
|---|---|
API key based authentication |
Adds simple API key verification to the API proxy that you are defining. Apigee automatically adds the following policies to your API proxy:
|
Access token based authentication |
Adds OAuth 2.0 based authentication to your API proxy. Apigee automatically adds the following policies to your API proxy:
|
No authentication |
No authentication required. Requests are passed to the backend without any security checks on Apigee. |
For the API proxy details, respond to each of the following prompts and press Enter to confirm and proceed, or Esc to cancel the wizard:
| Field | Description |
|---|---|
Backend target URL |
URL of the backend service that this API proxy invokes. |
API proxy name |
Name displayed for your API. Specify alphanumeric characters, dash (-), or underscore (_). |
API proxy base path |
URI fragment that appears after the http://[host] or https://[host] address of your API proxy. Apigee uses the base path URI to match and route incoming request messages to the proper API proxy.
Use wildcards in base paths Use one or more |
After you complete the steps in the wizard, the new apiproxy-name folder is added under apiproxies in the Apigee section. Each API proxy folder is structured as described in API proxy configuration directory structure.
The following provides an example of the default configuration created for a reverse API proxy named helloworld with policies added to support API key based authentication.
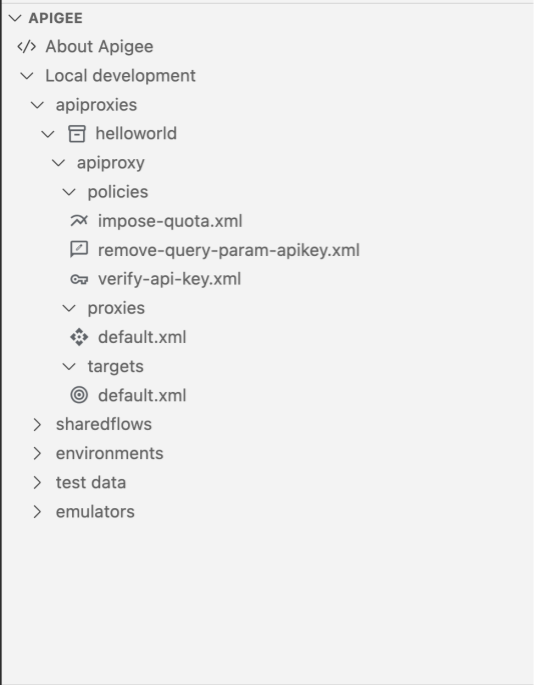
For a description of the default configuration, see Exploring the default API proxy configuration.
Creating an API proxy with no backend target
The process of creating an API proxy with no backend target is the same as creating a reverse proxy except that you are not prompted to specify a URL for the backend service (Target (Existing API)) and the default target endpoint configuration is not included. See Creating a reverse proxy for an HTTP service for more information.
Exploring the default API proxy configuration
The following table summarizes the contents included in the default configuration when you create an API proxy based on the API proxy type and authentication options selected.
| No target | ||||
|---|---|---|---|---|
proxies/default.xmlDefault proxy endpoint configuration. |
||||
targets/default.xmlDefault target endpoint configuration. |
||||
impose-quota.xmlQuota policy to define a default quota. |
||||
remove-header-authorization.xmlAssignMessage policy to remove the Authorization header that is passed for authentication. |
> |
|||
remove-query-param-apikey.xmlAssignMessage policy to remove the apikey query parameter that is passed for authentication. |
||||
verify-api-key.xmlVerifyAPIKey policy to enforce the verification of API keys. |
||||
verify-oauth-v2-access-token.xmlOAuthV2 policy to validate OAuth V2 access tokens. |
Uploading an API proxy bundle
To upload an API proxy bundle to Apigee in Cloud Code:
Perform one of the following actions:
In the Apigee section, position your cursor over the apiproxies folder and click
 .
.Select View > Command Palette to open the Command palette and select Cloud Code: Import Apigee proxy bundle.
Navigate to the API proxy bundle that you want to upload and click Import proxy. The API proxy bundle must be structured as described in API proxy configuration directory structure.
(Optional) By default, the name of the zip file minus its extension is used for the name of the API proxy. If this name is not unique, you are prompted to enter a unique name.
The uploaded apiproxy-name folder is added under apiproxies in the Apigee section.
Managing proxy endpoints
As described in What is an API proxy?, a proxy endpoint (ProxyEndpoint) defines the way client apps consume your APIs. You configure the proxy endpoint to define the URL of your API proxy. The proxy endpoint also determines whether apps access the API proxy over HTTP or HTTPS. You can attach policies to the proxy endpoint to enforce security, quota checks, and other types of access control and rate-limiting.
Create and configure proxy endpoints as described in the following sections.
Creating proxy endpoints
When you create an API proxy, a default proxy endpoint is added to the API proxy configuration. For more information, see Exploring the default API proxy configuration. You can create additional proxy endpoints, as required.
To create a proxy endpoint using Apigee in Cloud Code:
In the Apigee section, perform one of the following actions:
- In the Apigee section, position your cursor over one of the following folders, click , and select Create proxy endpoint:
apiproxy-nameproxy bundleapiproxy-name/apiproxy
- In the Apigee section, position your cursor over the
apiproxy-name/apiproxy/proxiesfolder and click.
The Create proxy endpoint wizard opens.
- In the Apigee section, position your cursor over one of the following folders, click
Enter the values for the next set of prompts. Press Enter after each to confirm and proceed or Esc to cancel.
Field Description Proxy endpoint nameName used to identify the proxy endpoint. API proxy base pathPart of the URL used to make requests to your API. Apigee uses the URL to match and route incoming requests to the proper API proxy.
The endpoint is created and added to the apiproxy-name/apiproxy/proxies folder in the Apigee section and opened in the editor. Configure the proxy endpoint, as described in the following section.
Configuring proxy endpoints
To configure proxy endpoints, refer to the following sections:
- Controlling how a proxy executes with flows
- Determining the URL of the API proxy endpoint
- Adding features using policies
- Managing resources
- ProxyEndpoint configuration
- Flow configuration reference
- Endpoint properties reference
Managing target endpoints
As described in What is an API proxy?, a target endpoint (TargetEndpoint) defines the way the API proxy interacts with your backend services. You configure the target endpoint to forward requests to the proper backend service, including defining any security settings, HTTP or HTTPS protocol, and other connection information. You can attach policies to the target endpoint to ensure that response messages are properly formatted for the app that made the initial request.
Create and configure target endpoints as described in this section.
Creating target endpoints
When you create a reverse API proxy, a default target endpoint is added to the API proxy configuration. When creating an API proxy with no backend target, only the default proxy endpoint is added to the API proxy configuration, no target endpoint is added. For more information, see Exploring the default API proxy configuration.
Create target endpoints, as required.
To create a target endpoint using Apigee in Cloud Code:
In the Apigee section, perform one of the following actions:
- In the Apigee section, position your cursor over one of the following folders, click , and select Create target endpoint:
apiproxy-nameproxy bundleapiproxy-name/apiproxy
- In the Apigee section, position your cursor over the
apiproxy-name/apiproxy/targetsfolder and click.
The Create target endpoint wizard opens.
- In the Apigee section, position your cursor over one of the following folders, click
Perform the following steps based on the type of target endpoint you want to create:
Type Steps External HTTP(s) target To define an external HTTP(s) target:
- Select HTTP(s) target.
- Enter the name of the target endpoint in Target endpoint name.
- Enter URL of the backend service that this target endpoint invokes in Backend target URL.
For more information, see Determining the URL of the target endpoint.
Proxy chaining To define a locally deployed API proxy as your target:
- Select Proxy chaining.
- Enter the name of the target endpoint in Target endpoint name.
- Select an API proxy.
- Select the proxy endpoint.
For more information, see Chaining proxies together.
Load balanced target To define a load balanced target using target servers defined in the environment:
- Select Load balanced target.
- Enter the name of the target endpoint in Target endpoint name.
For more information, see Configuring a TargetEndpoint to load balance across named TargetServers.
The target endpoint is created and added to the apiproxy-name/apiproxy/targets folder in the Apigee section and opened in the editor. Configure the target endpoint, as described in the following section.
Configuring target endpoints
Configure target endpoints, as described in the following topics.
- Load balancing across backend servers
- Controlling how a proxy executes with flows
- Chaining API proxies together
- Determining the URL of the target endpoint
- Adding features using policies
- Managing resources
- TargetEndpoint configuration
- Flow configuration reference
- Endpoint properties reference