Learn how to create a sample integration in Apigee Integration using the Salesforce trigger. The following steps describe how to configure the trigger, tasks, connectors, and data mappings required to run a complete integration.
In this quickstart, you will use the Salesforce trigger to invoke an integration in Apigee Integration for a Salesforce Change Data Capture (CDC) event as shown in the following figure:
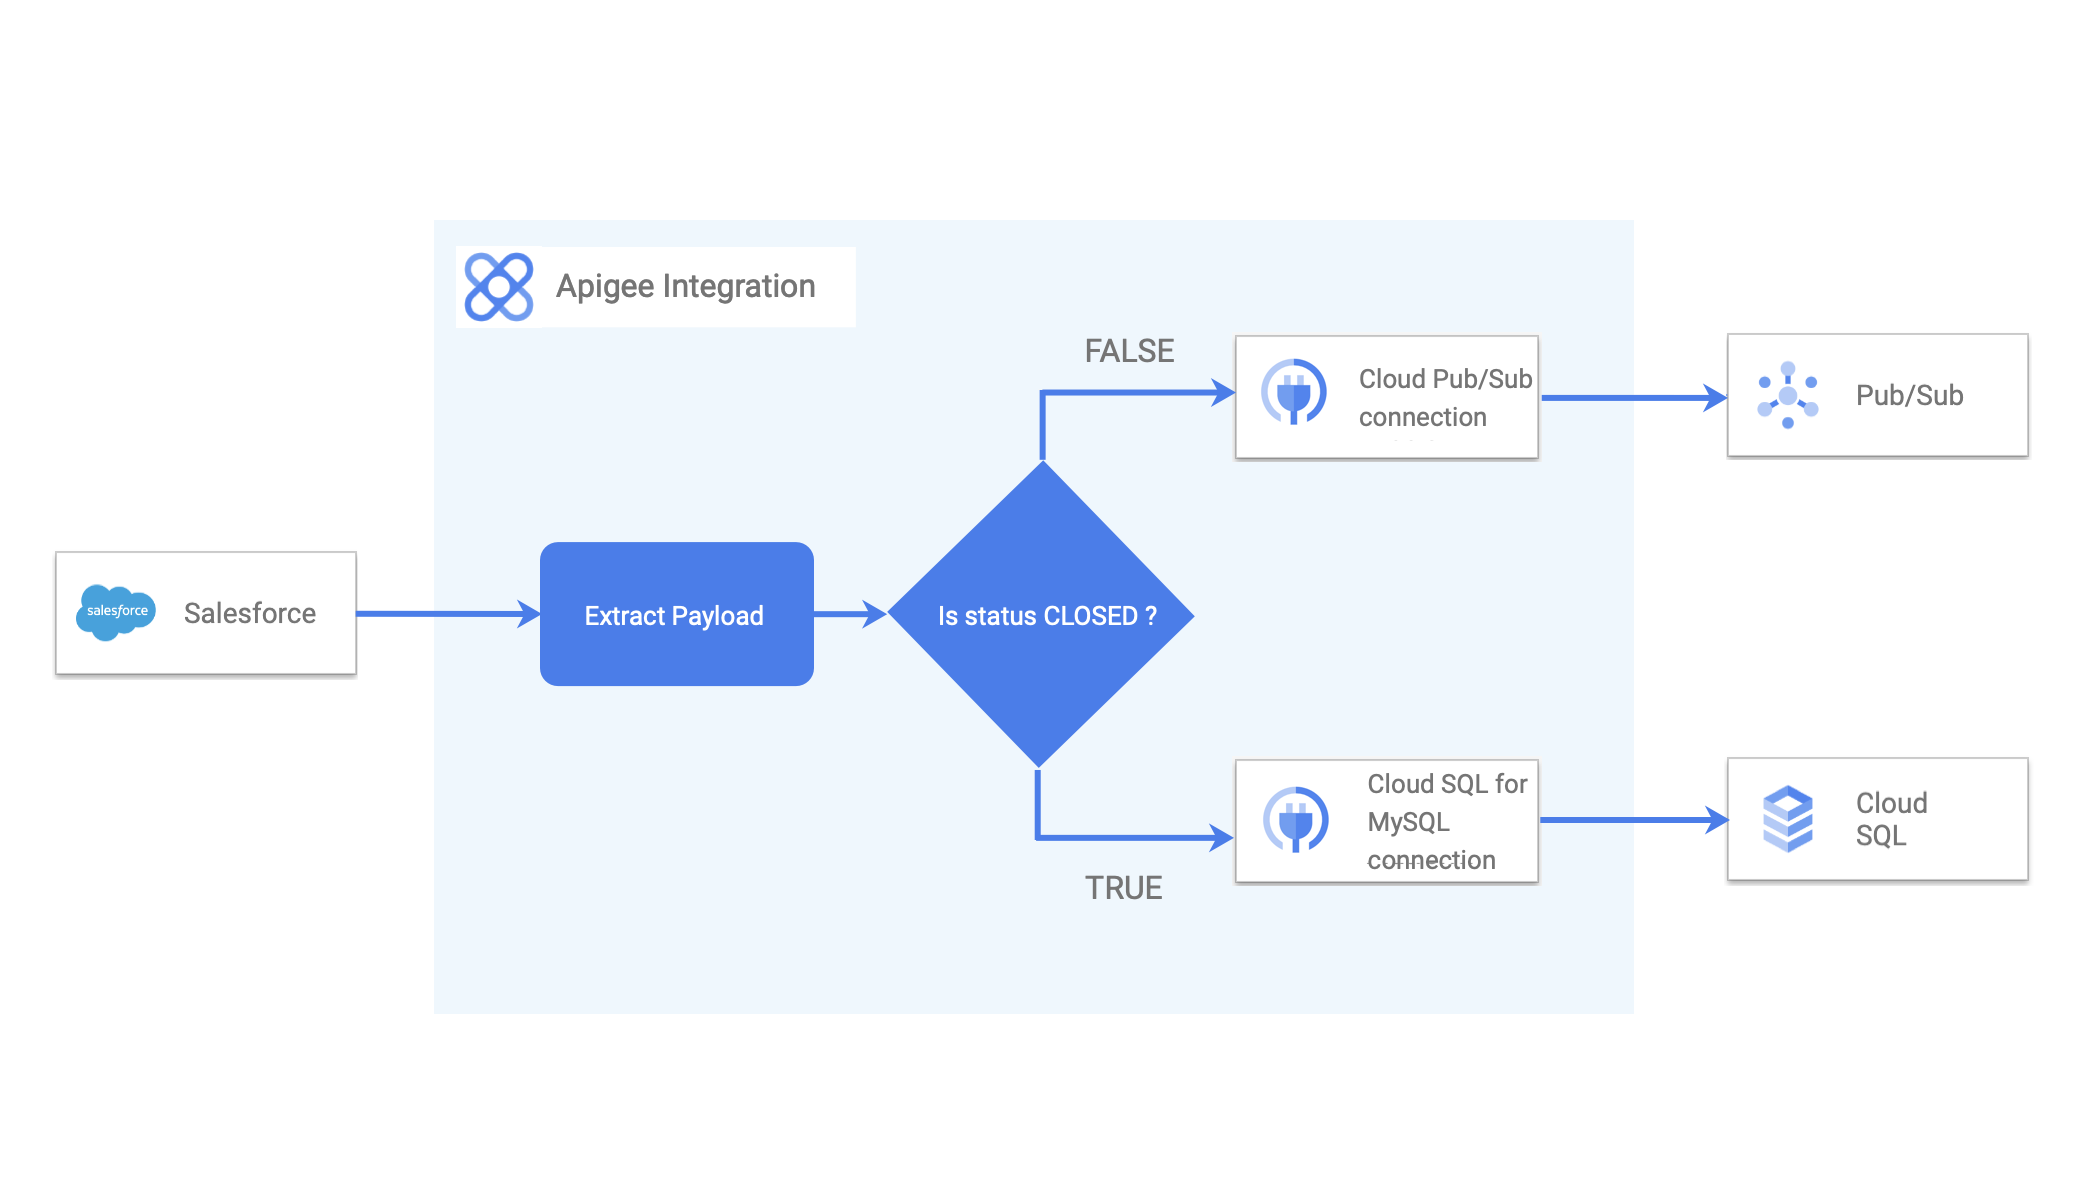
A Salesforce trigger is subscribed to the Salesforce opportunity channel. Data changes to the Salesforce opportunity invokes an Apigee Integration which extracts the status of the Salesforce opportunity. If the status is closed, the integration extracts the opportunity details and writes the data to a Cloud SQL instance using a connector. If there is a data change, but the status remains open, the integration sends a message to a pub/sub topic using a connector.
The following steps describe how to configure the trigger, tasks, authentication profiles, edges, variables, and data mapping required to run a successful integration.
Before you begin
- Confirm that your Salesforce developer account has Change Data Capture (CDC) enabled. This tutorial assumes that you have an existing Salesforce developer account with the required user setup and permission set. For information about Salesforce user setup and permission set, see Configure a Salesforce trigger.
- Assign the following IAM roles to the Apigee Integration Service Agent(
service-PROJECT_NUMBER@gcp-sa-apigee.iam.gserviceaccount.com) in your Google Cloud project.- Pub/Sub Editor
- Connectors Admin
- Apigee Integration Invoker
- Create the Cloud SQL table to store the Salesforce CDC data.
- In the Google Cloud console, go to the Cloud SQL Instances page and connect to your MySQL instance. See Connect to Cloud SQL for MySQL from Cloud Shell.
- Create the following MySQL database on your Cloud SQL instance:
CREATE DATABASE SALESFORCE_TRIGGER_DEMO; USE SALESFORCE_TRIGGER_DEMO; CREATE TABLE OPPORTUNITIES ( ID INT NOT NULL AUTO_INCREMENT, NAME VARCHAR(150) NOT NULL, AMOUNT DOUBLE NOT NULL, DT_CLOSE VARCHAR(150) NOT NULL, PRIMARY KEY (ID) ); COMMIT; - Verify that the table is created by executing the following command.
SELECT * FROM OPPORTUNITIES;
- Create a Cloud SQL for MySQL connection in Connectors. See Create a Cloud SQL for MySQL connection for detailed information.
- Create a Cloud Pub/Sub connection in Connectors. See Create a Cloud Pub/Sub connection for detailed information.
Create a new integration
To create a new integration, perform the following steps:
- In the Apigee UI, select your Apigee Organization.
- Click Develop > Integrations.
- Click Create integration.
- Enter a name and description in the Create Integration dialog. For example,
Demo-CDC-Opportunities. - Select a region for the integration.
- Click Create to open the integration designer.
Add and configure the Salesforce trigger
To add and configure a Salesforce trigger to the integration, perform the following steps:
- In the integration designer, select Add a task/trigger > Triggers to display a list of available triggers.
- Click and place the Salesforce trigger element in the integration designer.
- Click the Salesforce trigger element on the canvas to open the configuration pane of the trigger.
- Configure the following fields under Trigger Input:
- Event type: Select Change Data Capture (CDC) from the drop-down list.
- Salesforce instance configuration: Click the + Add new Salesforce instance configuration option from the drop-down list.
The Add Salesforce instance configuration dialog appears.
- Salesforce instance connection name: Enter a connection name for the Salesforce instance. For example,
CDC-PlatformUser. - Salesforce domain: Enter your Salesforce domain name. You can find this information from your Salesforce account > View profile page.
- Authentication profile: Select an authentication profile. If you don't have an authentication profile, create a new profile. For information, see Create a new authentication profile.
- Click Add.
- Salesforce instance connection name: Enter a connection name for the Salesforce instance. For example,
- Salesforce channel configuration: Click the + Add new Salesforce channel configuration option from the drop-down list.
The Add Salesforce channel dialog appears.
- Salesforce object name: Enter
Opportunity. - Click Add.
- Salesforce object name: Enter
- Operation: Select Update from the drop-down list
Changes to the properties are saved automatically.
Add and configure tasks
This tutorial uses the Connectors and Data Mapping tasks. Configuration details for each of these tasks are described as follows.
Configure a Connectors task with a Cloud SQL for MySQL connection
Perform the following steps to configure a Connectors task to insert records into an existing Cloud SQL table using the Cloud SQL for MySQL connection:
- Select +Add a task/trigger > Tasks in the integration designer to display the list of available tasks.
- Click and place the Connectors element in the integration designer.
- Click the Connectors task element on the designer to view the Connectors task configuration pane.
- Click and change the Connectors name as
Insert row to Cloud SQL. - Click Configure task.
The Configure connector task dialog appears.
- Do the following in the Configure connector task dialog:
- Select the connection region.
- Once a region is chosen, the Connection column appears. Select your Cloud SQL for MySQL connection from the list of available connections.
- Once a connection is chosen, the Type column appears. Select Entities and then OPPORTUNITIES from the list of available entities.
- Once a type is chosen, the Operation column appears. Select Create.
- Click Done to complete the connection configuration and close the pane.
Configure a Connectors task with a Cloud Pub/Sub connection
Perform the following steps to configure a Connectors task to publish a Pub/Sub message using the Cloud Pub/Sub connection:
- Select +Add a task/trigger > Tasks in the integration designer to display the list of available tasks.
- Click and place the Connectors element in the integration designer.
- Click the Connectors task element on the designer to view the Connectors task configuration pane.
- Click and change the Connectors name as
Publish to cloud pub/sub. - Click Configure task.
The Configure connector task dialog appears.
- Do the following in the Configure connector task dialog:
- Select the connection region.
- Once a region is chosen, the Connection column appears. Select your Pub/Sub connection from the list of available connections.
- Once a connection is chosen, the Type column appears. Select Actions and then publishMessage from the list of available actions.
- Click Done to complete the connection configuration and close the pane.
Configure the Data Mapping task
Do the following to configure a Data Mapping task.:
- Select Add a task/trigger > Tasks to display a list of available tasks.
- Click and place the Data Mapping element in the integration designer.
- Click the Data Mapping element on the designer to open the configuration pane of the task.
- Click Open Data Mapping Editor.
The Data Mapping Editor lets you to map input variables to the desired output variables, using the available transformation functions. The output is then available as a variable to any other integration task or trigger. For more details on passing data as variables, see Using variables in Apigee Integration.
- Click + Add new variable and create the following output variables:
Output variable name Data type OpportunityIsClosedBooleanOpportunityIdStringPubSubMessageString - Create the following mapping between the SalesforceTriggerCdcPayload variable and the Connector input payload variables as shown in the following table:
Input Output SalesforceTriggerCdcPayload.GET_PROPERTY("IsClosed").TO_BOOLEAN()OpportunityIsClosedSalesforceTriggerCdcPayload.GET_PROPERTY("Id").TO_STRING()OpportunityIdOpportunityId.TO_DOUBLE()connectorInputPayload.ID(Insert row to Cloud SQL)SalesforceTriggerCdcPayload.GET_PROPERTY("Name").TO_STRING()connectorInputPayload.NAME(Insert row to Cloud SQL)SalesforceTriggerCdcSnapshot.GET_PROPERTY("Amount").TO_DOUBLE()connectorInputPayload.AMOUNT(Insert row to Cloud SQL)SalesforceTriggerCdcSnapshot.GET_PROPERTY("CloseDate").TO_STRING()connectorInputPayload.DT_CLOSE(Insert row to Cloud SQL)OpportunityId.CONCAT(" is still open")PubSubMessagePubSubMessageconnectorInputPayload.message(Publish to cloud pub/sub)
Once your mapping is complete, close the pane. Any changes will be autosaved.
Add edge connection
An edge is a connection between any two elements in an integration and an edge condition lets you specify the conditions that must be met for control of an integration to pass to the task connected by the edge. For more information on edges and edge conditions, see Edges.
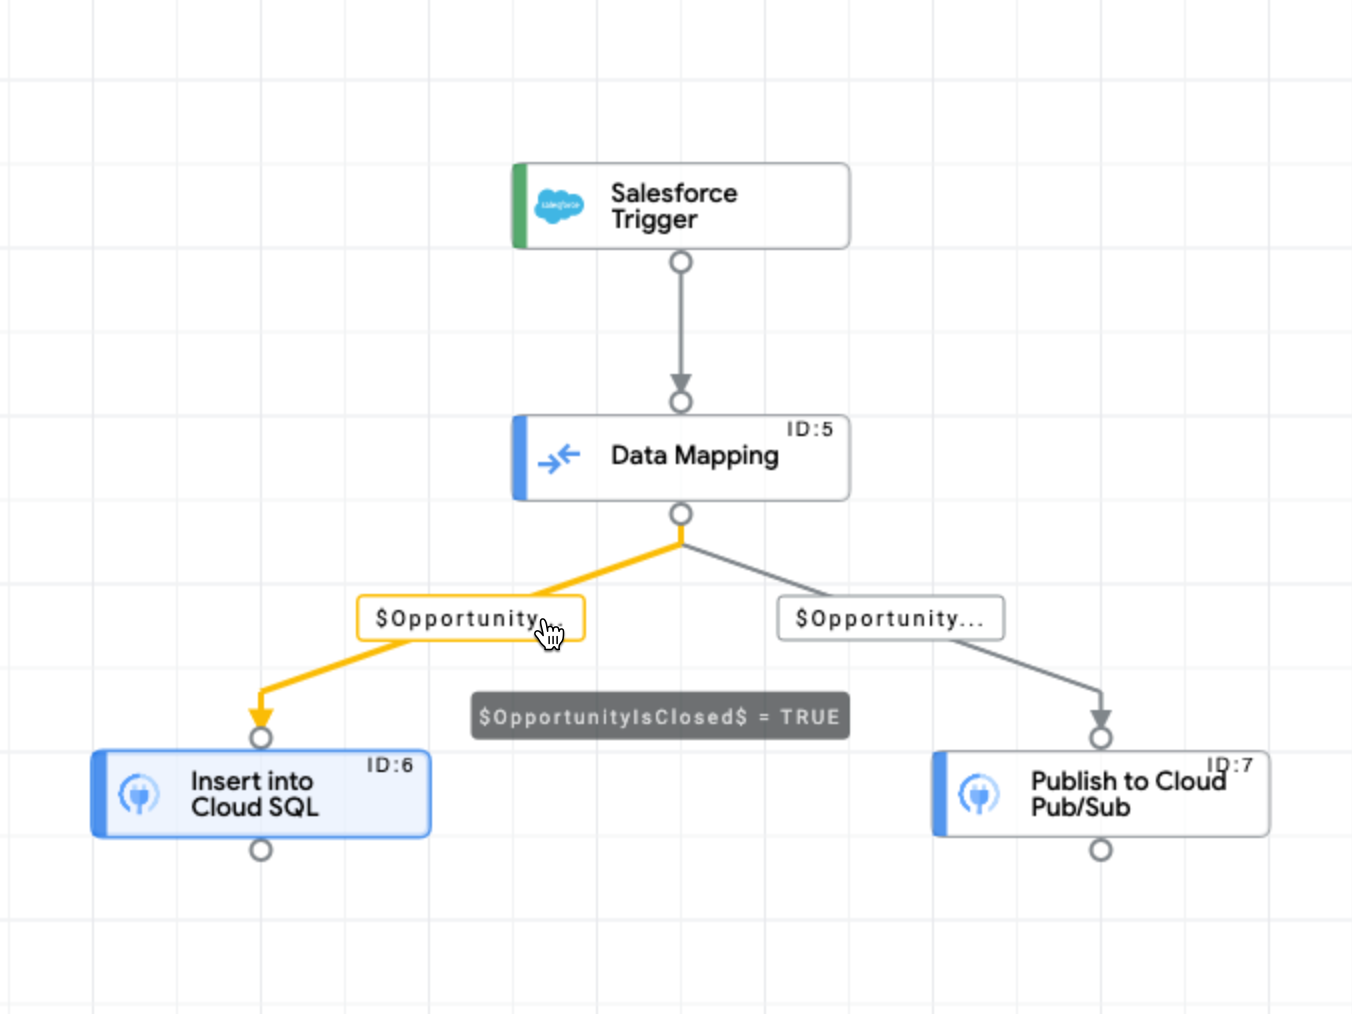
- Add an edge connection from the Salesforce trigger element to the Data Mapping element.
- Add an edge connection from the Data Mapping element to the Insert row to Cloud SQL Connector element with the following edge condition:
$OpportunityIsClosed$ = TRUE
- Add another edge connection from the Data Mapping element to the Cloud Pub/Sub Connector element with the following edge condition:
$OpportunityIsClosed$ = FALSE
Test the integration
To test the new integration:
- Click Test in the integration designer toolbar, and then select the Salesforce Trigger.
The Test Integration dialog appears.
- Click Test integration.
Test the Cloud SQL task by logging in to the Salesforce instance and changing an opportunity status to "closed."
Test the Pub/Sub task by logging in to the Salesforce instance and changing another detail about the opportunity, but leave the status of the opportunity "open."
For more information about testing, see Test and publish integrations.
To verify the success of your integration:
- Go to the Cloud SQL page. Check your database and Cloud SQL logs to confirm the insertion of the new row.
- Go to the Pub/Sub page. Select your Pub/Sub topic and then click View messages to confirm receipt of the message sent by the integration.
- Inspect the Apigee Integration logs to view the status of a given integration. To view logs:
- Click Logs in the toolbar of the integration designer.
- On the Execution Logs page, you can view details about each attempt to run an integration.
Each entry includes details for the execution attempt, including:
- Integration name
- Execution ID
- Status
- Start time
- Duration
- Integration version
- Trigger ID
- Click the expander arrow (>) next to the executed integration to view an expanded list of tasks and variables in the integration, along with task status and variable payloads.