Learn how to create a sample integration using Apigee Integration and the Cloud Pub/Sub trigger. The following steps describe how to configure the trigger, tasks, variables, and data mappings required to run a complete integration.
Overview
In this quickstart, you will create an integration with a Cloud Pub/Sub trigger to listen to an existing Pub/Sub topic that receives temperature readings in degrees Kelvin from a IOT device. You can then use the Data Mapping task to transform the Pub/Sub message to celsius and send the value in an email.
Before you begin
Ensure that you perform the following tasks before beginning the quickstart:
- Assign the following IAM roles to the Apigee Integration Service Agent (
service-PROJECT_NUMBER@gcp-sa-apigee.iam.gserviceaccount.com) in your Google Cloud project.- Pub/Sub Editor
- Apigee Integration Invoker
For more information about assigning IAM roles, see IAM roles and permissions.
- Go to the Pub/Sub topics page in the Cloud console.
- Click Create a topic.
- In the Topic ID field, provide a unique topic name. For example,
temperaturesensor - Click Save.
- In the Apigee UI, select your Apigee Organization.
- Click Develop > Integrations.
- Click Create integration.
- Enter a name and description in the Create Integration dialog. For example,
my-test-integration. - Select a region for the integration.
- Click Create to open the integration editor.
- In the integration editor, select Triggers to display a list of available triggers.
- Click and place the Cloud Pub/Sub trigger element to the designer.
- PROJECT_ID is the Google Cloud project where your topic is created.
- TOPIC_ID is the ID of the Cloud Pub/Sub topic you created in Before you begin.
- Select Tasks to display a list of available tasks.
- Click and place the Data Mapping element in the integration editor.
- Click on the Data Mapping task on the designer to open the configuration pane for the task.
- Click Open Data Mapping Editor.
The Data Mapping Editor lets you map input variables to the desired output variables, using the available transform functions. The output is then available as a variable to any other integration task or trigger. For more details on passing data as variables, see Using variables in Apigee Integration.
For this quickstart, follow these steps to create a mapping using the
CloudPubSubMessageas input:- Expand the
CloudPubSubMessageJSON variable in the Variables list and drag theCloudPubSubMessage.datavariable to the first Input row. - Click + (Add a function) next to the
CloudPubSubMessage.datavariable to view the drop-down list of available functions. - Select
TO_DOUBLE()to convert theCloudPubSubMessage.datavalue to a data type ofdouble. - Click + (Add a function) again to select and chain the
SUBTRACTfunction. - Enter
273.15as theSUBTRACTfunction value. This is to convert the Kelvin temperature to degrees Celsius. - Click the first row in the Output column to create a new output variable to hold the value of the transformed
data. Complete the following fields:
- Name: Enter
TempInCelsius. - Check Use as an output of integration.
- Click Create to create the variable and close the pane. The new TempInCelsius variable will appear in the Variables list.
- Name: Enter
- Drag the TempInCelsius variable from the Variables list to the second row in the Input column.
- Click + (Add a function) in the TempInCelsius variable to view the drop-down list of available functions.
- Click
TO_STRING()to transform the data type of the variable fromdoubletostring. - Click the second row in the Output column to create a new variable to hold the value of the transformed
data. Complete the following fields:
- Name: Enter
TempInCelsiusString. - Blank default value means: Select Empty String.
- Select the Use as an output of integration checkbox.
- Click Create to create the variable and close the pane. The new variable will appear in the Variables list on the left side of the data mapping editor.
- Name: Enter
- Close the Data Mapping Editor once your mapping is complete. Any changes will be autosaved.
- Expand the
- Select Tasks in the integration editor to display the list of available tasks.
- Click and place the Send Email element in the integration editor.
- Click the Send Email element on the designer to open the configuration pane
of the task. Set the following properties:
- To Recipient(s): Enter your email address. You will use this email to confirm the successful completion of the integration.
- Subject: Enter
Temperature in Celsius. - Body in Plain Text: Select the
TempInCelsiusStringvariable created earlier in the Data Mapping task. - The remaining options can be left in the default configuration.
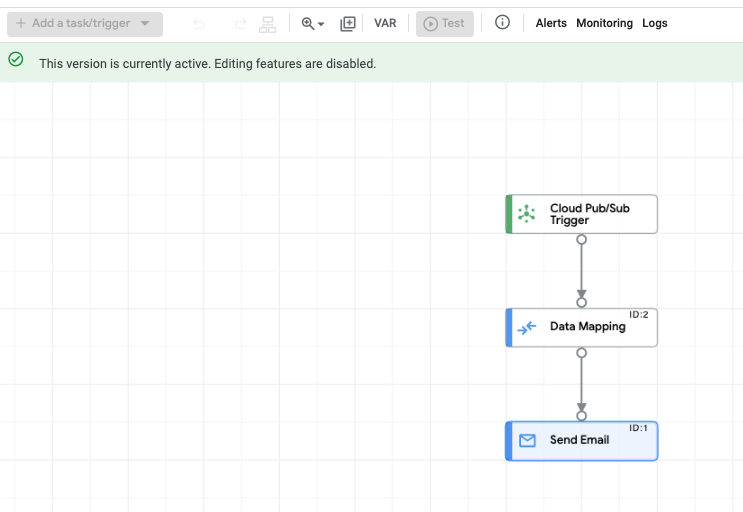
- Add an edge connection from the Cloud Pub/Sub trigger element to the Data Mapping element by hovering over a control point on the Cloud Pub/Sub trigger element, then clicking and dragging a line to a control point on the Data Mapping task element. This edge denotes the flow of control from the Cloud Pub/Sub trigger task to the Data Mapping task.
- Add an edge connection from the Data Mapping element to the Send Email element by hovering over a control point on the Data Mapping element, then clicking and dragging a line to a control point on the Send Email task element. This edge denotes the flow of control from the Data Mapping task to the Send Email task.
- Go to the Pub/Sub topics page in the Cloud console.
- Search for and then select the temperaturesensor topic that you created.
- From the topic details page, click + Publish Message to open the Publish Message configuration pane.
- In the Message body field, enter
307.15.Creating this message simulates the publication of a temperature reading in Kelvin received by Pub/Sub from an IOT device.
- Click Publish to publish the message to the topic and trigger your integration.
- In the integration editor, click
 View execution logs for this integration. The Execution Logs page appears.
For more information about execution logs, see View integration execution logs.
View execution logs for this integration. The Execution Logs page appears.
For more information about execution logs, see View integration execution logs. - On the Execution Logs page, you can view details about each attempt to run an integration.
Each entry includes details for the execution attempt, including:
- Integration name
- Execution ID
- Status
- Start time
- Duration
- Integration Version
- Trigger ID
- Click the expander arrow (>) next to the executed integration to view an expanded list of tasks and variables in the integration, along with task status and variable payloads.
Set up environment
Create a new Cloud Pub/Sub topic
This quickstart assumes that you have a Pub/Sub topic that receives temperature readings in degrees Kelvin from a IOT device. It is not necessary to actually have the topic connected to a device. This quickstart tests the integration's ability to listen to the topic and perform tasks when triggered.
To create a sample topic for the purposes of this quickstart:
Create a new integration
To create a new integration, perform the following steps:
Add a Cloud Pub/Sub trigger
To add a Cloud Pub/Sub trigger to the integration, follow the steps below:Configure a Cloud Pub/Sub trigger
Click the Cloud Pub/Sub trigger element in the integration editor to view the trigger configuration pane.
Specify the topic the trigger should listen to in the Pub/Sub topic field in the following format:
projects/PROJECT_ID/topics/TOPIC_IDwhere:
For example, if your project is named my-project and you named your topic temperaturesensor, enter:
projects/my-project/topics/temperaturesensor.
To view all the available topics in your Google Cloud project, see the Topic name column in Topics.
The Cloud Pub/Sub trigger configuration pane will automatically populate the Trigger Output field with a variable to hold the Pub/Sub message.
Add and configure the Data Mapping task
To configure the Data Mapping task:
Add and configure the Send Email task
To configure the Send Email task:
Add the required edge connections
An edge is a connection between any two elements in an integration. The connection denotes the direction of the control flow from one element(task or trigger) to another. For more information on edges, see Edges.
The completed connection should appear as shown in the figure below:
Test the integration
To test the new integration from the Pub/Sub topics page, do the following steps:
Upon successful completion, the integration sends an email with the Kelvin temperature converted to degrees Celsius to the email address specified in the Send Email task. Confirm receipt of the email in your email client.
The email sent by the integration should have a message body containing the value 34.
In addition to verifying the contents of the email, you can inspect the logs to view the status and payload of a given integration. To view logs: