This page applies to Apigee, but not to Apigee hybrid.
View
Apigee Edge documentation.

This section describes how to set up an Apigee evaluation organization (or eval org) using the Apigee provisioning wizard. For more information, see Organization types.
Video: Check out this short video to learn about setting up and testing an Apigee eval org.
Creating an eval org with the Apigee provisioning wizard
This section describes how to use the Apigee provisioning wizard to create an eval org.
Get started
- Ensure that you have met the prerequisites before you continue.
- Create a Google Cloud project if you have not done so already.
-
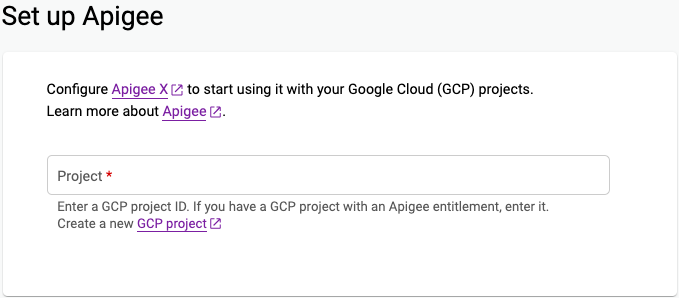
Launch the Apigee provisioning wizard in a browser.
The Set up Apigee pane of the Apigee provisioning wizard displays:
-
Enter your Google Cloud project ID in the Project field.
If you do not have permission to manage the project, or if the project does not exist, you will see an error message. Make sure the project ID you entered is correct, and that it is the project ID and not the project name, if they are different.
If the project is already associated with a paid Apigee account, you cannot create an evaluation org for the project. See Provisioning > Paid orgs > Before you begin to use the Apigee provisioning wizard to provision a paid org.
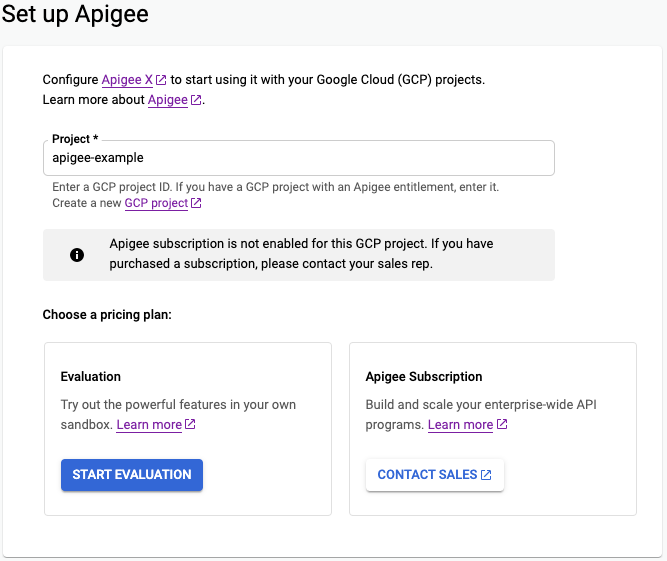
- Click START EVALUATION.
- The Apigee provisioning wizard displays the Set up Apigee Evaluation page. As you complete each step, the EDIT icon will display by the next step.
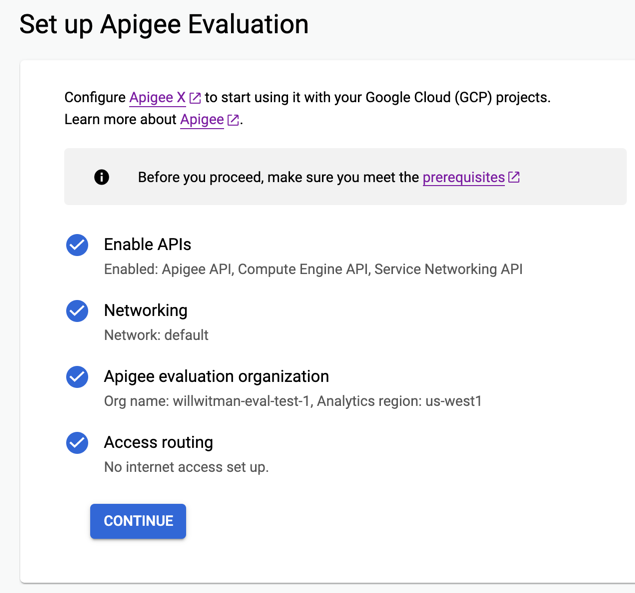
Enable APIs
Enable the Google Cloud APIs needed for Apigee to function.
- Click EDIT next to Enable APIs to enable the required APIs for your evaluation org.
-
Click ENABLE APIS in the Enable APIs pane of the wizard. This will enable for your
project:
- Apigee API
- Compute Engine API
- Service Networking API
- Wait a few moments for the step to complete. When it is done, a check will display next to the Enable APIs step and the Networking step will be available.
Networking
Set up networking for your local Virtual Private Cloud (VPC).
-
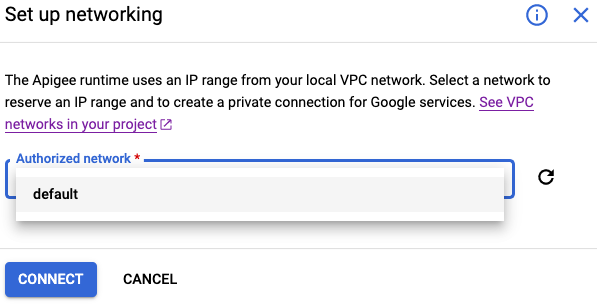
Click EDIT next to Networking.
The Set up networking pane displays:
-
Select a network from the Authorized network drop-down list. For most eval orgs, you will select
default, which is the network that Google Cloud created for you when you created your Google Cloud project. If you have a different Cloud network and want to use it, select it from the list. (Note that the network must have a /22 CIDR block of IP addresses free.)If your project is using shared Virtual Private Cloud (VPC) networking, select the network that manages the network settings for your project. If you do not see that network in the dropdown list, have a user with permission to manage the network log in to complete this step. Then you can return to the wizard and continue. For more information on Shared VPC networking, see Using Shared VPC networks.
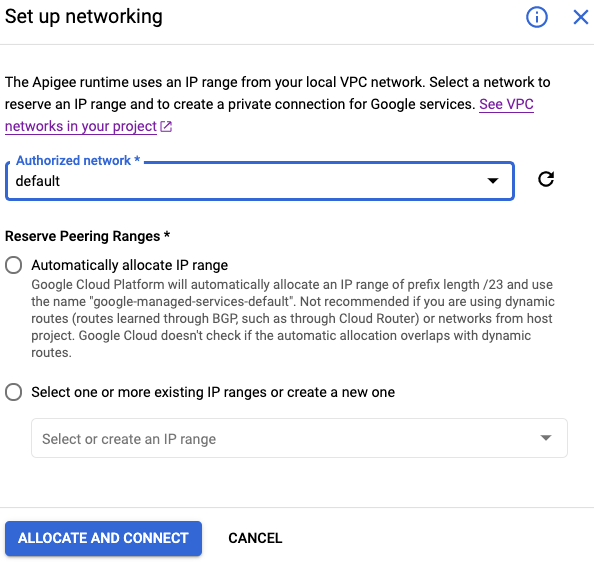
After you select a network the wizard displays the peering range selection options:
-
Select how you want Apigee to identify IP addresses for your network. For eval organizations it is most common to select Automatically allocate IP range. If you prefer to specify a range, select Select one or more existing IP ranges or create a new one. You must specify both a name and a specific IP range, like
10.20.238.0/22.Click ALLOCATE AND CONNECT to continue.
The wizard creates the network and allocates IP addresses for the services within that network. The network creation takes a couple of minutes to complete.
Apigee evaluation organization
Create an Apigee eval organization.
-
Click EDIT next to Apigee evaluation organization.
The Create an Apigee evaluation organization pane displays:
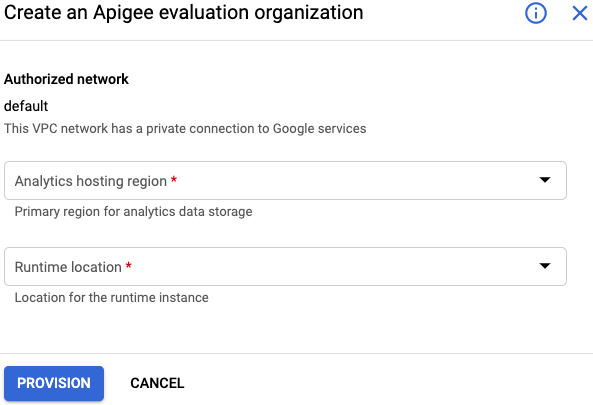
Select an analytics hosting region and a runtime location. For a list of available Apigee API Analytics and runtime locations, see Apigee locations.
-
Click PROVISION.
The Apigee provisioning wizard creates the eval org and its associated runtime instance. The eval org will have the same name and ID as your project ID.
When it is done, a check will display next to the Apigee evaluation organization step and the Access routing step will be available.
Access routing
In this step, you choose whether to expose your new cluster to external requests or to keep it private (and only allow requests from within your VPC). The manner in which you access API proxies depends on whether you decide to allow external requests or restricted requests to internal only:
| Access Type | Description of the configuration and deployment process |
|---|---|
| External |
Allow external access to API proxies. The wizard deploys a Hello World proxy to your runtime instance for you. You can then send a request to the API proxy from your administration machine or any machine with access to the internet. |
| Internal |
Allow only internal access to API proxies. The wizard deploys a Hello World proxy to your runtime instance for you. You must manually create a new VM inside your VPC and connect to it. From the new VM, you can send requests to the API proxy. |
Follow the steps under the External Access or Internal Access tab below:
External Access
This section describes how to configure routing when you're using the Apigee provisioning wizard and you want to allow external access to your API proxy.
To configure routing for external access in the Apigee provisioning wizard:
- Open the Apigee provisioning wizard if it is not currently open. The wizard returns to the most recent incomplete task in the list.
Click EDIT next to Access routing.
Select Enable internet access from the Configure access panel.
The wizard displays additional options for configuring the instance:
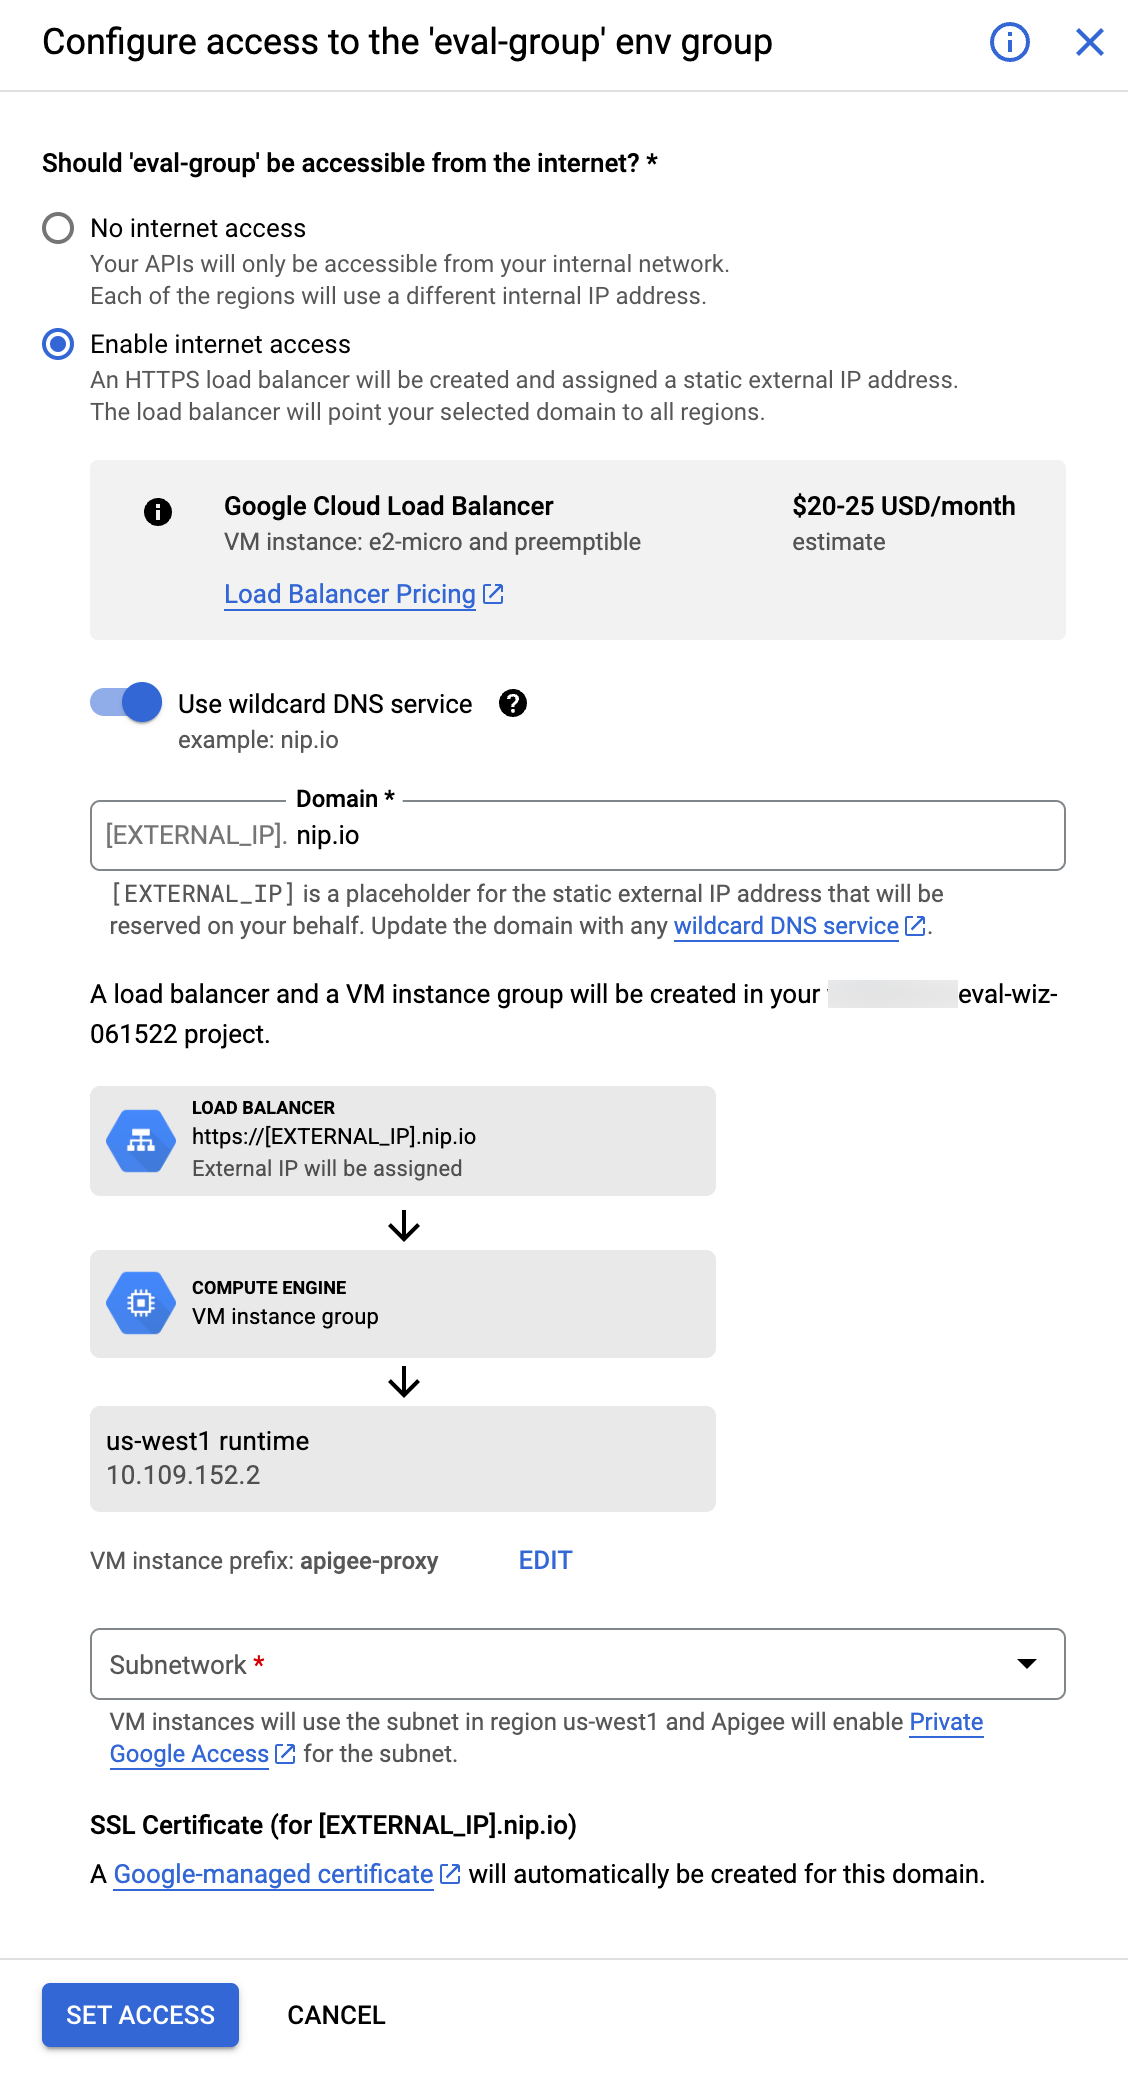
- For the domain setting, enter a valid DNS name that you own, or choose to use a wildcard DNS service, such as nip.io. If you choose the wildcard service, a static external IP address is reserved for you. The wildcard option is easy to use, but is only recommended for testing purposes.
- (Optional) You can change the virtual machine instance name to something more meaningful. As part of the provisioning process, Apigee creates a managed instance group (MIG) containing multiple VMs to proxy traffic between the load balancer and the Apigee runtime. To change the VM instance name, click EDIT and make your changes.
- Select the subnet used to host the MIG of VMs to bridge to the Apigee runtime. The subnet size can be small (e.g. /28) as it needs to host at most three VMs. The subnet can be shared and used by VMs or other entities.
-
If you are using a wildcard DNS service, just note that a Google-managed certificate will be created for the domain. You do not have to take further action. See also Using Google-managed SSL certificates.
If you are using your own domain, select whether to supply a certificate you manage or use a Google-managed certificate:
- Supply a self-managed certificate:
- Generate a certificate/key pair if you don't already have one. For test environments, this can be a self-signed certificate. For a production system you should use a certificate signed by a Certificate Authority. See Using self-managed SSL certificates.
- In the respective fields, browse your file system and attach the files containing the certificate and private key. Both must be PEM-formatted.
- Use a Google-managed certificate. To use a Google-managed certificate, do not enter a signed certificate or RSA private key. The Google-managed certificate will be created for you.
- Supply a self-managed certificate:
Click SET ACCESS.
Apigee prepares your cluster for external access. This includes setting up the MIG to proxy traffic, creating firewall rules, uploading certificates, and creating a load balancer.
This process can take several minutes to complete.
When Apigee finishes setting up your runtime's access, you'll notice that there is a blue check mark next to all steps in the wizard:
Click CONTINUE.
The wizard displays Recommended next steps. The steps shown depend on whether you used your own DNS name or a wildcard DNS.
- If you specified your own domain name, go to your domain registrar and create an A record for your domain hostname that points to the IP address shown in the wizard. When that is done, click Launch to call the API proxy that was deployed for you.
- If you used a wildcard DNS, then just click Launch to call the hello-world API proxy that was deployed for you.
- (Optional) Add users and roles for your organization. See Users and roles.
You have now completed the steps to configure external internet access to API proxies.
Internal Access
This section describes how to configure routing when you're using the Apigee provisioning wizard and you do not want to allow external access to your API proxy. Instead, you want to limit access to internal requests only that originate from within the VPC.
To configure routing for internal access in the Apigee provisioning wizard:
- Click EDIT next to the Access Routing step.
Select No internet access in the Configure access to the 'eval-group' env group panel.
- Click CONTINUE.
You'll notice that there is a blue check mark next to all steps in the wizard. This indicates all steps were completed successfully:
- Click CONTINUE.
- To test your newly provisioned organization, follow the instructions in
Calling an API proxy with internal-only access.
In those steps, you will create a Virtual Machine (VM) inside your VPC from which
API proxy requests can be sent to the internal load balancer (ingress), which forwards them
to your Apigee runtime instance. For convenience, the provisioning wizard created and deployed a test
proxy for you, called
hello-world. - (Optional) Add users and roles for your organization. See Users and roles.
If you encounter errors during this part of the process, see Troubleshooting.
View organization details
Finally, open the Apigee UI to view details about your organization.
- Click OPEN APIGEE CONSOLE to open the Apigee UI.
- Make sure the project you just created is selected in the Apigee UI. For example:

If the org you just created is not the one selected, click the project name to drop down a list of projects.
If your project is not in the list of available projects, you may need to wait a few moments before it is available. Refresh your browser and check again.
-
Click Admin to see the configuration of your org:
Location Property Value Admin > Instances Name eval-instanceIP address This is your org's internal load balancer IP address. Admin > Environments > Overview Environment name evalAdmin > Environments > Groups Environment group eval-groupAdmin > Environments > Groups Hostnames PROJECT_NAME-eval.apigee.net -
Click Develop > API Proxies. Apigee created
an API proxy called
hello-worldfor you when you provisioned the eval org.Location Property Value Develop > API Proxies API proxy hello-world
Deleting an evaluation organization
To delete (or deprovision) an eval organization, use the gcloud alpha apigee organizations delete command.