This page applies to Apigee, but not to Apigee hybrid.
View
Apigee Edge documentation.

![]()
An Apigee organization (sometimes referred to as an org) is the top-level container in Apigee. It includes all of your environments and environment groups, users, API proxies, and related resources. For more information, see Understanding organizations.
What you're doing in this step
Now that you've enabled the required APIs, you can create an Apigee organization. Remember that the project ID and org name are always the same.
The wizard gives your new organization the same name as your project ID. This ensures that it is globally unique.
In this step, depending on your specific user journey, you specify hosting locations for your Apigee analytics or control plane, runtime instances, and API consumer data region. You also specify encryption key selections.
The difference between each of the user journeys is whether you are using data residency or not.
The following keys are used during organization creation:
| Encryption key | Description |
|---|---|
| Control plane key |
Encrypts Analytics data that is stored within BigQuery in Apigee tenant project. Encrypts API proxies, Target Servers, Truststores and Keystores and anything else shared across runtimes. |
| API Data Consumer key | This is required to be a region within the control plane location. |
| Runtime database key | Encrypts application data such as KVMs, cache, and client secrets, which is then stored in the database. |
The following key is used during each instance creation:
| Encryption key | Description |
|---|---|
| Runtime disk key | Encrypts KVMs; environment cache; quota buckets and counters.
Encrypts KMS data API products, developers, developer apps, OAuth tokens (including access tokens, refresh tokens, and authorization codes), and API keys. |
Perform the step
To view the steps for your specific user journey, select one of the following user journeys.
View user journey flow diagram
The following diagram shows the possible user journeys to configure hosting and encryption in the subscription wizard.
The user journeys are noted A and B; where A is no data residency and B is with data residency.

| User journey | Description | |
|---|---|---|
| User journey A: No data residency |
Select this option if you are not required to store core content and processing in the same geographic region: |
|
| User journey B: With data residency |
Select this option if you want to store your core content and processing in the same geographic region: |
User Journey A: No data residency
To create a new organization in the Apigee provisioning wizard:
- If it is not currently open, open the Apigee provisioning wizard. The wizard returns to the next incomplete install task.
- In the wizard, click Edit next to Apigee
organization:
The Create an Apigee organization view displays:
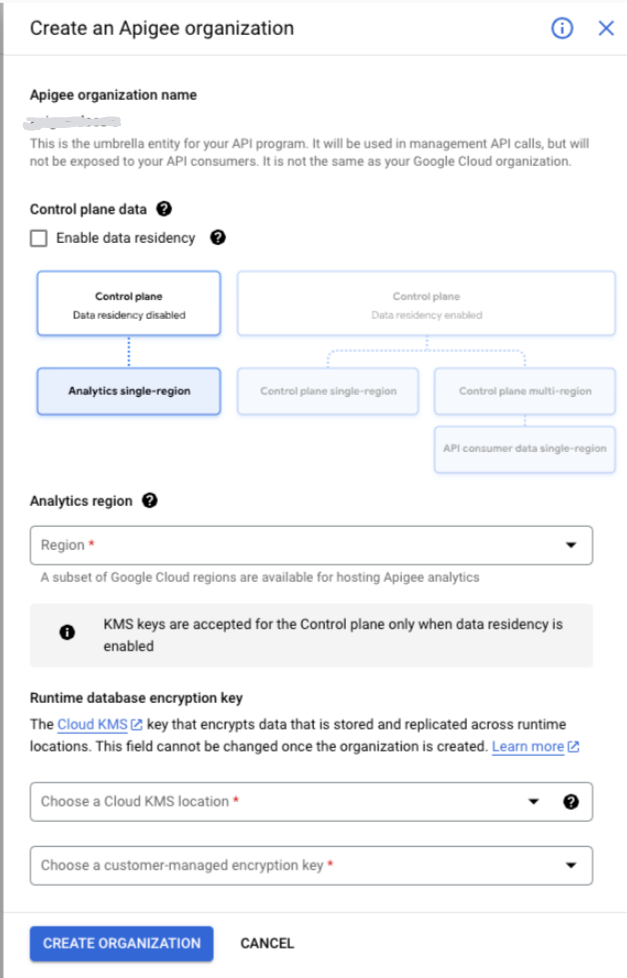
- In the Control plane data section, clear the Enable data residency box.
From the Analytics hosting region drop-down list, select the physical location where you want your analytics data stored. For a list of available Apigee API Analytics regions, see Apigee locations.
- Under Runtime database encryption key make the following
selections:
- Choose a Cloud KMS location. The dropdown menu lists two groupings of locations: multi-regional and dual-regional are grouped together, and regional locations are in another grouping. Note that if you select a Regional location, we cannot offer an SLA higher than 99.9%.
- Select or create a key for data stored and replicated across runtime locations.
- Click Grant to grant the service account permission to encrypt/decrypt with the selected key.
- Click Create organization.
Apigee begins the process of creating an organization for your project. The process takes approximately 20 minutes to complete.
When Apigee finishes creating your organization, a check mark appears next to the task and an Edit button appears next to the next task in the wizard.
User Journey B: With data residency
To create a new organization in the Apigee provisioning wizard:
- If it is not currently open, open the Apigee provisioning wizard. The wizard returns to the next incomplete install task.
- In the wizard, click Edit next to Apigee organization. The Create an Apigee organization view displays.
- In the Control plane data section, select the Enable data residency box.
- In the Control plane hosting location section:
- Select your Location type:
- Region: Your data is stored in a single region, which can reduce latency.
- Multi-region: You data is stored in more than one region, which can increase availability across a large area.
- From the Region or Multi-region drop-down list that displays, select the physical location where you want your data stored. For a list of available control plane regions, see Apigee locations.
- From the Control plane encryption key drop-down list, select or create a key.
- Click Grant if prompted.
- Select your Location type:
- In the API consumer data region section:
- From the API consumer data region drop-down list, select the physical location where you want your data stored. For a list of available control plane regions, see Apigee locations.
- From the API consumer data encryption key drop-down list, select or create a key for data stored for the control plane.
- Click Grant if prompted.
- In the Runtime database encryption key section:
- Choose a Cloud KMS location.
- From the Runtime database encryption key drop-down list, select or create a key for data stored and replicated across runtime locations.
- Click Grant if prompted.
- Click Create organization.
Apigee begins the process of creating an organization for your project. The process takes approximately 20 minutes to complete.
When Apigee finishes creating your organization, a check mark appears next to the task and an Edit button appears next to the next task in the wizard.
How to create a key
To create a key:
- Click Create key.
- Select a key ring, or if one doesn't exist, enable Create key ring and enter a key ring name and pick your key ring location. Key ring names can contain letters, numbers, underscores (_), and hyphens (-). Key rings can't be renamed or deleted.
- Click Continue.
- Create a key. Enter a name and protection level. Note that key names can contain letters, numbers, underscores (_), and hyphens (-). Keys can't be renamed or deleted. For protection level, Software is a good choice. This is the same default used by Cloud KMS; however, you can change it if you wish.
- Click Continue and review your selections.
- Click Create.
Troubleshooting
If you encounter errors during this part of the process, see Troubleshooting.
Progress (3/8 ... Keep going!)
1 2 3 NEXT: Configure service networking 5 6 7 8