This page applies to Apigee and Apigee hybrid.
View
Apigee Edge documentation.

Combine policies and resources into a shared flow that you can consume from multiple API proxies, and even from other shared flows. Although it's like a proxy, a shared flow has no endpoint. It can be used only from an API proxy or shared flow that's in the same organization as the shared flow itself.
By capturing in one place functionality that's useful in multiple places, a shared flow helps you ensure consistency, shorten development time, and more easily manage code.
The following video demonstrates how to create and debug a shared flow in the Apigee UI.
You can call a shared flow using the FlowCallout policy. Also, by attaching a shared flow to a flow hook, you can have the shared flow execute before a proxy or target request, or after a proxy or target response.
For reference on the FlowCallout policy, see FlowCallout policy. For more on
flow hooks, see Attaching a shared flow
using a flow hook.
For example, imagine you have areas of functionality that are either used in multiple places or must be standardized across APIs in your organization. You could have a shared flow for each category, including:
- Security, with authorization code using OAuth and API key verification, as well as threat protection code.
- Logging, for generating standard error messages.
- Mediation, for transforming between XML and JSON message formats.
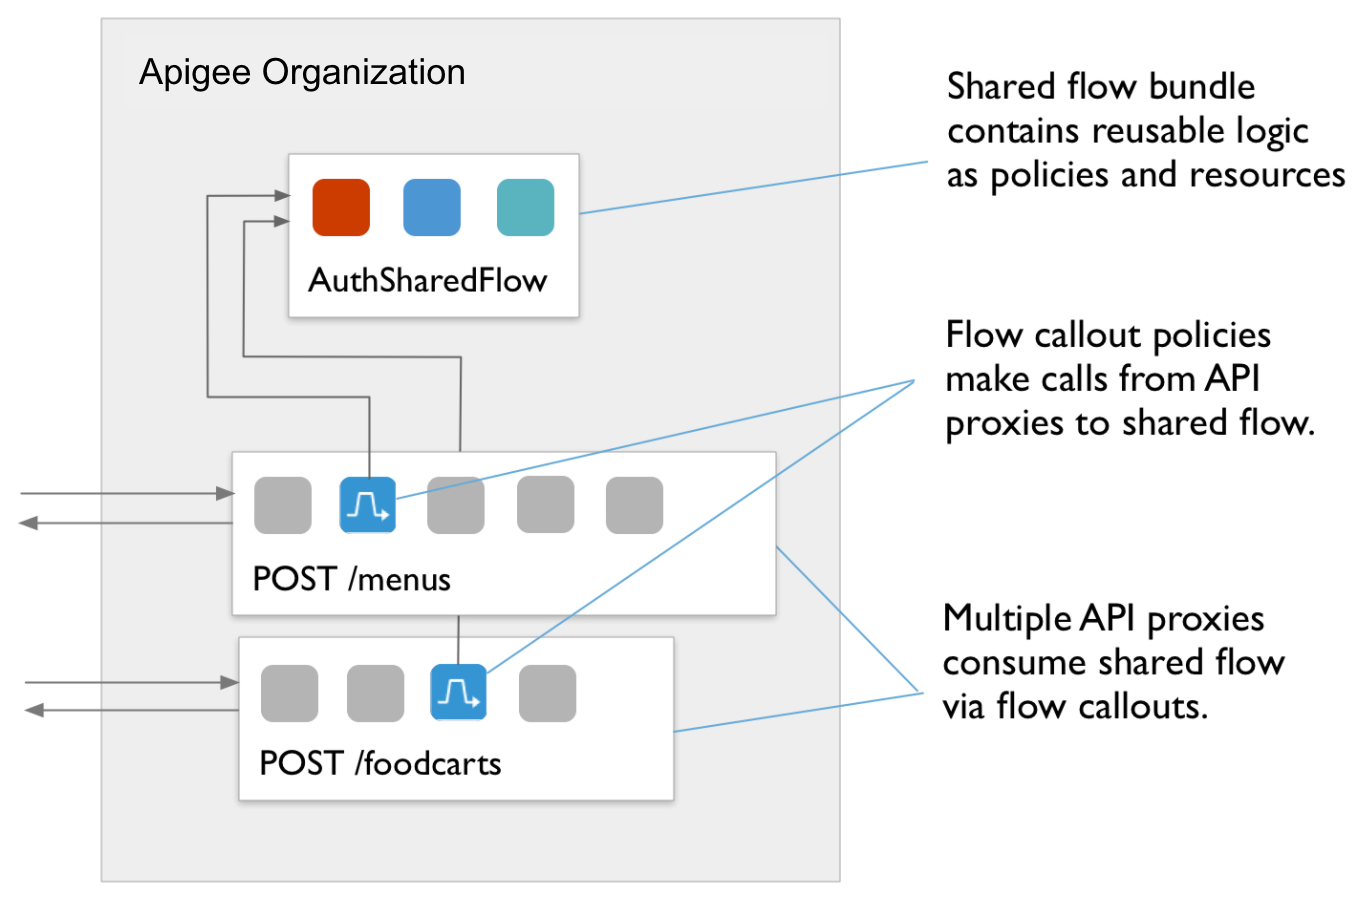
In the following illustration, two API proxies call out (with a FlowCallout policy) to a
shared flow to authenticate incoming user requests. The AuthSharedFlow has been deployed
separately to the organization before the proxies so that it is available to support requests from the
proxies. A shared flow can be developed and managed by a team responsible for broad company
policies, then consumed in proxies by line-of-business teams building more specialized apps.
Developing a shared flow
When developing a shared flow, you must always test it with calls sent to an API proxy. In other words, you can't send requests directly to a shared flow as you would an API proxy. Instead, you send requests to an API proxy which is, in turn, calling out to the shared flow.
Here are the high-level steps for developing a shared flow:
- Figure out what the shared set of features should be.
For example, you might want to combine traffic management features, including suppressing traffic spikes. That way, you can manage their configuration outside the workflow of those implementing line-of-business logic.
-
Develop a shared flow by implementing policies and supporting resources, just as you
would when developing an API proxy.
A shared flow is a sequence of conditional steps. So developing one is like developing an API proxy. You can include policies and resources you might include in a proxy.
For example, as part of your traffic management support, you might implement a Spike Arrest policy to allow only 30 requests per second, as in the following example:
<SpikeArrest async="false" continueOnError="false" enabled="true" name="Spike-Arrest">
    <DisplayName>Spike Arrest</DisplayName>
    <Properties/>
    <Identifier ref="request.header.some-header-name"/>
    <MessageWeight ref="request.header.weight"/>
    <Rate>30ps</Rate>
</SpikeArrest>
Then, to a shared flow for traffic management, you could attach the Spike Arrest policy as a step. The policy would execute for any API proxy that calls the shared flow.
<SharedFlow name="default">
    <Step>
        <Name>Spike-Arrest</Name>
    </Step>
</SharedFlow>
For information on how to get a shared flow started in the management console, see Creating a shared flow in the Apigee UI.
As with API proxies, you can import a zip file containing your shared flow source artifacts using the Create shared flow API. The following illustrates how to import a shared flow with the Apigee API:
curl "https://apigee.googleapis.com/v1/organizations/$ORG/sharedflows?action=import&sharedFlowID=mySharedFlow" \
  -X POST \
  -F "file=@sharedflow.zip" \
  -H "Authorization: Bearer $TOKEN"
Where
$TOKENis set to your OAuth 2.0 access token, as described in Obtaining an OAuth 2.0 access token. For information about thecurloptions used in this example, see Using curl. For a description of the environment variables used, see Setting environment variables for Apigee API requests. -
Deploy the shared flow to the environment before deploying proxies or shared flows
that will consume it. You deploy a shared flow in the same way you deploy an API proxy. (For
more, see Deployment
overview.)
A shared flow must be in the same organization and deployed to the same environment as the API proxies and other shared flows that consume it. Deploying the shared flow before the proxies makes it possible to resolve the proxy's dependency on the shared flow at deploy time.
You can deploy a shared flow with an Apigee API call such as the following:
curl https://apigee.googleapis.com/v1/organizations/$ORG/environments/$ENV/sharedflows/$SHAREDFLOW/revisions/$REV/deployments \
  -X POST \
  -H "Authorization: Bearer $TOKEN"
Similar to API proxies, all successful shared flow deployments to Apigee are zero-downtime deployments.
-
Develop the consuming API proxy so that it can call the shared flow as part of its own
flow.
From an API proxy, you call a shared flow with a FlowCallout policy. (You can also attach the shared flow to the proxy using a flow hook.)
To consume a shared flow, you add a
FlowCalloutpolicy to the proxy or shared flow that will consume it. Like a Service Callout policy, with which you call out to another service, aFlowCalloutcalls out to the shared flow. The consuming API proxy must be deployed after the shared flow and to the same environment as the shared flow. The shared flow has to be in place when you want to test a call to it using theFlowCalloutpolicy.In the following code, a
FlowCalloutpolicy calls out to a shared flow calledtraffic-management-shared.<FlowCallout async="false" continueOnError="false" enabled="true" name="Traffic-Management-Flow-Callout"> <DisplayName>Traffic Management FlowCallout</DisplayName> <Properties/> <SharedFlowBundle>traffic-management-shared</SharedFlowBundle> </FlowCallout>For more, see Calling a shared flow from an API proxy or shared flow
- Deploy the consuming API proxy to begin using the shared flow. (For more on deployment in general, see Deployment overview.)
-
Develop iteratively by tracing, as you would with an API proxy.
As with an API proxy, you develop a shared flow by iteratively invoking and tracing until you have the logic the way you want it. In this case, because the shared flow doesn't run on its own, you invoke a proxy endpoint and debug the proxy.
Here are the steps:
- Make sure that both the shared flow and the API proxy calling it with a
FlowCalloutpolicy are in the same organization and deployed to the same environment. - On the API proxy's Trace tab, begin tracing the API proxy.
- Send a request to a proxy endpoint in the API proxy. The flow from the endpoint must
include the
FlowCalloutpolicy that calls out to the shared flow. - On the Trace tab, examine the flow from the API proxy to the shared flow.
Notice that in tracing, the shared flow is represented as a set of steps or policies enclosed in a grey box. Icons representing
FlowCalloutpolicies precede shared flows. (For more on tracing, see Debug tool.)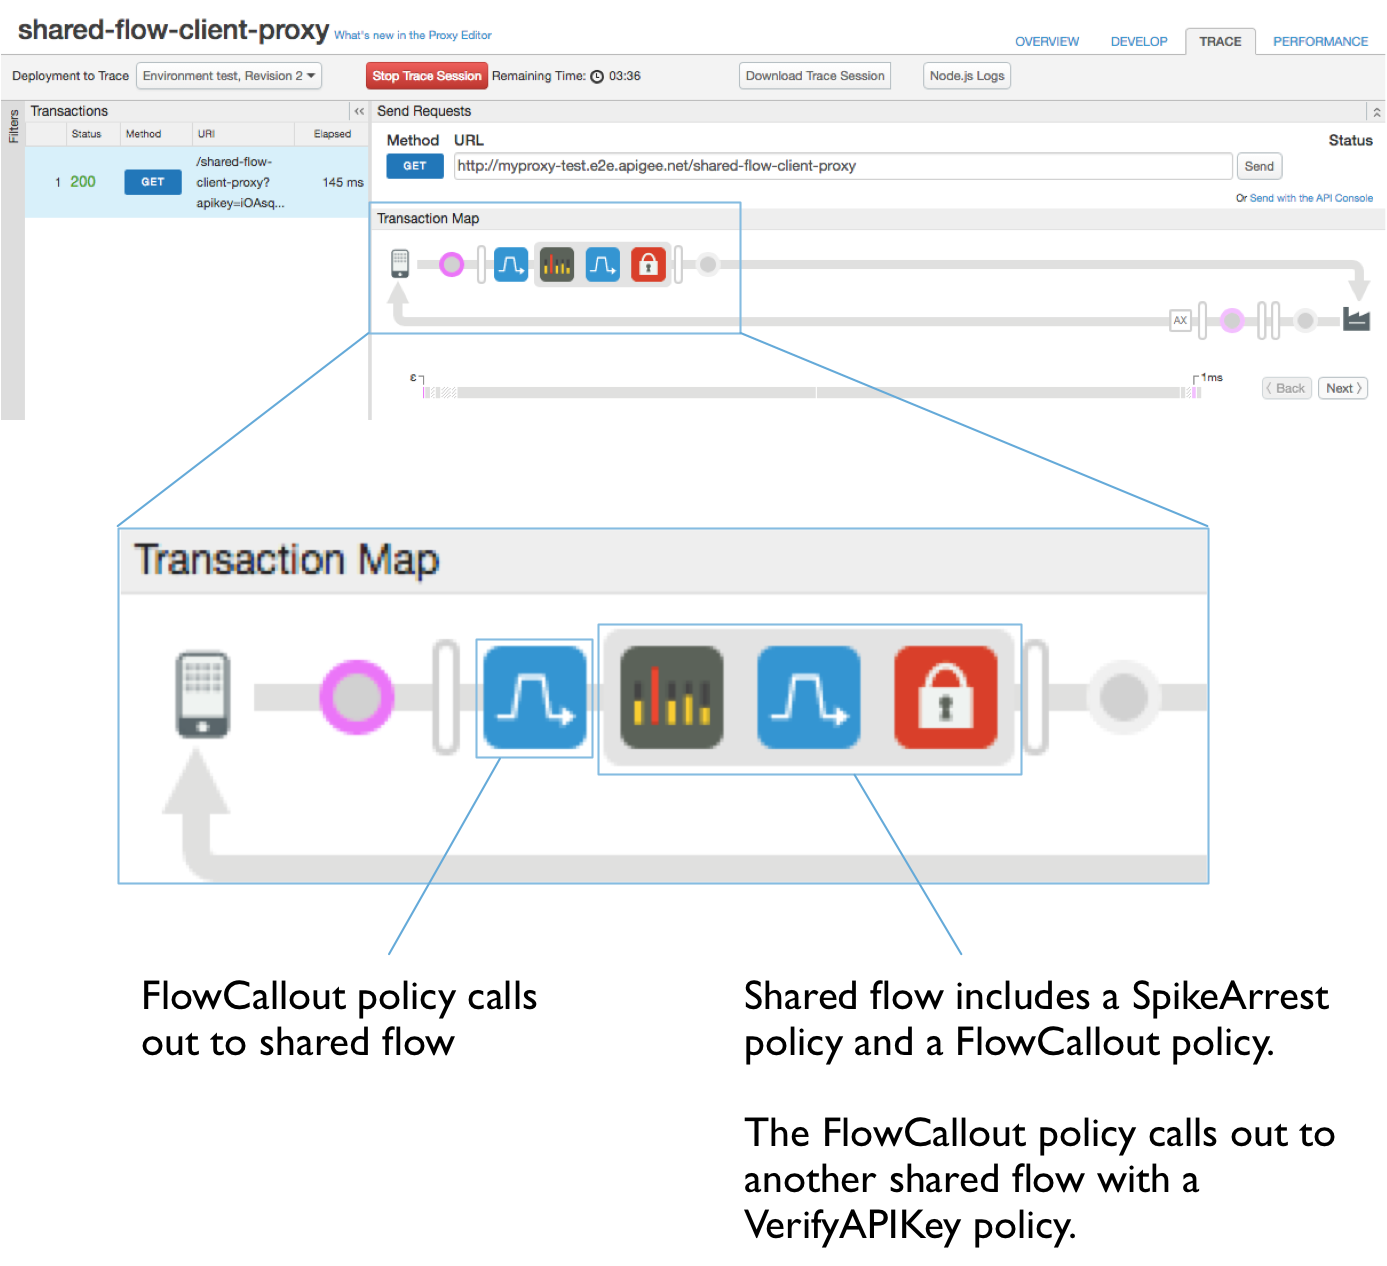
- Make sure that both the shared flow and the API proxy calling it with a
Creating a shared flow in the Apigee UI
When you use the Apigee API to create a shared flow, you can either create one from scratch or by importing existing flow sources as a flow bundle zip file.
Access the Shared Flows page, as described below. On the Shared Flows page, you can view a list of shared flows in the organization, and edit or delete flows in the list.
To create a shared flow in the Apigee UI:
- Sign in to the Apigee UI.
-
Select the organization containing your shared flow. See
Switching between your
organizations.
The shared flow will be available to any API proxies and shared flows deployed to an environment from this organization. It won't be available from outside this organization.
- Select Develop > Shared Flows in the left navigation bar.
-
Create or upload a shared flow:
-
Click Create New to create a new flow from scratch. You'll be able to configure policies and resources as
steps in the flow.
The Create a Shared Flow dialog displays.
-
Enter the name of the shared flow.
This will be the name that API proxies and other shared flows use to reference this shared flow. The name should be descriptive to developers consuming the flow.
- Enter a description to provide more information about what the flow does.
-
Click Create.
The shared flow is created.
- Next, you can develop the shared flow features and deploy it to the desired environment.
-
Enter the name of the shared flow.
- Click Upload bundle to create a shared flow from existing sources by uploading a flow bundle.
A shared flow bundle contains the source artifacts of a shared flow. For example, if you were to download a shared flow from the Apigee UI, you'd have a zip file with the flow bundle.
The Create a Shared Flow dialog displays.
- Select the zip file containing the artifacts you want in the new flow.
- Click Open.
-
Enter a name for the imported shared flow.
This will be the name that API proxies and other shared flows use to reference this shared flow. The name should be descriptive to developers consuming the flow.
-
Click Create.
The shared flow is created from the bundle.
- Next, you can develop the shared flow features and deploy it to the desired environment.
-
Click Create New to create a new flow from scratch. You'll be able to configure policies and resources as
steps in the flow.
Calling a shared flow from an API proxy or shared flow
You can call a shared flow from a proxy or from another shared flow by using the FlowCallout policy.
- In the Apigee UI, open the API proxy or shared flow from which you want to call the shared flow.
- Click the Develop tab.
- In the Navigator, next to Policies, click +.
- In the list of policies, under Extension, click FlowCallout.
- Enter the display name and name (unique identifier), then select the shared flow that this policy will call.
- Click Add.
- Add the new
FlowCalloutpolicy to the proxy where you want the call to be made.