This page applies to Apigee and Apigee hybrid.
View
Apigee Edge documentation.

This section describes how to create, edit, and delete environments with Apigee.
About environments
An environment is an isolated area within an organization where you can create and deploy API proxies. You create an environment during provisioning, and can later add more environments to your organization.
Environments and instances
Each environment must be attached to at least one Apigee instance. An instance is a region-specific virtual machine. Attaching an environment to an instance means the instance loads, deploys, and serves proxies for the environment.
The instance or instances an environment is attached to should match the region or regions with the most traffic for the environment. You can add the environment to an instance or move it to a different instance if more of the traffic is in the new instance's region.
To set and change the environment's instance, see Attaching or removing an environment from an instance.
Creating environments
You can create a new environment using the Apigee UI or the Apigee API, as described in the following sections. Before you begin, it is important to note that Apigee and Apigee hybrid have limits on the number of environments and environment groups you can create per organization and per region. For details, see Limits: Environment and organization.
Creating a new environment in the UI
Apigee in Cloud console
To create a new environment in Apigee in Cloud console:
- Open Apigee UI in Cloud console in a browser.
- Select Management > Environments in the left navigation pane.
- In the Environments pane, click + Create Environment.
- In the Create an environment pane, enter the following:
- Select environment type: If you are a Pay-as-you-go customer, click Select to choose the type of environment you want
to create: Base, Intermediate, or Comprehensive.
The selection of environment type does not apply to Subscription customers and will not appear in the UI.
Name: The programmatic environment name. The Name can't be changed after it is created.
The name must contain between 2 and 32 characters which can be lower-case letters, numbers, or hyphens. The name must begin with a letter and cannot end with a hyphen. The name must be different from any other environment name in your organization.
- Display Name: The name for the environment that is displayed in the UI.
- Description: Optional. A description of the environment.
- Instance: Optional. Select the Apigee instance that will load, deploy, and serve traffic for the environment.
- Environment group: Optional. Select a checkbox to add the new environment to an existing environment group. Click OK.
- Deployment type: Select whether you want to deploy individual API proxies or an archive of your API proxy configuration environment. For more information, see Supported deployment types.
- Select environment type: If you are a Pay-as-you-go customer, click Select to choose the type of environment you want
to create: Base, Intermediate, or Comprehensive.
- Click Create.
Once complete, the new environment is displayed in the table in the Environments pane.
Classic Apigee
To create a new environment in the classic Apigee UI:
- Open Apigee UI in a browser.
- Select Admin > Environments > Overview in the left navigation pane.
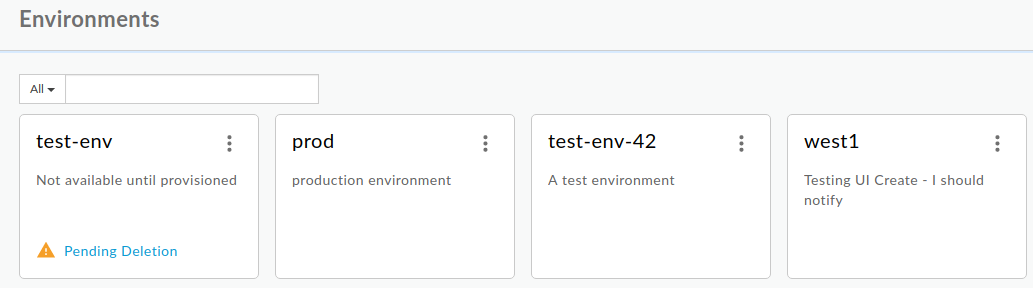
The UI displays a set of cards, each one representing an existing environment:
-
Click +ENVIRONMENT.
The New environment dialog box displays:
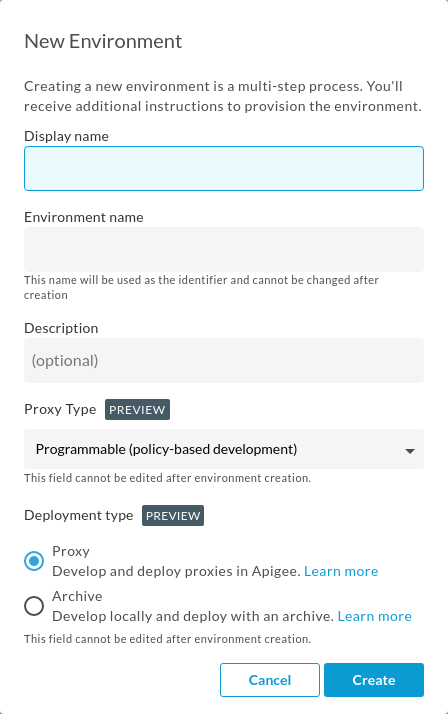
- Enter the following information in the New Environment dialog box:
- Display name: A friendly name for the environment that is used in the
UI. For example,
My Test Environment. -
Environment name: The programmatic name for the environment. The name must consist of lowercase letters, numbers, and hyphens. It must start with a lowercase letter and cannot end in a hyphen. For example,
test.The environment name cannot be changed after it has been created.
- Description (optional): Additional information about the environment that you want to add as a reminder.
- Deployment type (Preview): Select whether you want to deploy individual API proxies or an archive of your API proxy configuration environment. For more information, see Supported deployment types.
All fields except Description are required.
- Display name: A friendly name for the environment that is used in the
UI. For example,
-
Click OK.
The card displays Pending Provisioning status while Apigee creates the new environment, as the following example shows:
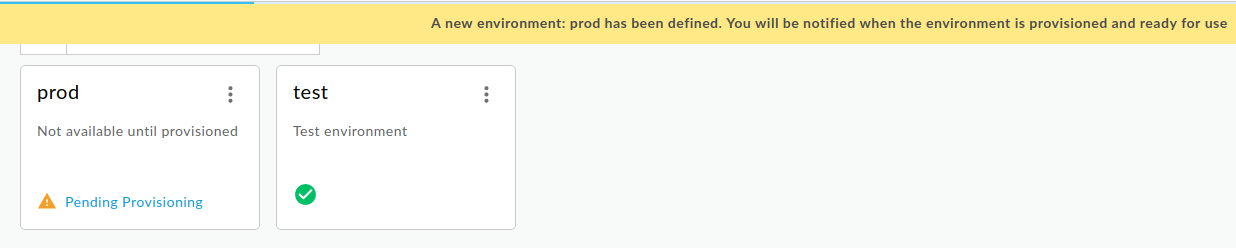
There can be a several minute delay before the new environment is provisioned.
When it's done, the Apigee UI displays the new environment as a card with other environments that you have created:
Every new environment must be attached to an Apigee instance and an environment group.
If you did not attach your environment to an instance during creation, you can do this step in the Instances UI or using the Instances attachment create API. For an example of how to do this using the API, see Create an environment in the command-line provisioning documentation.
If you did not assign the new environment to a group during creation, you can follow the steps in Adding environments to an environment group. Environments not assigned to groups have no hostnames pointing to them, and therefore they are not accessible. For more information, see Creating environment groups.
If you have an Apigee organization with Pay-as-you-go billing, you may want to enable the Apigee API Analytics add-on in your new environment. For more information, see Manage the Apigee API Analytics add-on.
Creating a new environment with the Apigee API
This section describes how to create a new environment using the Apigee API.
Most steps in this process trigger long-running operations that can take several minutes.
To create a new environment with the Apigee API:
- Create the new environment with the Create environments API.
- Attach the environment to the runtime instance using the Instances attachment API.
- Create an environment group if you do not already have one. To do this, use the Create environment groups API.
- Attach the new environment to the environment group using the Environment group attachment API.
Attaching an environment to the group makes the proxies in that environment routable via the hostnames in the group.
For detailed information and examples on using the Apigee APIs to create and attach new environments, see Create an environment in the command-line provisioning instructions.
Editing environments
This section describes how to edit existing environments in the Apigee UI and with the Apigee API.
Edit environments in the Apigee UI
You can change the following properties of an existing environment in the Apigee UI:
- Display name: Enter a new display name for the environment.
- Description: Enter a new description for the environment.
- Environment group: Clear the previously selected checkbox and select the checkbox for the new environment group.
Apigee in Cloud console
To edit environment in the Apigee in Cloud console:
- Open Apigee UI in Cloud console in a browser.
- Select Management > Environments in the left navigation pane.
- In the row the environment you want to edit, click the three-dot menu under Actions and select Edit.
- In the Edit Environment dialog, make the changes you want in either the Display name or Description fields.
- In the Environment group listbox, you can clear the previously selected checkbox and select the checkbox for the new environment group.
- Click Update to save your changes.
Classic Apigee
To edit an environment in the classic Apigee UI
- Open the Apigee UI in a browser.
- Select Environments.
-
Locate the card for the environment that you want to edit.
The following example shows cards for four different environments:
-
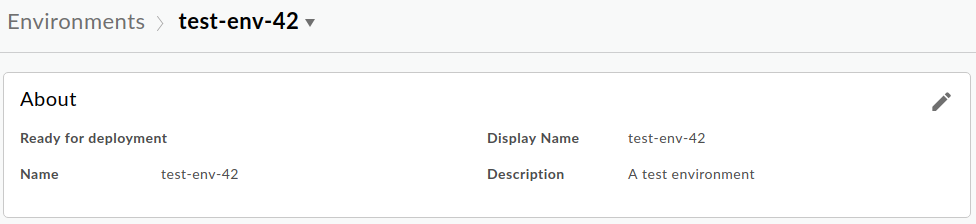
Click the environment's pane.
The Apigee UI displays details about that environment in the About view:
- Click Edit in the About view.
The Edit Environment dialog box displays:
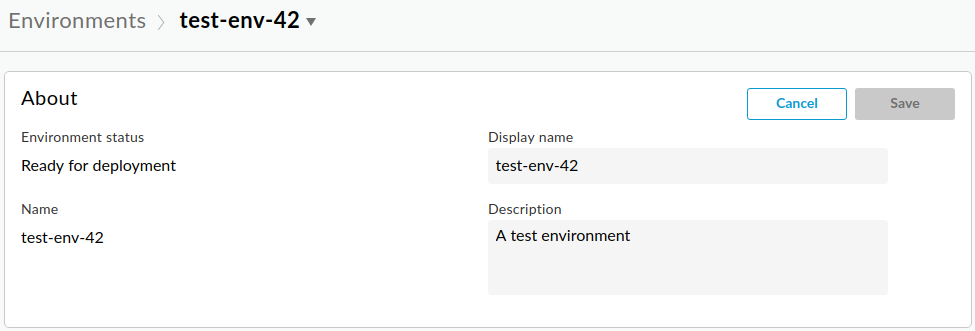
- Edit the values in the Display name and Description fields.
- Click Save.
Edit environments with the Apigee API
To edit an existing environment with the Apigee API, use the Get environments API to get the list of current properties that you can modify, and the Update environments API to set or change them.
Configure forward proxying on an environment
To configure
forward proxying,
set the forwardProxyUri value for the environment using the
environments API.
Disable forward proxying for a proxy in the environment
If the traffic for a specific target of an API proxy should go directly to the backend target, bypassing the forward proxy, then set the following property in the TargetEndpoint to override the HTTP forward proxy:
<Property name="use.proxy">false</Property>
For more information on setting the TargetEndpoint properties, including how to configure the connection to the target endpoint, see Endpoint properties reference.
Set use.proxy to "true" for any TargetEndpoint that you want to go through
an HTTP forward proxy:
<Property name="use.proxy">true</Property>
Deleting environments
Before deleting an environment, make sure to consider the following key points:
- You must delete all key value maps and key value entries before you delete an environment. Otherwise, if you re-create the environment the key value map entry operations will encounter encryption/decryption discrepancies.
- When you delete an environment with the Apigee API Analytics add-on enabled, the analytics data for the environment is also deleted. If you wish to retain analytics data for any environment, we recommend that you export and save your data in another location. For more information on saving your data, see Exporting data from Analytics. To learn more about the impact of environment deletion on Apigee API Analytics data, see Manage your Apigee API Analytics data
Deleting an environment with the Apigee UI
Apigee in Cloud console
To delete an environment in the Apigee in Cloud console:
- Open Apigee UI in Cloud console in a browser.
- Select Management > Environments in the left navigation pane.
- In the row the environment you want to edit, click the three-dot menu under Actions and select Delete.
Classic Apigee
- Open the Apigee UI in a browser.
-
Select Admin > Environments > Overview.
Apigee displays a set of cards, each representing an environment within your Apigee organization.
- Locate the card for the environment that you want to delete.
-
Click the environment's menu and select Delete.
Apigee displays a confirmation dialog.
- Click OK to delete the environment.
The environment's card in the UI displays a Pending Deletion label while Apigee deletes the environment.
There can be a several minute delay before the deletion is completed.
Deleting an environment with the Apigee API
To delete an environment, use the Delete environments API.