This page applies to Apigee and Apigee hybrid.
View
Apigee Edge documentation.

Create a proxy in the Apigee UI, or using the API, as described in the following sections.
Apigee in Cloud console
To create a proxy in Apigee in Cloud console:
- Open the Apigee UI in Cloud console in a browser.
- In the left navigation pane, click Proxy development > API Proxies.
- In the API Proxies pane, click + Create.
- In the Create a proxy pane, under Proxy template, select Reverse proxy (Most common).
- Under Proxy details, enter the following:
- Proxy name: Enter a name for the proxy, such as
myproxy. - Base Path: Automatically set to the value you enter for
Proxy name. The Base Path is part of the URL used to make requests to your API. Apigee uses the URL to match and route incoming requests to the appropriate API proxy. - Description (Optional): Enter a description for your new API proxy, such as "Testing Apigee with a simple proxy."
- Target (Existing API): Enter
https://mocktarget.apigee.net. This defines the target URL that Apigee invokes on a request to the API proxy. The mocktarget service is hosted at Apigee and returns simple data. It requires no API key or access token. - Click Next.
- Proxy name: Enter a name for the proxy, such as
- Click Next.
- Deploy (optional):
- Deployment environments: Optional. Use the checkboxes to select one or more environments in which to deploy your proxy. If you prefer not to deploy the proxy at this point, leave the Deployment environments field empty. You can always deploy the proxy later.
- Service Account: Optional. Attach a service account to your deployment to enable your proxy to access Google Cloud services, as specified in the service account's role and permissions.
- Click Create.
Apigee creates the new proxy and displays a summary of the proxy details in the Proxy summary view.

If you choose to deploy the proxy, the Deployments section displays the Revision number, which is 1 when you first deploy. The Status column displays the environments in which the proxy is deployed with a green status indicator.
Classic Apigee
To create a simple API proxy in the classic Apigee UI:
- Sign in to the Apigee UI.
- Click API Proxies in the main view.
- From the Environment drop-down list, select the environment in which you want
to create a new API proxy.
The hybrid UI displays a list of API proxies for that environment. If you haven't created any proxies yet, the list is empty.
- Click Create New.
The Create Proxy wizard starts.
- Click Reverse proxy (most common).

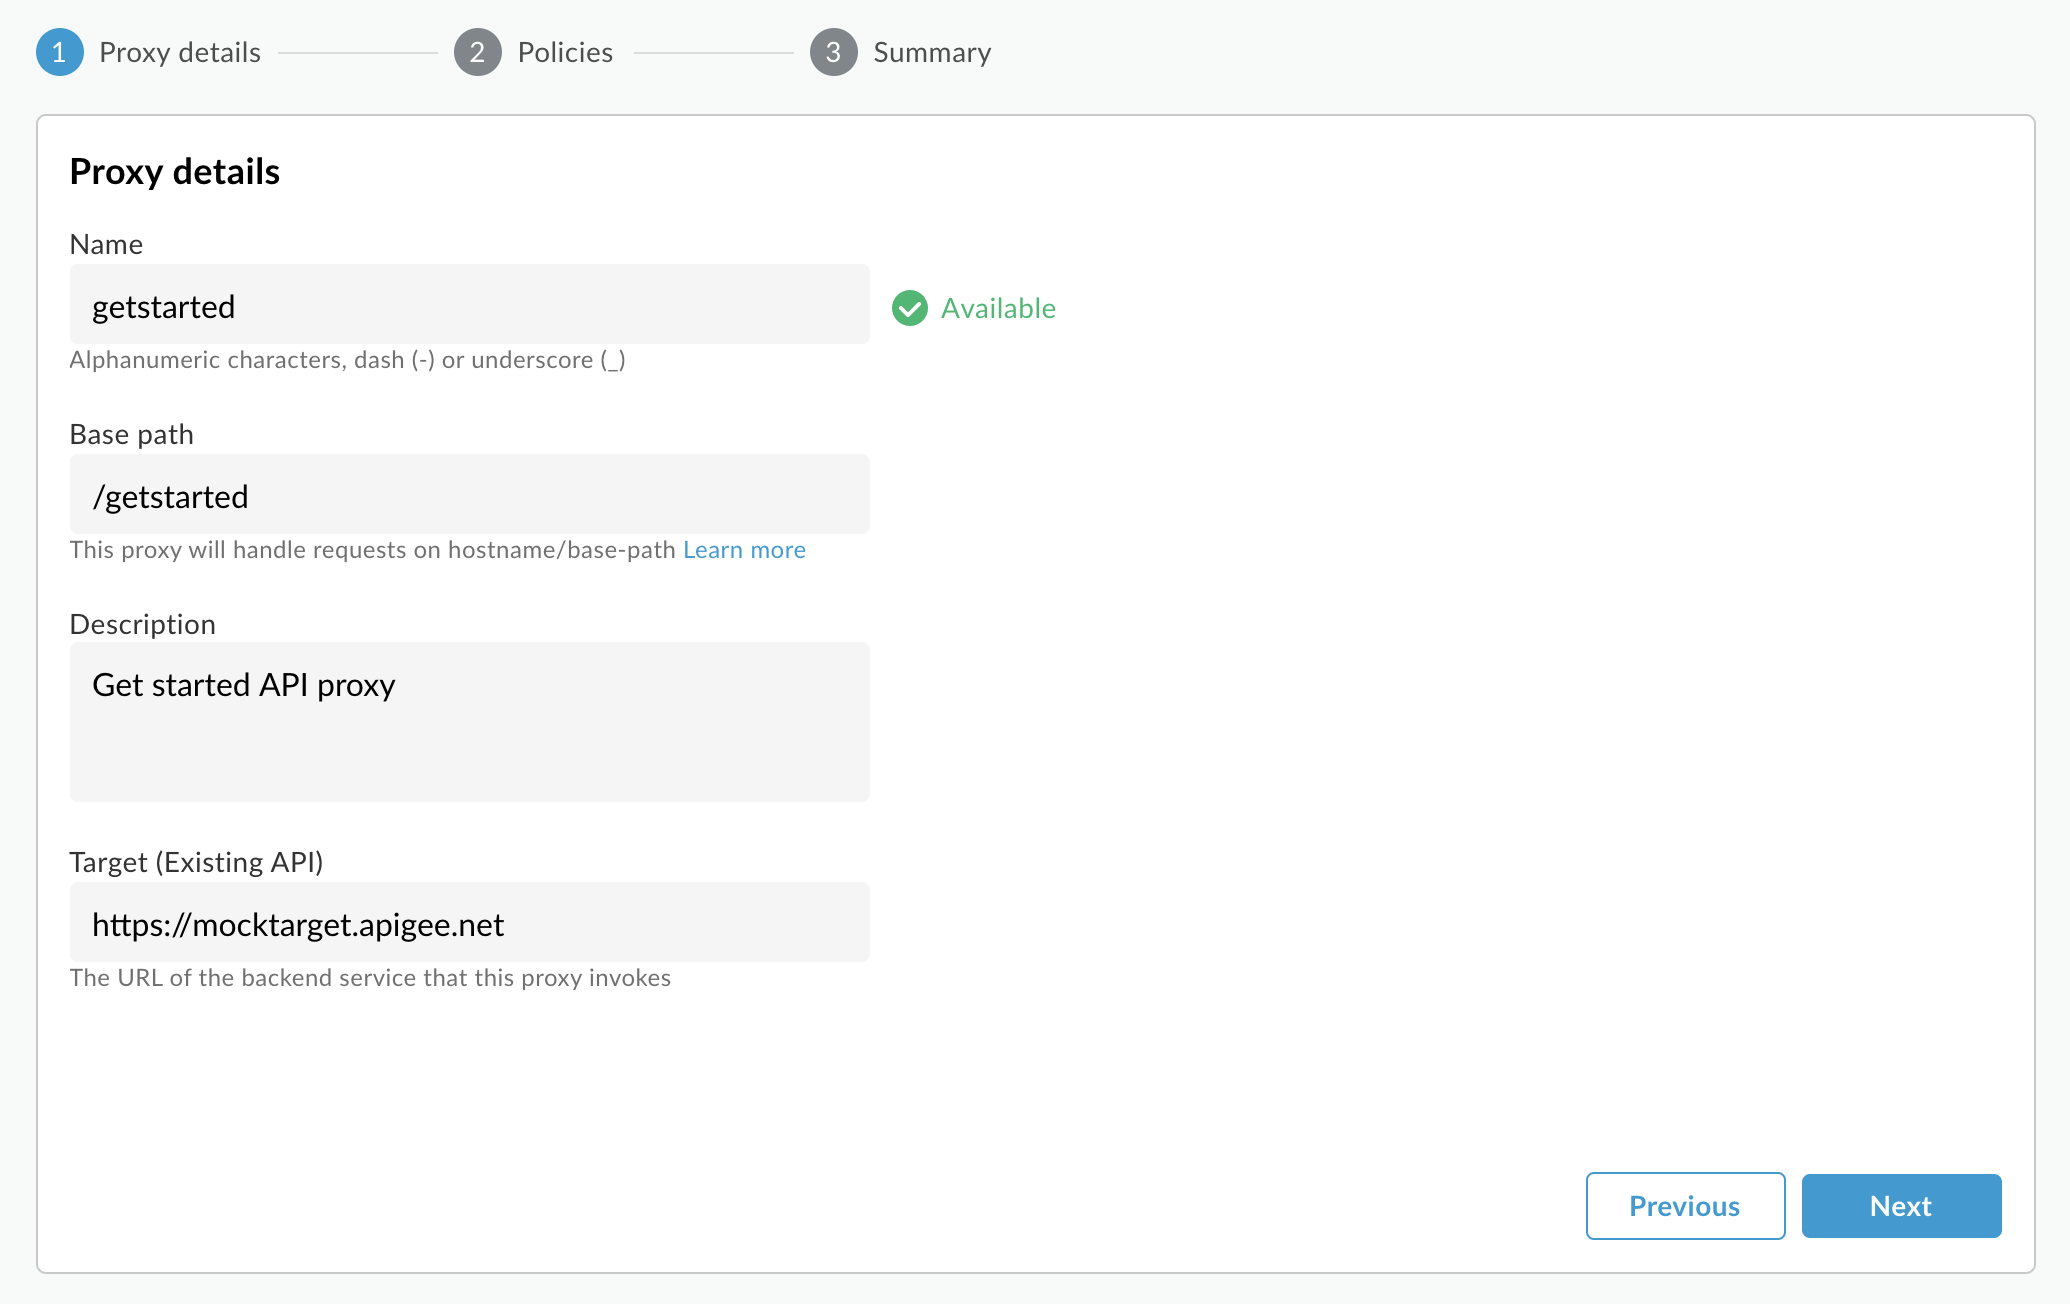
The Proxy details page is displayed.
- Configure your proxy with the following settings:
- Name: Enter
getstarted. If a proxy already exists with this name, choose a different name. - Base Path: Leave this set to
/getstarted. The Base Path is part of the URL used to make requests to your API. Apigee uses the URL to match and route incoming requests to the appropriate API proxy. - Description (Optional): Enter a description for your new API proxy, such
as
Get started API proxy. - Target (Existing API): Enter
https://mocktarget.apigee.net. This defines the target URL that Apigee invokes on a request to the API proxy. The mocktarget service is hosted at Apigee and returns simple data. It requires no API key or access token.
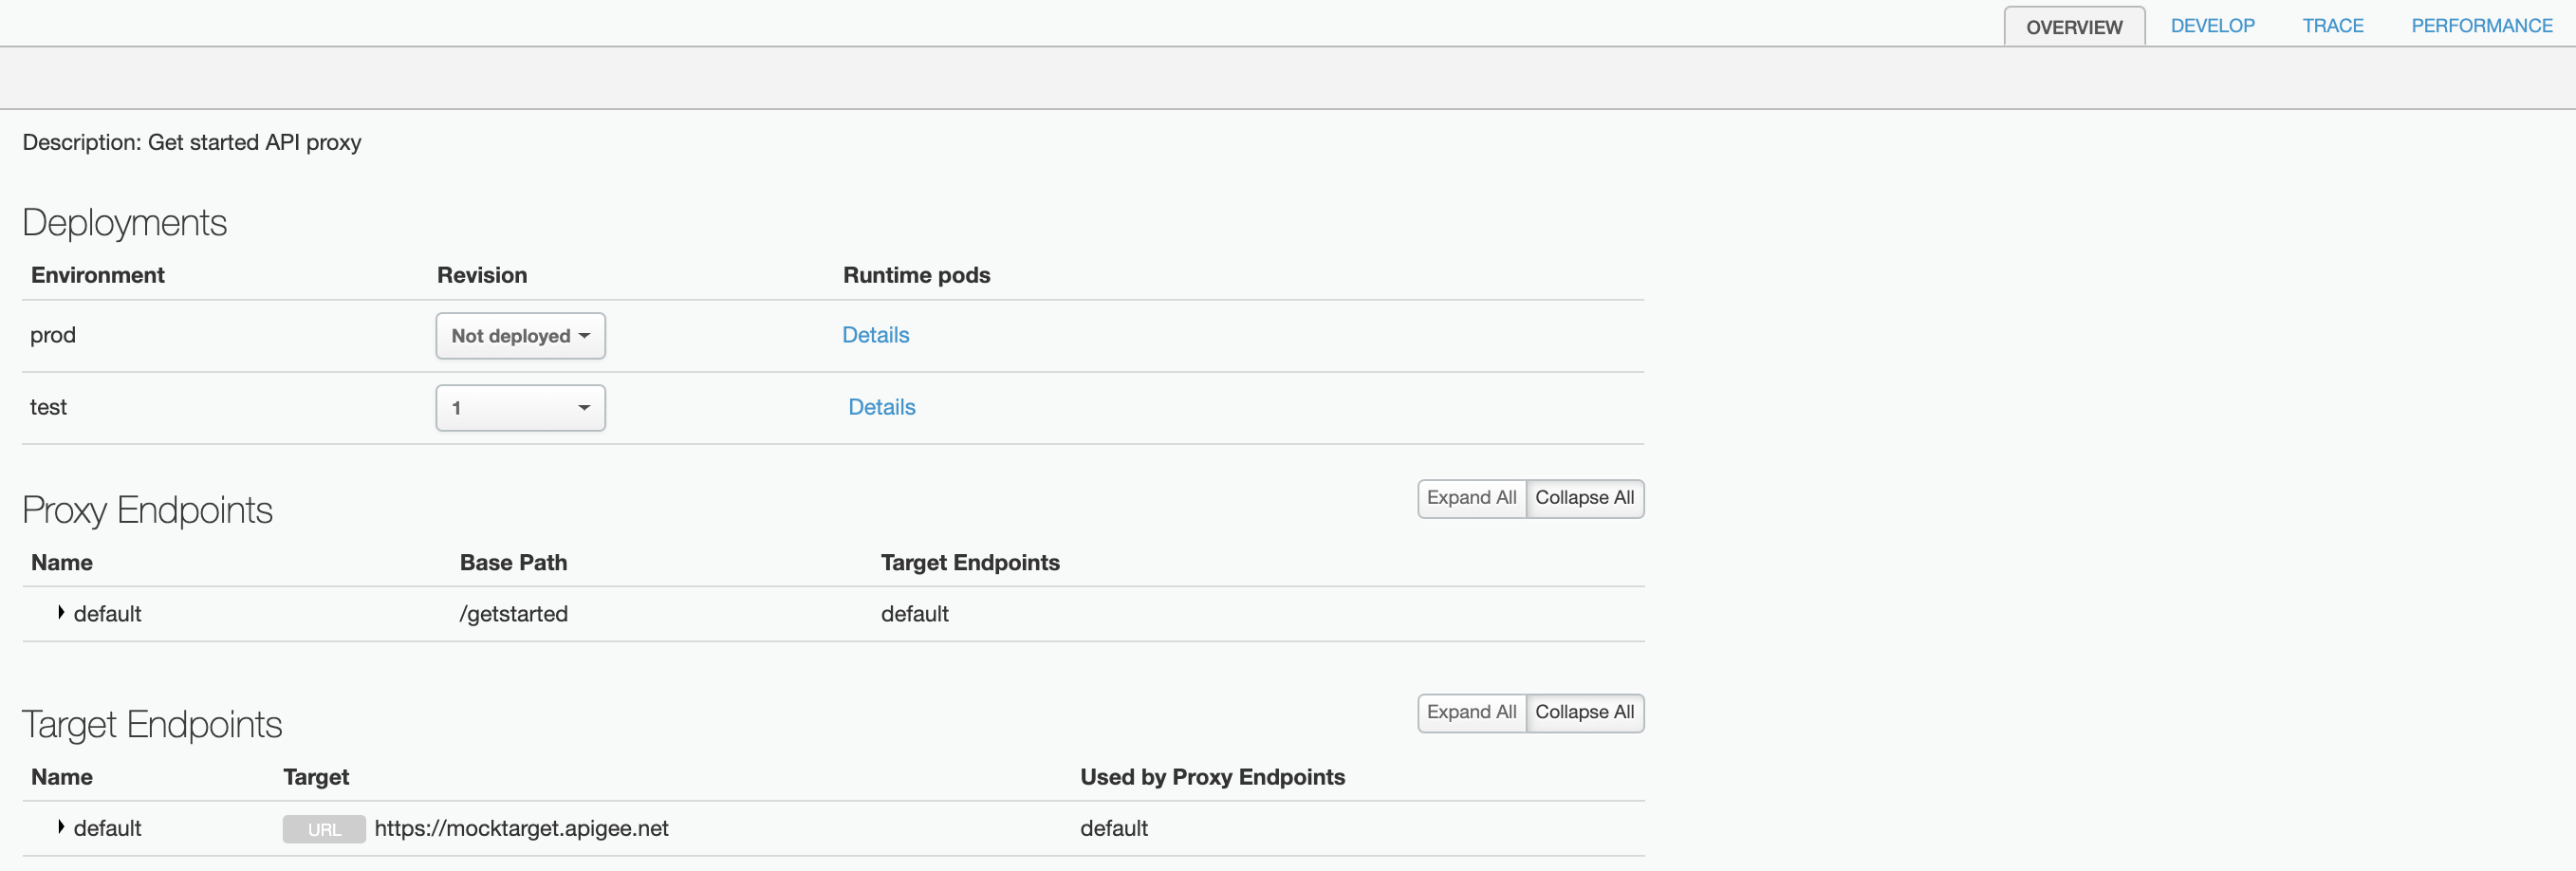
Your API proxy's details should look like the following:
- Name: Enter
- Click Next.
- In the Common policies view, under Security:
Authorization select Pass through (no authorization).
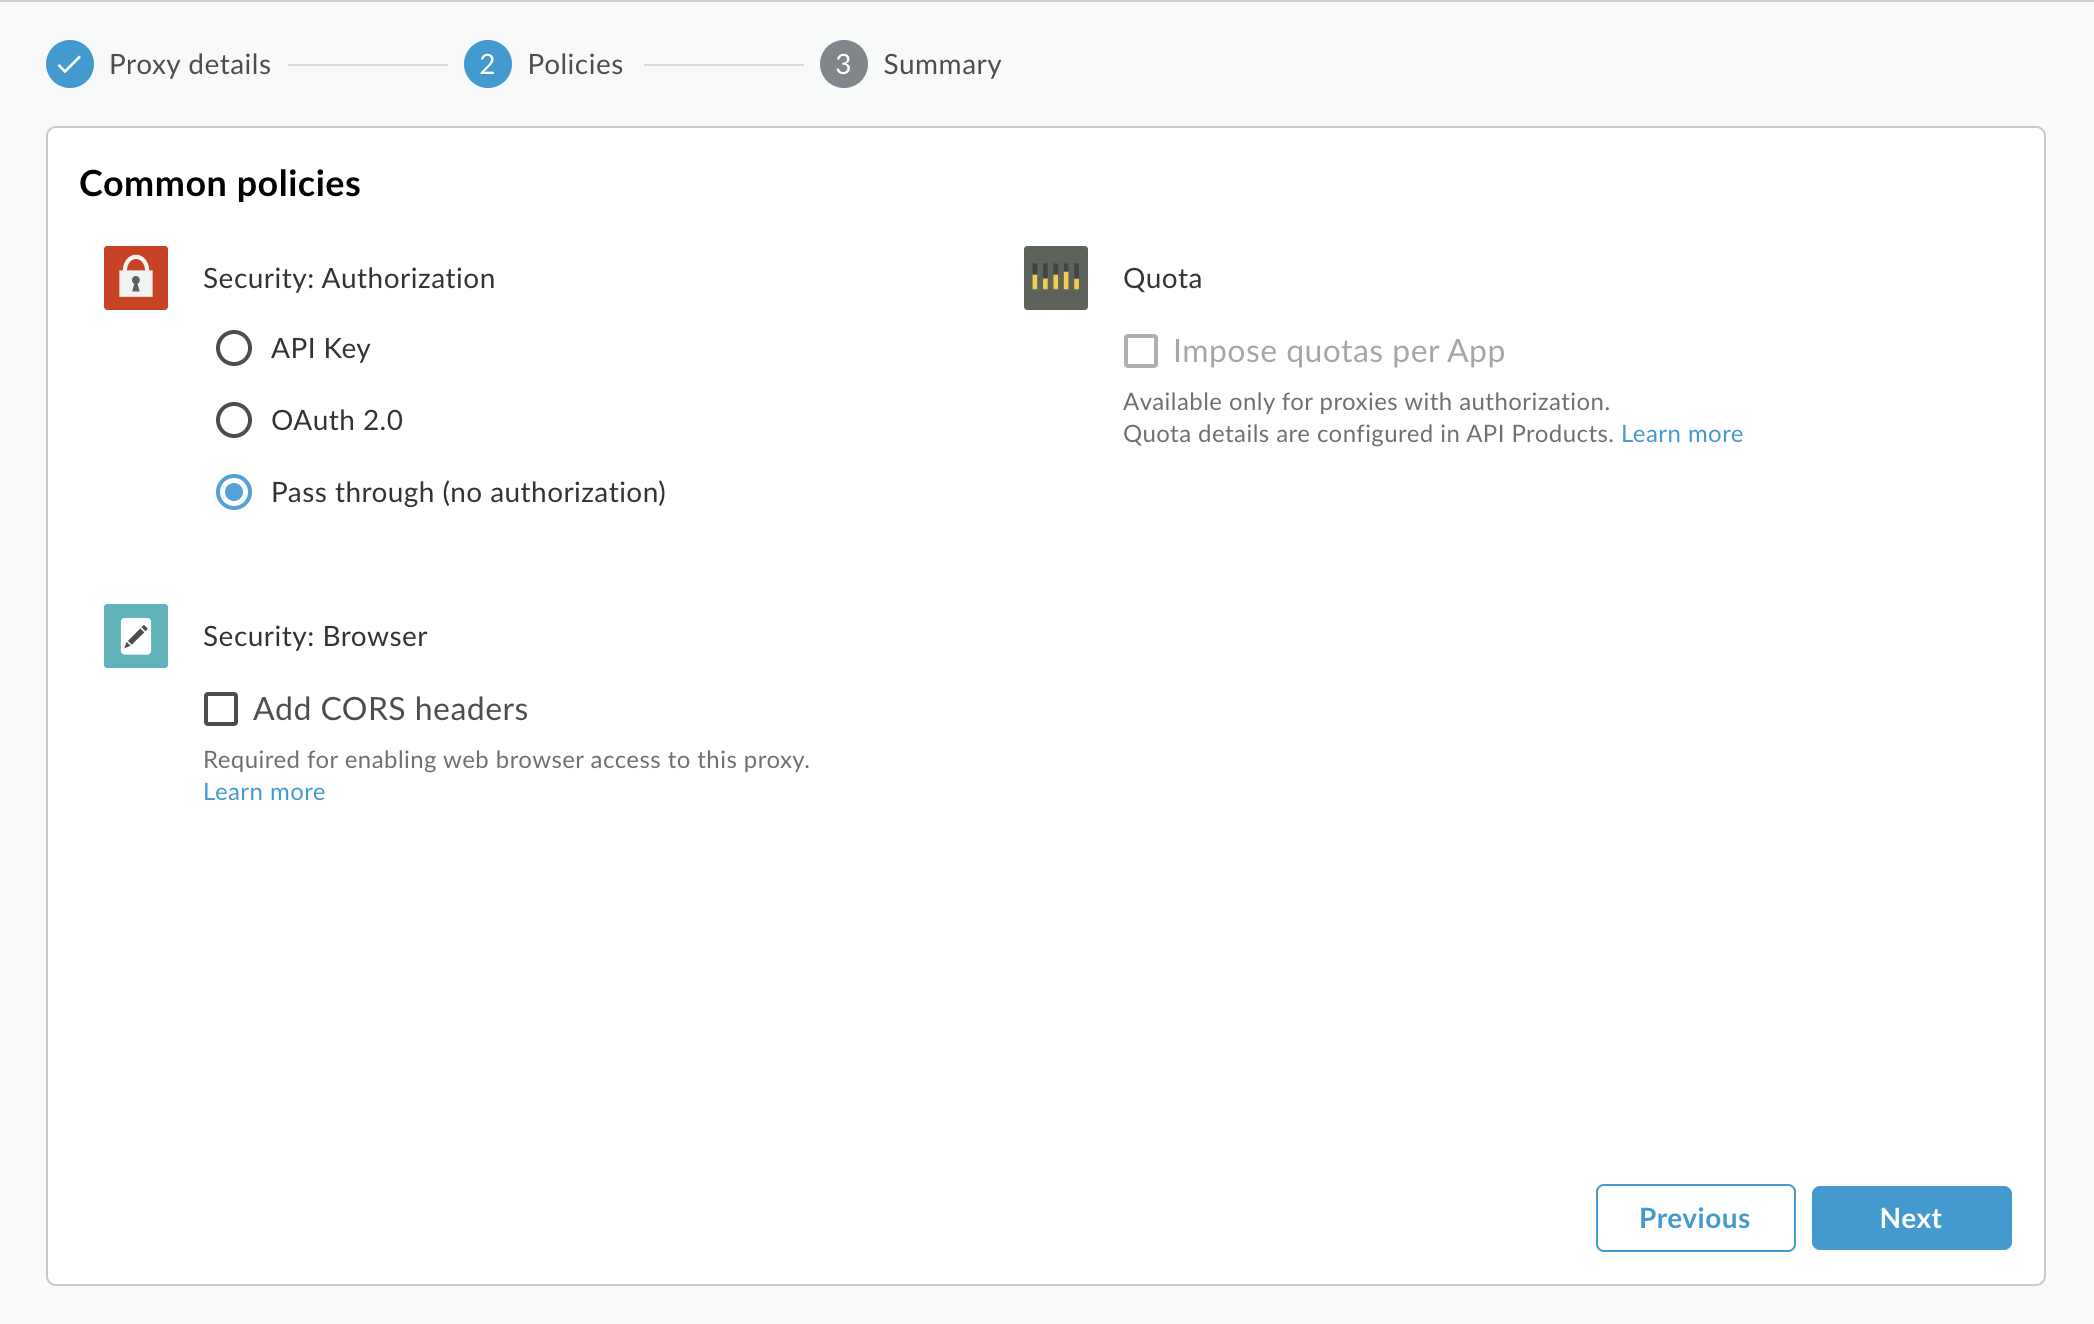
- Click Next.
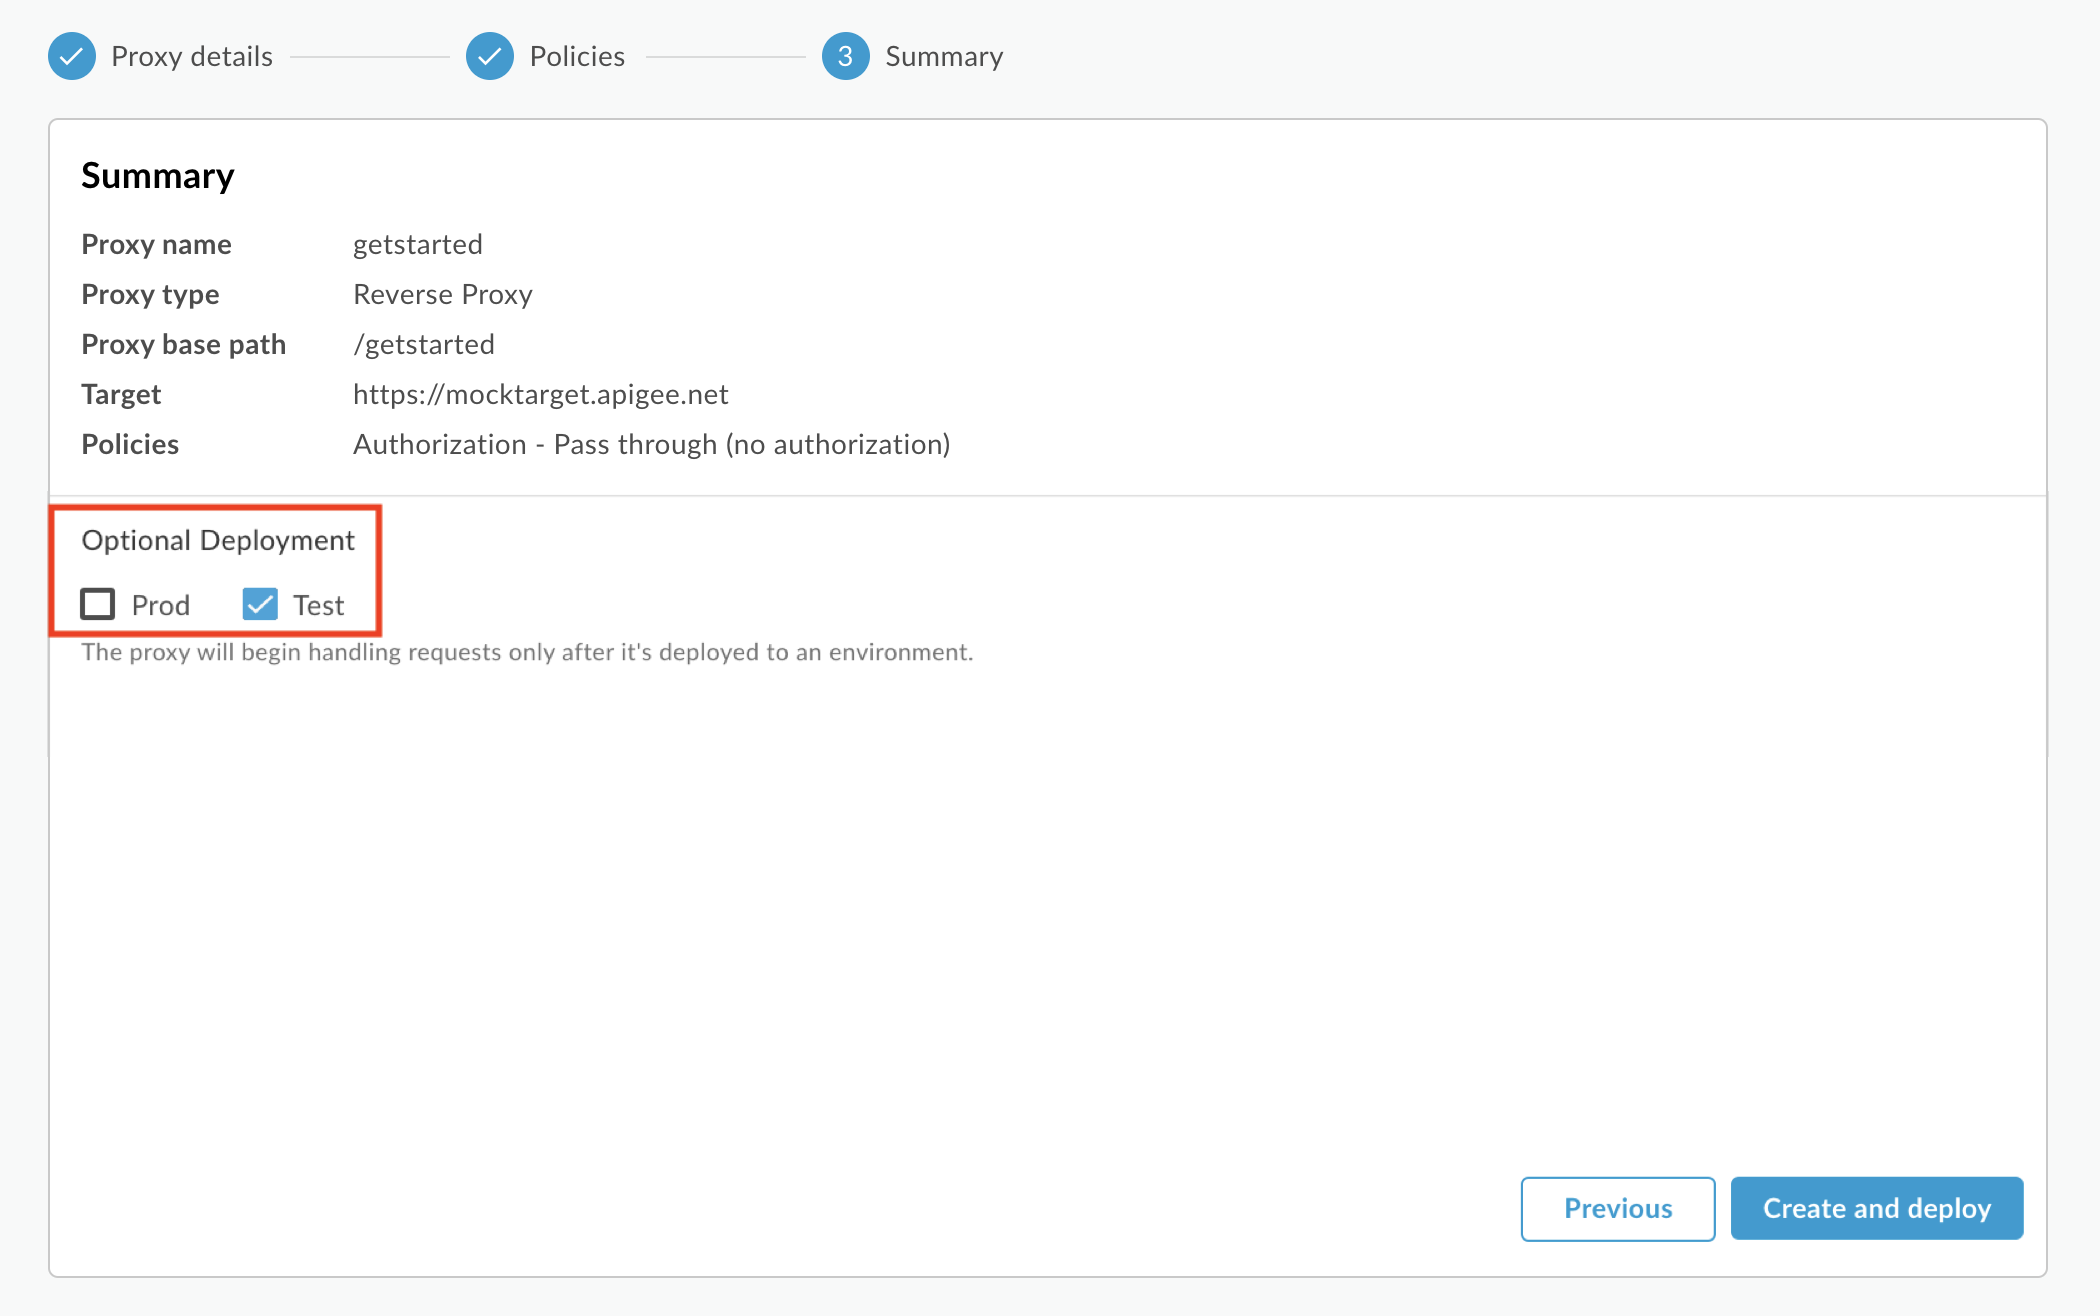
- On the Summary page, select the deployment environments, if desired,
and click Create and deploy.
Your new API proxy is created and deployed in the selected environment.
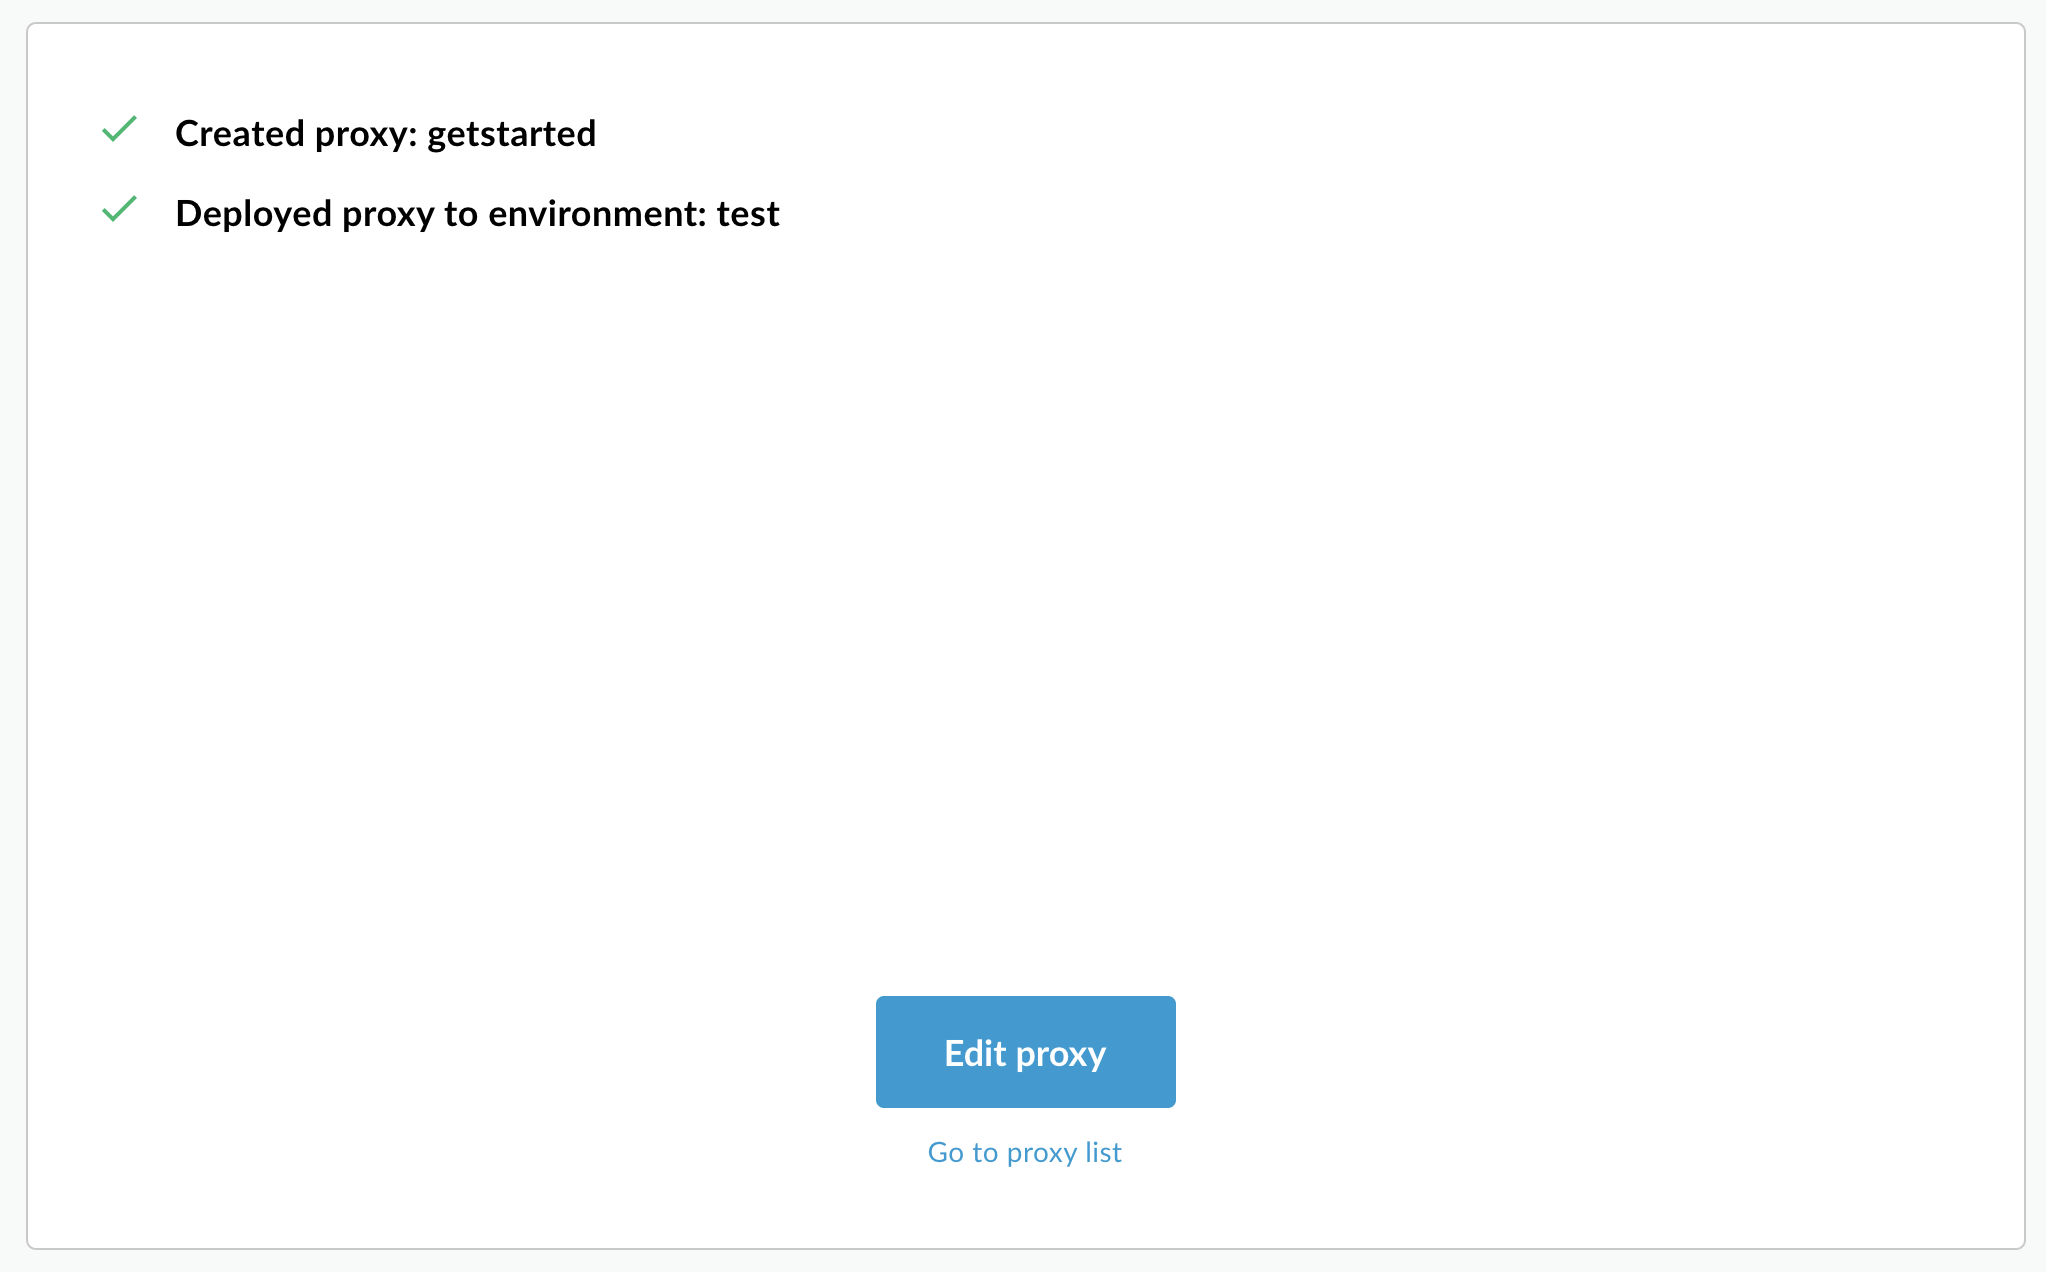
- Click Edit proxy to display the Overview tab in the Proxy Editor.
In the API proxies list, the getstarted API proxy deployment status is green for the test environment.

Apigee API
Create an API proxy in your Apigee organization by issuing a POST
request to the following resource:
https://apigee.googleapis.com/v1/organizations/$ORG/apis
You must define the name of the API proxy using the name query parameter. Restrict
the characters used in the name to the following: A-Za-z0-9._\-$ %
Optionally, you can import an API proxy configuration bundle by performing the following steps:
- Set the
actionquery parameter toimport - Set the
Content-typeheader tomultipart/form-data - Pass the name of the API proxy configuration bundle on your local file system
The following example demonstrates how to create an API proxy by importing an API proxy
configuration bundle (helloworld-config.zip) on your local file system using the
API.
curl "https://apigee.googleapis.com/v1/organizations/$ORG/apis?name=helloworld&action=import" \
  -X POST \
  -H "Authorization: Bearer $TOKEN" \
  -H "Content-type: multipart/form-data" \
  -F "file=@helloworld-config.zip"
Where $TOKEN is set to your OAuth 2.0 access token, as described in
Obtaining an OAuth 2.0 access token. For information about the curl options used in this example, see
Using curl. For a description of the environment variables used,
see Setting environment variables for Apigee API requests.
The following provides an example of the response output:
{
  "basepaths": [
    "/helloworld"
  ],
  "configurationVersion": {
    "majorVersion": 4
  },
  "createdAt": "1559145292799",
  "displayName": "helloworld",
  "entityMetaDataAsProperties": {
    "bundle_type": "zip",
    "subType": "Proxy",
    "lastModifiedAt": "1559145292799",
    "createdAt": "1559145292799"
  },
  "lastModifiedAt": "1559145292799",
  "name": "helloworld",
  "policies": [
    "verify-api-key",
    "remove-query-param-apikey",
    "OAuth-v20-1"
  ],
  "proxies": [
    "default"
  ],
  "proxyEndpoints": [
    "default"
  ],
  "resourceFiles": {},
  "targetEndpoints": [
    "default"
  ],
  "targets": [
    "default"
  ],
  "type": "Application",
  "revision": "1",
  "description": "Hello world"
}
For more information on creating an API proxy, see the apis.create method
in the Apigee API. To see all the methods available for API proxies, see the API proxies API.
Next steps
After you create a simple API proxy, you typically do one of the following:
- Add policies, security, and other features of the Apigee platform, as described in Understanding APIs and API proxies.
- Deploy it to your cluster, as described in Deploy an API proxy.