Getting started with HTTP(S) Load Balancing for API Gateway
This tutorial shows you how to create a Google Cloud HTTP(S) External Load Balancer to route requests to API Gateway. The configuration process follows the same steps used to configure Cloud Load Balancing integration with other serverless products such as Cloud Run, Cloud Functions, and App Engine.
While a load balancer is not required for API Gateway to function, it does allow your gateway to leverage multiple benefits of Cloud Load Balancing. For example, using Cloud Load Balancing with API Gateway enables you to:
- Use custom domains.
- Leverage Google Cloud Armor as a network security service.
- Manage efficient load balancing across gateways in multiple locations.
- Implement advanced traffic management.
Before you begin
If you have not already done so, download and install the Google Cloud CLI.
Update
gcloudcomponents:gcloud components update
Follow the API Gateway Quickstart to deploy a Cloud Run service and create a gateway that points to that service.
Deploy a Cloud Run service and API Gateway instance
In this tutorial, you will deploy a "hello-world" service to Cloud Run, create a gateway that routes to the Cloud Run service, and configure an HTTP(S) load balancer to route requests to a custom domain.
Although this tutorial uses Cloud Run as the backend service for API Gateway, these steps also apply to any backend services API Gateway currently supports.
Upon successful completion of the API Gateway quickstart, you should have a deployed gateway URL that points to the Cloud Run service.
Configure permissions
In this tutorial, you will create a serverless network endpoint group (NEG) and create an external HTTP(S) load balancer in a Cloud project. This requires either a project owner or editor role, or the following Compute Engine IAM roles:
| Task | Required Role |
|---|---|
| Create load balancer and networking components | Network Admin |
| Create and modify NEGs | Compute Instance Admin |
| Create and modify SSL certificates | Security Admin |
Create an SSL certificate resource
To create an HTTP(S) load balancer, an SSL certificate resource must be added to the load balancer's front end. Create an SSL certificate resource using either a Google-managed SSL certificate or a self-managed SSL certificate.
Google-managed certificates. Using Google-managed certificates is recommended because Google Cloud obtains, manages, and renews these certificates automatically. To create a Google-managed certificate, you must have a domain and the DNS records for that domain in order for the certificate to be provisioned. If you don't already have a domain, you can get one from Google Domains. Additionally, you will need to update the domain's DNS A record to point to the load balancer's IP address created in a later step. For detailed instructions, see Using Google-managed certificates.
Self-signed certificates. If you do not want to set up a domain at this time, you can use a self-signed SSL certificate for testing.
This tutorial assumes that you have already created an SSL certificate resource.
If you want to test this process without creating an SSL certificate resource (or a domain as required by Google-managed certificates), you can still use the instructions on this page to set up an HTTP load balancer instead.
Create the HTTP(S) load balancer
Create a serverless NEG for API Gateway.
A network endpoint group (NEG) specifies a group of backend endpoints for a load balancer. A serverless NEG is a backend that points to a service like API Gateway, as shown in the figure below:

To create a serverless NEG for your gateway, run the following command, where:
- SERVERLESS_NEG_NAME is the name of the serverless NEG to create.
- GATEWAY_ID specifies the name of the gateway.
- REGION_ID is the deployment region for the serverless NEG (this should match the gateway region).
gcloud beta compute network-endpoint-groups create SERVERLESS_NEG_NAME \
  --region=REGION_ID \
  --network-endpoint-type=serverless \
  --serverless-deployment-platform=apigateway.googleapis.com \
  --serverless-deployment-resource=GATEWAY_ID
For example:
gcloud beta compute network-endpoint-groups create api-gateway-serverless-neg \
  --region=us-central1 \
  --network-endpoint-type=serverless \
  --serverless-deployment-platform=apigateway.googleapis.com \
  --serverless-deployment-resource=my-gateway
Create a backend service to define how Cloud Load Balancing distributes traffic.
The backend service configuration contains a set of values, such as the protocol used to connect to backends, various distribution and session settings, health checks, and timeouts, as shown in the figure below:

To create a backend service, run the following command:
gcloud compute backend-services create BACKEND_SERVICE_NAME --global
where BACKEND_SERVICE_NAME is the name of your new backend service.
For example:
gcloud compute backend-services create api-gateway-backend-service --global
To add your serverless NEG as a backend to the backend service, run the following command, where:
- BACKEND_SERVICE_NAME is the name of your backend service.
- SERVERLESS_NEG_NAME is the name of the serverless NEG created in the previous step.
- REGION_ID is the deployment region for the serverless NEG (this should match the gateway region).
gcloud compute backend-services add-backend BACKEND_SERVICE_NAME \
  --global \
  --network-endpoint-group=SERVERLESS_NEG_NAME \
  --network-endpoint-group-region=REGION_ID
For example:
gcloud compute backend-services add-backend api-gateway-backend-service \
  --global \
  --network-endpoint-group=api-gateway-serverless-neg \
  --network-endpoint-group-region=us-central1
Create a URL map to route incoming requests to the backend service, as shown in the figure below:

To create the URL map, run the following command, where:
- URL_MAP_NAME is the name of the URL map to create.
- BACKEND_SERVICE_NAME is the name of your backend service.
gcloud compute url-maps create URL_MAP_NAME \
  --default-service BACKEND_SERVICE_NAME
For example:
gcloud compute url-maps create api-gateway-url-map \
  --default-service api-gateway-backend-service
This example URL map only targets one backend service representing a single gateway, so host rules or path matchers are not required. If you have more than one backend service, you can use host rules to direct requests to different services based on the host name. Use path matchers to direct requests to different services based on the request path.
For example:
gcloud compute url-maps add-path-matcher api-gateway-url-map \
  --path-matcher-name=my-pm2  \
  --default-service=my-host-default-backend \
  --path-rules="/video=video-service,/video/*=video-service" \
  --new-hosts my-hosts.com
gcloud compute url-maps add-host-rule api-gateway-url-map \
  --hosts=my-app-domain \
  --path-matcher-name=my-app-path-matcher
To learn more about host rules and path matchers, see the URL Map documentation.
Create an SSL certificate for your target proxy, as shown in the figure below:
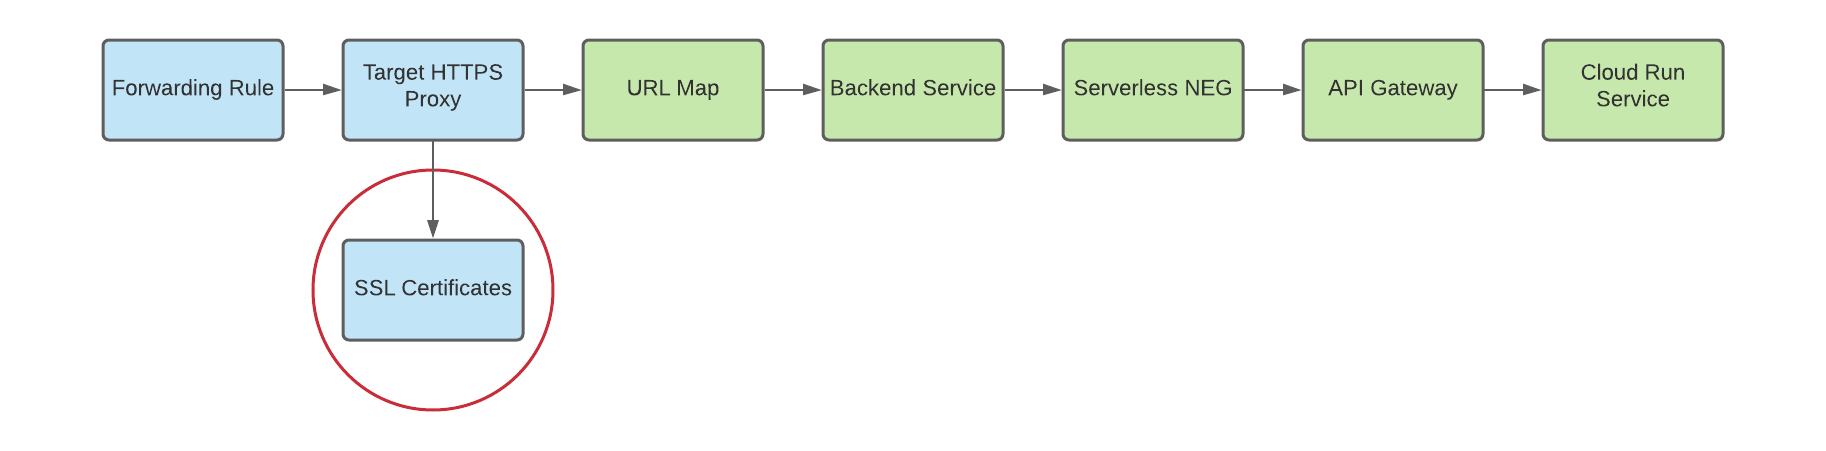
To create an HTTP(S) load balancer, an SSL certificate resource is required for the HTTP(S) target proxy. You can create an SSL certificate resource using either a Google-managed SSL certificate or a self-managed SSL certificate. Using Google-managed certificates is recommended. If you are testing this process without an SSL certificate resource and wish to set up an HTTP load balancer, you can skip this step.
To create a Google-managed certificate, you must have a domain. If you do not have a domain, you can use a self-signed SSL certificate for testing.
To create a Google-managed SSL certificate resource:
gcloud compute ssl-certificates create SSL_CERTIFICATE_NAME \
  --domains DOMAIN
To create a self-managed SSL certificate resource:
gcloud compute ssl-certificates create SSL_CERTIFICATE_NAME \
  --certificate CRT_FILE_PATH \
  --private-key KEY_FILE_PATH
Create a target HTTP(S) proxy to route requests to your URL map, as shown in the figure below:
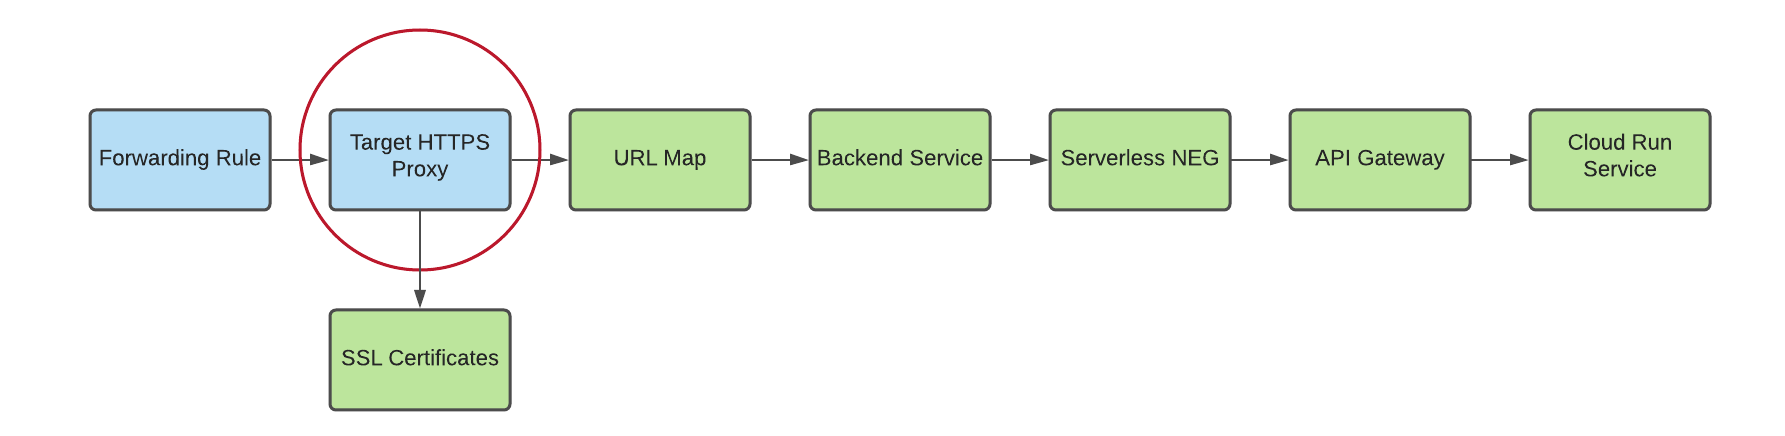
To create the target proxy, use the following command, where:
- TARGET_HTTPS_PROXY_NAME is the name of the target HTTP(S) proxy to create.
- URL_MAP_NAME is the name of the URL map created in a previous step.
- Optional: SSL_CERT_NAME is the name of the SSL cert created.
gcloud compute target-https-proxies create TARGET_HTTPS_PROXY_NAME \
  --ssl-certificates=SSL_CERT_NAME \
  --url-map=URL_MAP_NAME
For example:
gcloud compute target-https-proxies create api-gateway-https-proxy \
  --ssl-certificates=hello-cert \
  --url-map=api-gateway-url-map
As noted above, you can create an HTTP load balancer without creating an SSL certificate resource. To do so, use the following command:
gcloud compute target-http-proxies create TARGET_HTTP_PROXY_NAME \
      --url-map=URL_MAP_NAME
For example:
gcloud compute target-http-proxies create api-gateway-http-proxy \
  --url-map=api-gateway-url-map
Subsequent commands for HTTP proxies should be modified to accommodate the
--target-http-proxyflag and you TARGET_HTTP_PROXY_NAME for their HTTP(S) counterparts.Create a forwarding rule to route incoming requests to the proxy, as shown in the figure below:
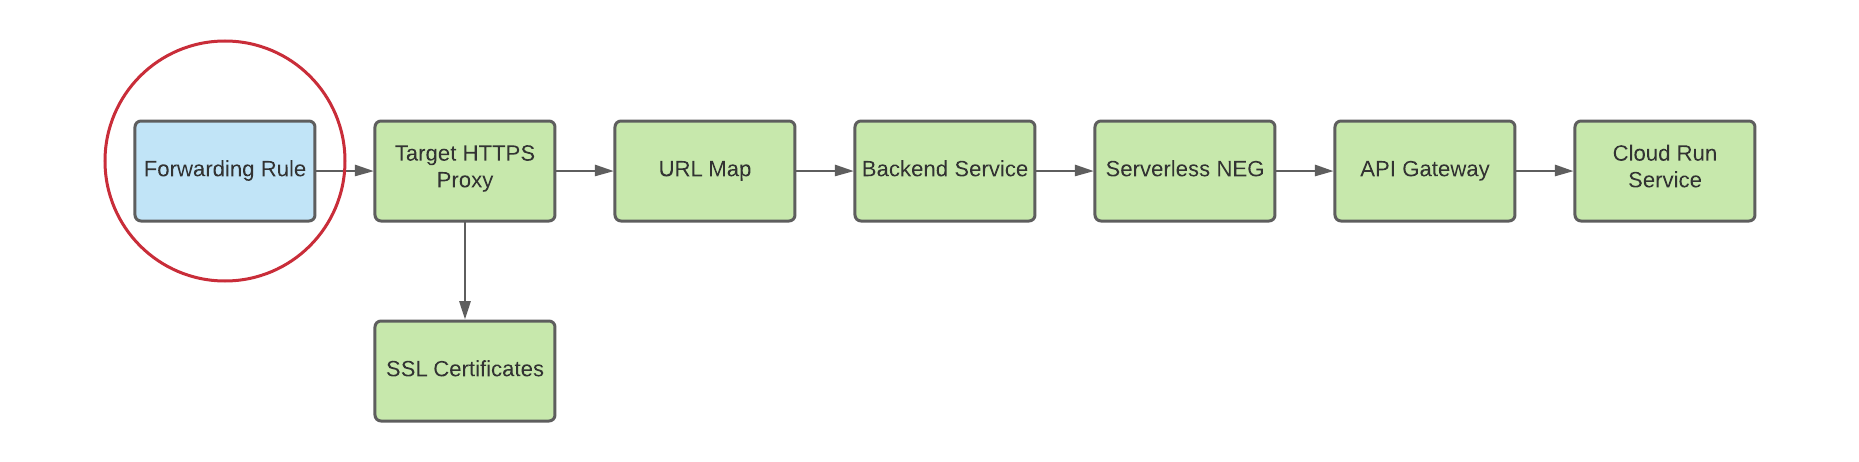
Use the following command to create the forwarding rule, where:
- HTTPS_FORWARDING_RULE_NAME is the name of the rule to create.
- TARGET_HTTPS_PROXY_NAME is the name of the HTTP(S) target proxy.
gcloud compute forwarding-rules create HTTPS_FORWARDING_RULE_NAME \
  --target-https-proxy=TARGET_HTTPS_PROXY_NAME \
  --global \
  --ports=443
For example:
gcloud compute forwarding-rules create my-fw \
  --target-https-proxy=api-gateway-https-proxy \
  --global \
  --ports=443
Update DNS records with load balancer IP address
If you have a custom domain, this step is required to set up the DNS settings for your domain to point to the new IP address of your service. It is also required if you created an HTTP(S) load balancer with a Google-managed certificate (which requires a domain). Allocating and using a static IP address is recommended when used with DNS. The specific instructions for this step depend on your DNS provider.
To send traffic to the load balancer, the DNS record of your domain (in this tutorial, my-app-domain) must point to the IP address(es) of the load balancer.
To find the IP address of your global forwarding rule, use this command:
gcloud compute forwarding-rules list
Update your domain's DNS A or AAAA record to point to the load balancer's IP address so that traffic sent to the existing custom domain URL is routed through the load balancer instead. It may take as little as several seconds or as long as several hours for DNS to propagate this change to the DNS server.
Test to confirm that that your gateway is receiving traffic using
curlor by visiting the URL in your browser. For example:https://my-app-domainUpon testing, you should see the response generated by the Cloud Run service. For example, this may be a "Hello World" HTML page or another expected response generated by the backend service directly. This means your request is going through the load balancer, and the backend service is instructing the load balancer to send it to your gateway.
Test your load balancer configuration
Now that you have configured your load balancer, you can start sending traffic to the forwarding rule's IP address.
To find the IP address of your global forwarding rule, use the following command:
gcloud compute forwarding-rules list
Use the curl command to test the response for various URLs for your services. For example:
curl https://HOST_URL/hello/
curl https://HOST_URL
You can use the API Gateway Cloud console to verify that requests are reaching the correct services.
Congratulations! You have successfully configured HTTP(S) Load Balancing for API GatewayPREVIEW.
Clean up
To avoid incurring charges to your Google Cloud account for the resources used in this quickstart, you can delete the Cloud Load Balancing resources you created. If these resources were created within their own project, you can delete the entire project. Otherwise, you can delete the resources individually.
Delete the project
Run the following command, replacing PROJECT_ID with your project ID:
gcloud projects delete PROJECT_ID
Delete individual resources
Delete each component in the load balancer:
Delete the forwarding rules:
gcloud compute forwarding-rules delete HTTPS_FORWARDING_RULE_NAME --global
Delete the global external IP addresses:
gcloud compute addresses delete IP_ADDRESSES --global
Delete the target proxy:
gcloud compute target-https-proxies delete TARGET_HTTP_PROXY_NAME
Delete the URL map:
gcloud compute url-maps delete URL_MAP_NAME
Delete the backend services:
gcloud compute backend-services delete BACKEND_SERVICE_NAME --global
(Optional) Delete the SSL certificate:
gcloud compute ssl-certificates delete SSL_CERTIFICATE_NAME
Delete the serverless NEG:
gcloud compute network-endpoint-groups delete SERVERLESS_NEG_NAME --region=REGION