This page shows you how to deploy VMs on GKE on Bare Metal using Anthos VM Runtime. Anthos VM Runtime uses KubeVirt to orchestrate VMs on clusters, allowing you to work with your VM-based apps and workloads in a uniform development environment. You can enable Anthos VM Runtime when creating a new cluster and on existing clusters.
Before you begin
These instructions assume that you have a cluster up and running. If you don't, you can follow the instructions on GKE on Bare Metal quickstart to quickly set up a cluster on your workstation.
Enable Anthos VM Runtime
Anthos VM Runtime is disabled, by default. To enable Anthos VM Runtime, edit the
VMRuntime custom resource in the cluster. Starting with GKE on Bare Metal
release 1.10.0, the VMRuntime custom resource is automatically installed on
clusters.
To enable Anthos VM Runtime:
Update the
VMRuntimecustom resource to setenabledtotrue.apiVersion: vm.cluster.gke.io/v1 kind: VMRuntime metadata: name: vmruntime spec: enabled: true # useEmulation default to false if not set. useEmulation: true # vmImageFormat default to "qcow2" if not set. vmImageFormat: qcow2If your node doesn't support hardware virtualization, or you aren't sure, set
useEmulationtotrue.If available, hardware virtualization provides better performance than software emulation. The
useEmulationfield defaults tofalse, if it isn't specified.apiVersion: vm.cluster.gke.io/v1 kind: VMRuntime metadata: name: vmruntime spec: enabled: true # useEmulation default to false if not set. useEmulation: true # vmImageFormat default to "qcow2" if not set. vmImageFormat: qcow2You can change the image format used for the VMs you create by setting the
vmImageFormatfield.The
vmImageFormatfield supports two disk image format values:rawandqcow2. If you don't setvmImageFormat, the Anthos VM Runtime uses therawdisk image format to create VMs. Therawformat may provide improved performance overqcow2, a copy on write format, but may use more disk. For more information about the image formats for your vm, see Disk image file formats in the QEMU documentation.apiVersion: vm.cluster.gke.io/v1 kind: VMRuntime metadata: name: vmruntime spec: enabled: true # useEmulation default to false if not set. useEmulation: true # vmImageFormat default to "qcow2" if not set. vmImageFormat: qcow2Save the configuration and verify that the
VMRuntimecustom resource is enabled:kubectl describe vmruntime vmruntimeThe details of the
VMRuntimecustom resource include aStatussection. Anthos VM Runtime is enabled and working whenVMRuntime.Status.Readyis set totrue.
Upgrading 1.9.x clusters
The VMRuntime custom resource is automatically installed on clusters upgraded
to version 1.10.0 or higher. When you upgrade a 1.9.x cluster to version 1.10.0
and higher, the upgrade process checks your cluster settings and configures the
VMRuntime custom resource to match the Anthos VM Runtime settings on your
1.9.x cluster. If spec.kubevirt is present in the 1.9.x cluster resource, the
upgrade process enables Anthos VM Runtime.
The VMRuntime custom resource settings take precedence over legacy Anthos VM
Runtime cluster settings, such as spec.kubevirt.useEmulation, in version
1.10.0 or higher clusters. Update the VMRuntime custom resource to change the
Anthos VM Runtime settings for your 1.10.0 or higher cluster.
Install virtctl
Install the
virtctlCLI tool as akubectlpluginexport GOOGLE_APPLICATION_CREDENTIALS="bm-gcr.json" sudo -E ./bmctl install virtctlVerify that
virtctlis installed:kubectl plugin listIf
virtctlis listed in the response, it's successfully installed.
Create a VM
Once you enable KubeVirt on your cluster and install the virtctl plugin for
kubectl, you can start creating VMs in your cluster using the
kubectl virt create vm command. Before running this command, we recommend
configuring a cloud-init file to ensure that you have console access to the VM
once it's created.
Create a custom cloud-init file for console access
There are two ways that you can create a custom cloud-init file. The easiest way
is to specify the --os=<OPERATING_SYSTEM> flag when creating the VM. This
method automatically configures a simple cloud-init file and works for the
following operating systems.
- Ubuntu
- CentOS
- Debian
- Fedora
Once your VM is created, you can access it for the first time with the following credentials and then change the password:
user: root
password: changeme
If your image contains a different Linux-based OS or you need a more advanced
configuration, you can manually create a custom cloud-init file and specify the
path to that file by specifying the --cloud-init-file=<path/to/file> flag. In
its most basic form, the cloud-init file is a YAML file that contains the
following:
#cloud-config
user: root
password: changeme
lock_passwd: false
chpasswd: {expire: false}
disable_root: false
ssh_authorized_keys:
- <ssh-key>
For more advanced configurations, see Cloud config examples.
Once you've determined which method to use, you are ready to create a VM.
Run the kubectl virt create vm command
You can create VMs from public or custom images.
Public image
If your cluster has external connection, you can create a VM from a public image by running:
kubectl virt create vm VM_NAME \
    --boot-disk-access-mode=MODE \
    --boot-disk-size=DISK_SIZE \
    --boot-disk-storage-class="DISK_CLASS" \
    --cloud-init-file=FILE_PATH \
    --cpu=CPU_NUMBER \
    --image=IMAGE_NAME \
    --memory=MEMORY_SIZE
Replace the following:
- VM_NAME with the name of the VM that you want to create.
- MODE with the access-mode of the boot disk. Possible values are
ReadWriteOnce(default) orReadWriteMany. - DISK_SIZE with the size you want for the boot disk. The default
value is
20Gi. - DISK_CLASS with the storage class of the boot disk. The default value is
local-shared. For a list of available storage classes, runkubectl get storageclass. - FILE_PATH with the full path of the customized cloud-init file.
Depending on the image, this may be required to gain console access to the
VM after it is created. If you plan to automatically configure the
cloud-init file with the
--osflag, then don't specify the--cloud-init-fileflag. If you're specifying the--cloud-init-fileflag, the--osflag is ignored. Acceptable values for--osareubuntu,centos,debian, andfedora. - CPU_NUMBER with the number of CPUs you want to configure for the VM.
The default value is
1. - IMAGE_NAME with the VM image, which can be
ubuntu20.04(default),centos8, or a URL of the image. - MEMORY_SIZE with the memory size of the VM. The default value is
4Gi.
Custom image
When creating a VM from a custom image, you can either specify an image from an HTTP image server or a locally stored image.
HTTP image server
You can set up an HTTP server using Apache or nginx and upload the custom image to its exposed folder. You can then create a VM from the custom image by running:
kubectl virt create vm VM_NAME \
    --boot-disk-access-mode=DISK_ACCESS_MODE \
    --boot-disk-size=DISK_SIZE \
    --boot-disk-storage-class=DISK_CLASS \
    --cloud-init-file=FILE_PATH \
    --cpu=CPU_NUMBER \
    --image=http://SERVER_IP/IMAGE_NAME \
    --memory=MEMORY_SIZE
Replace the following:
- VM_NAME with the name of the VM you want to create.
- DISK_ACCESS_MODE with the access-mode of the boot disk. Possible
values are
ReadWriteOnce(default) orReadWriteMany. - DISK_SIZE with the size you want for the boot disk. The default
value is
20Gi. - DISK_CLASS with the storage class of the boot disk. The default
value is
local-shared. For a list of available storage classes, runkubectl get storageclass. - FILE_PATH with the full path of the customized cloud-init file.
Depending on the image, this may be required to gain console access to the
VM after it is created. If you plan to automatically configure the
cloud-init file with the
--osflag, then don't specify the--cloud-init-fileflag. If you're specifying the--cloud-init-fileflag, the--osflag is ignored. Accectable values for--osareubuntu,centos,debian, andfedora. - CPU_NUMBER with the number of CPUs you want to configure for the
VM. The default value is
1. - SERVER_IP with the IP address of the server hosting the image.
- IMAGE_NAME with the file name of the custom image.
- MEMORY_SIZE with the memory size of the VM. The default value is
4Gi.
Locally stored image
You can store the custom image locally and create a VM from it by running:
kubectl virt create vm VM_NAME \
    --boot-disk-access-mode=DISK_ACCESS_MODE \
    --boot-disk-size=DISK_SIZE \
    --boot-disk-storage-class=DISK_CLASS \
    --cloud-init-file=FILE_PATH \
    --cpu=CPU_NUMBER \
    --image=IMAGE_PATH \
    --memory=MEMORY_SIZE \
Replace the following:
- VM_NAME with the name of the VM you want to create.
- DISK_ACCESS_MODE with the access-mode of the boot disk. Possible
values are
ReadWriteOnce(default) orReadWriteMany. - DISK_SIZE with the size you want for the boot disk. The default
value is
20Gi. - DISK_CLASS with the storage class of the boot disk. The default
value is
local-shared. - FILE_PATH with the full path of the customized cloud-init file.
Depending on the image, this may be required to gain console access to the
VM after it is created. If you plan to automatically configure the
cloud-init file with the
--osflag, then don't specify the--cloud-init-fileflag. If you're specifying the--cloud-init-fileflag, the--osflag is ignored. Accectable values for--osareubuntu,centos,debian, andfedora. - CPU_NUMBER with the number of CPUs you want to configure for the
VM. The default value is
1. - IMAGE_PATH with the local file path to the custom image.
- MEMORY_SIZE with the memory size of the VM. The default value is
4Gi.
Change the default values for flags
The kubectl virt create vm command uses default values to auto-fill
unspecified flags when the command is executed. You can change these default
values by running:
kubectl virt config default FLAG
Replace FLAG with the flag of the parameter that you want to change the default value for.
Example: The following command changes the default CPU configuration from
the initial default of 1 to 2:
kubectl virt config default --cpu=2
For a list of supported flags and their current default values, run:
kubectl virt config default -h
The default configurations are stored client side as a local file called
~/.virtctl.default. You can change the default configurations by editing
this file as well.
Access your VM
You can access VMs using the following methods:
Console access
To access a VM from the console, run:
kubectl virt console VM_NAME
Replace VM_NAME with the name of the VM that you want to access.
VNC access
To access a VM using VNC, run:
# This requires remote-viewer from the virt-viewer package and a graphical desktop from where you run virtctl
kubectl virt vnc VM_NAME
Replace VM_NAME with the name of the VM that you want to access.
Internal access
The IP addresses of your cluster VMs can be directly accessed by all other pods in the cluster. To find the IP address of a VM, run:
kubectl get vmi VM_NAME
Replace VM_NAME with the name of the VM that you want to access.
The command returns something like:
NAME     AGE   PHASE     IP              NODENAME
vm1      13m   Running   192.168.1.194   upgi-bm002
External access
VMs created in your cluster have pod network addresses that can be accessed only from within the cluster. To access cluster VMs externally:
Expose the VM as a load balancer service:
kubectl virt expose vm VM_NAME \
    --port=LB_PORT \
    --target-port=VM_PORT \
    --type=LoadBalancer \
    --name=SERVICE_NAME
Replace the following:
- VM_NAME with the name of the VM that you want to access.
- LB_PORT with the port of the load balancer service that is exposed.
- VM_PORT with the port on the VM that you want to access through the load balancer service.
- SERVICE_NAME with the name you want to give to this load balancer service.
Get the external IP address of the load balancer service:
kubectl get svc SERVICE_NAMEReplace SERVICE_NAME with the name of the load balancer service that exposes the VM.
You can access the target-port of the VM through the IP address listed in the
EXTERNAL-IPfield of the response.
Example
If you have a VM named galaxy that you wanted to access it from outside the
cluster using SSH, you would run:
kubectl virt expose vm galaxy \
   --port=25022 \
   --target-port=22 \
   --type=LoadBalancer \
   --name=galaxy-ssh
Then get the load balancer IP address:
kubectl get svc galaxy-ssh
The command returns something like:
NAME        TYPE          CLUSTER-IP     EXTERNAL-IP   PORT(S)           AGE
galaxy-ssh  LoadBalancer  10.96.250.76   21.1.38.202   25000:30499/TCP   4m40s
Now you can access the VM using SSH through 21.1.38.202:25022 (VIP:port)
from outside the cluster:
ssh root@21.1.38.202:22 -p 25022
Inspect VM telemetry and console logs
VM telemetry and console logs have been integrated into Google Cloud console. Telemetry information and log data are critical to monitoring the status of your VMs and troubleshooting any problems with your cluster VMs.
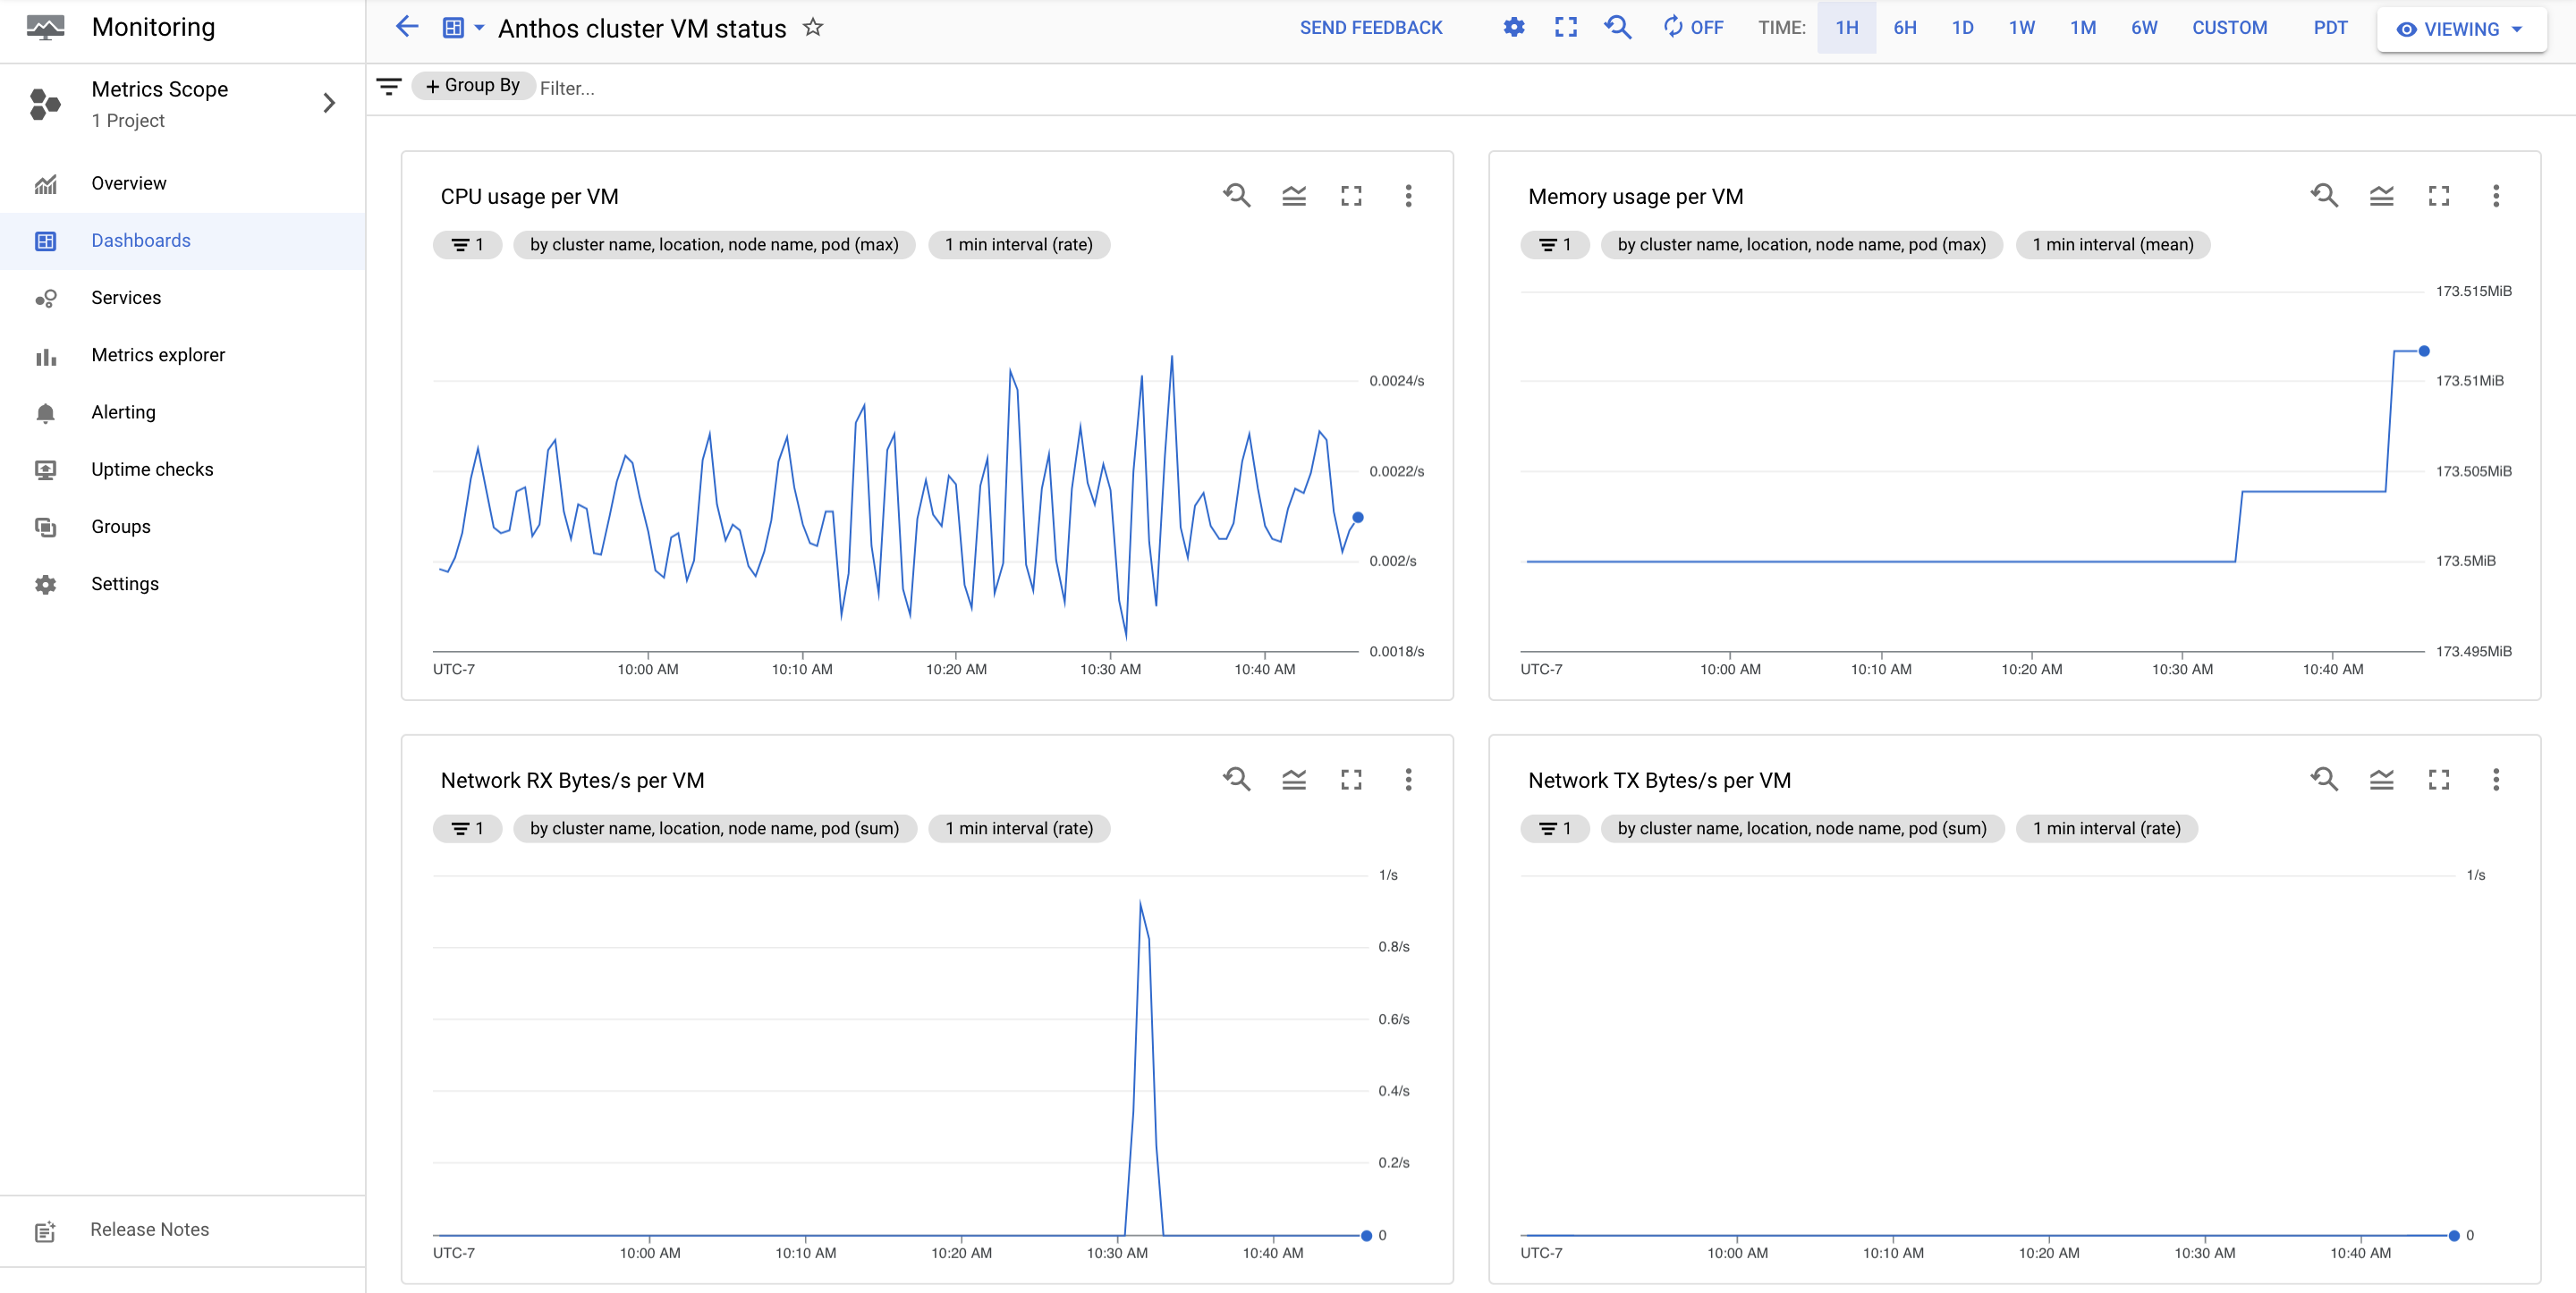
VM telemetry
The Anthos clusters VM status dashboard provides live telemetry data for your cluster VMs.
To view telemetry information for your cluster VMs:
In the Google Cloud console, select Monitoring, or click the following button:
Select Dashboards.
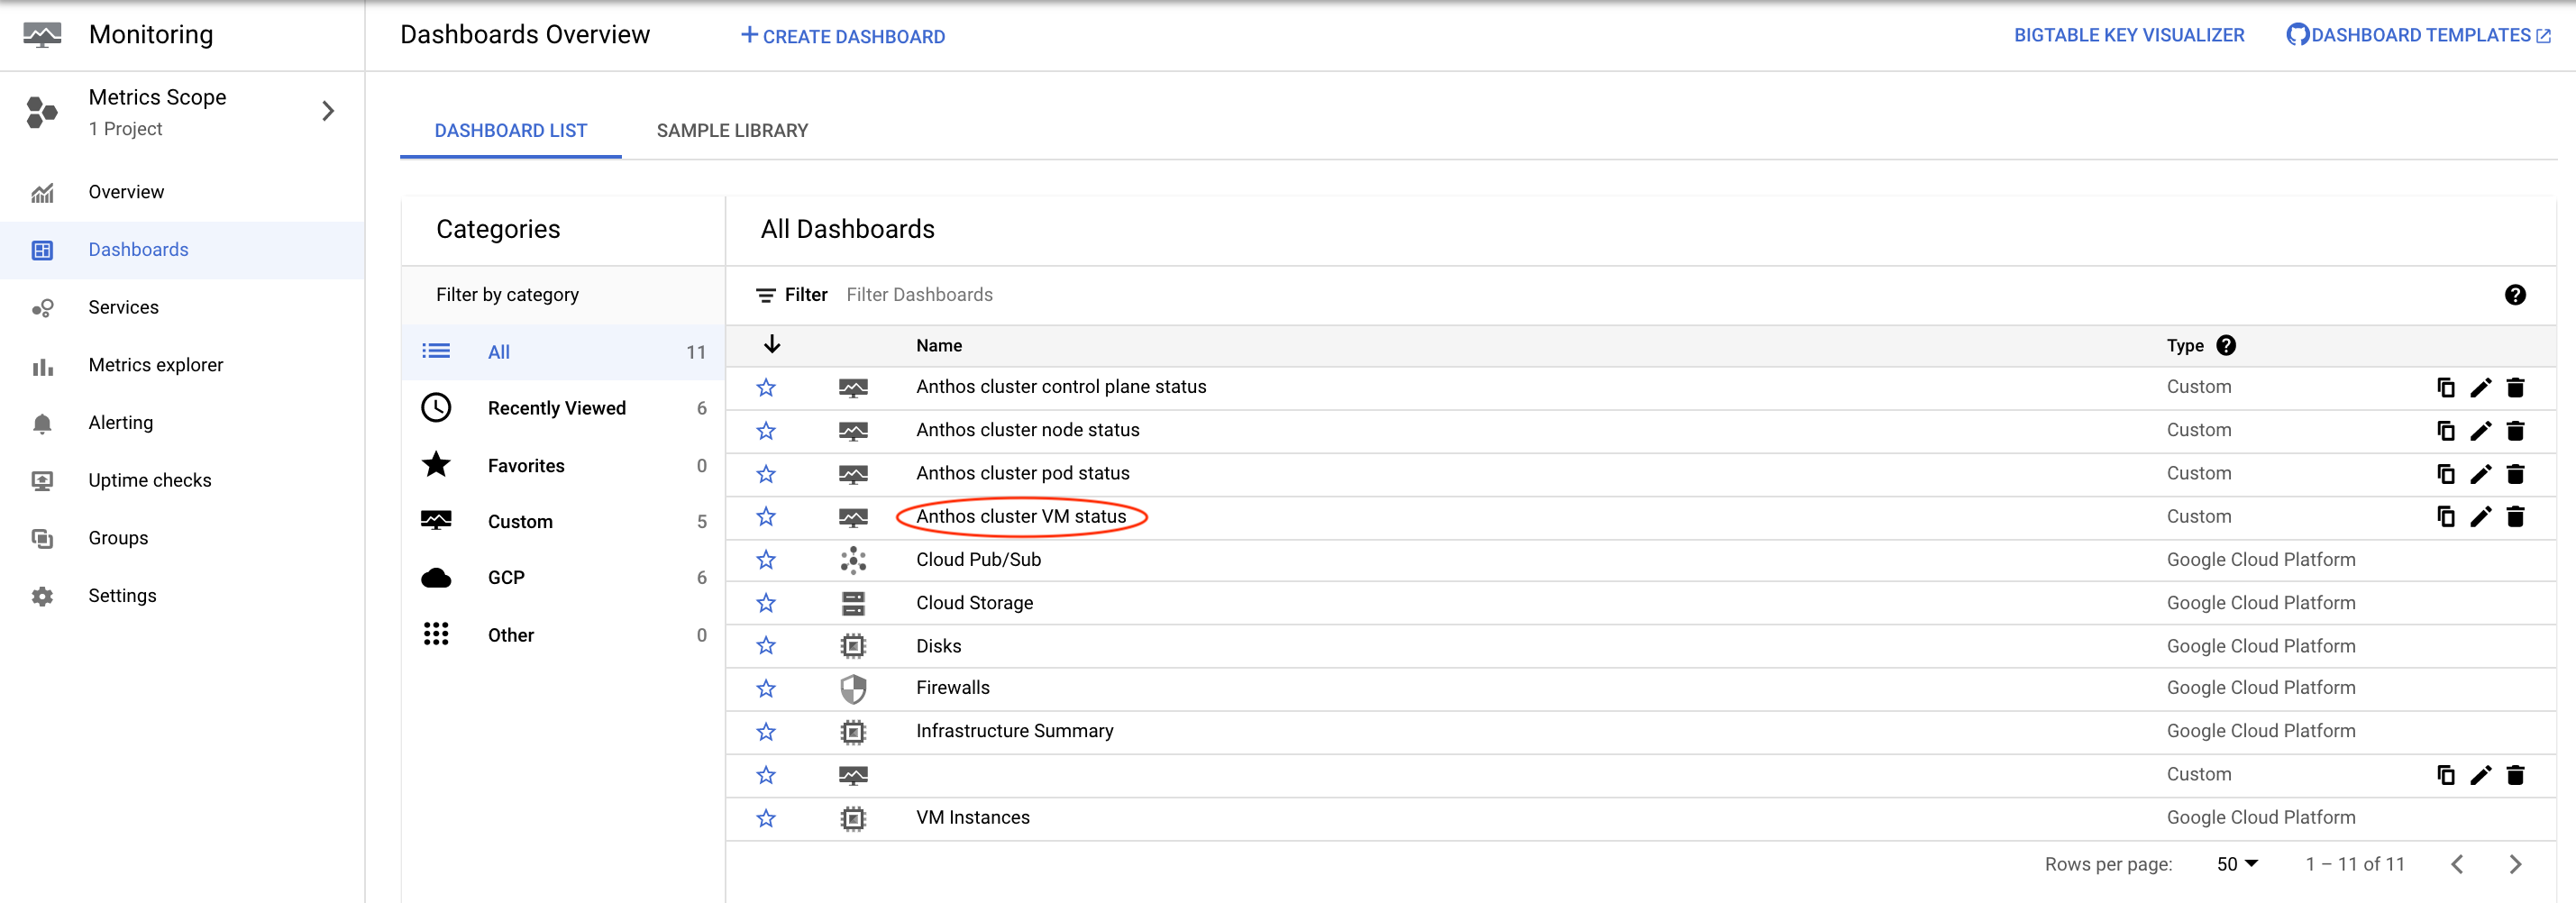
Click Anthos clusters VM status in the All Dashboards list.
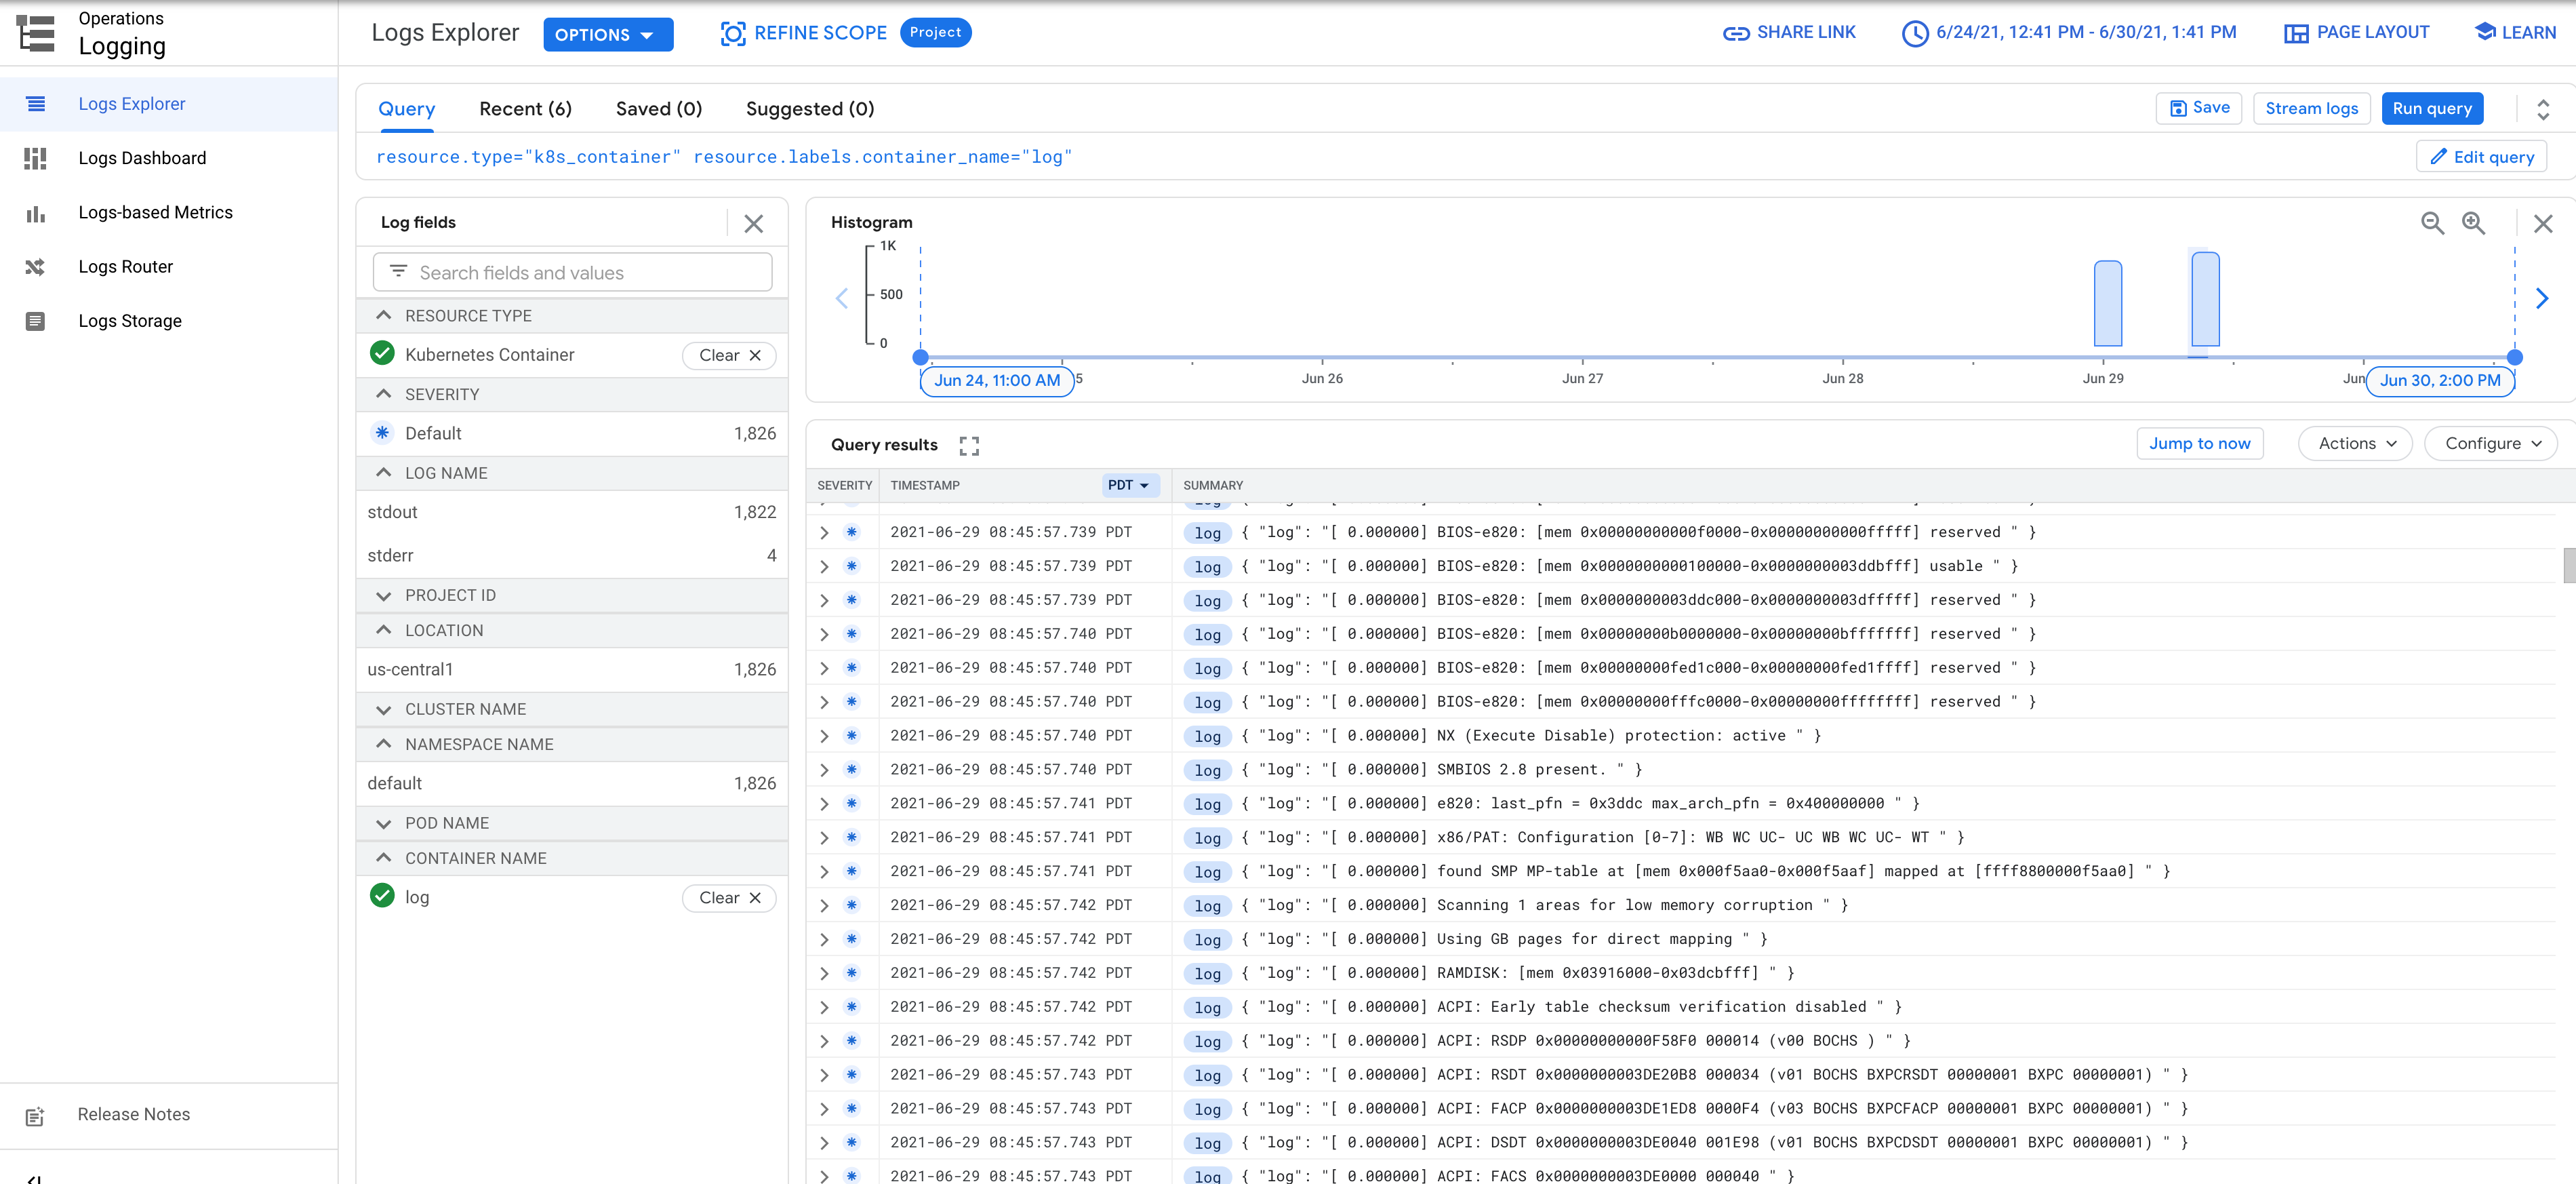
VM console logs
VM serial console logs are streamed to Cloud Logging and can be viewed in Logs Explorer.
Delete VMs and their resources
Deleting only the VM
kubectl virt delete vm VM_NAME
Replace VM_NAME with the name of the VM that you want to delete.
Deleting only VM disks
kubectl virt delete disk DISK_NAME
Replace DISK_NAME with the name of the disk that you want to delete. If you try to delete a VM disk before deleting the VM, the disk is marked for deletion pending the deletion of the VM.
Deleting VM & resources
kubectl virt delete vm VM_NAME --all
Replace VM_NAME with the name of the VM that you want to delete.
If you want to check the resources used by the VM that would be deleted, you
can specify the --dry-run flag together with --all.
Disable Anthos VM Runtime
Before you can disable Anthos VM Runtime in a cluster, you must ensure that all VMs in that cluster have been deleted. Disabling Anthos VM Runtime removes all KubeVirt related deployments, such as pods and services in the KubeVirt and CDI namespaces.
Check for any existing VMs in the cluster:
kubectl get vmIf the command shows that there are still VMs in your cluster, then you must delete them before proceeding.
Update the
VMRuntimecustom resource to setenabledtofalse.apiVersion: vm.cluster.gke.io/v1 kind: VMRuntime metadata: name: vmruntime spec: enabled: false # useEmulation default to false if not set. useEmulation: true # vmImageFormat default to "qcow2" if not set. vmImageFormat: qcow2Save the configuration and verify that the
VMRuntimecustom resource is disabled:kubectl describe vmruntime vmruntimeThe details of the
VMRuntimecustom resource include aStatussection. Anthos VM Runtime is enabled and working whenVMRuntime.Status.Readyis set tofalse.
What's next
- Learn about Anthos VM Runtime known issues.
- See the KubeVirt user guide.