Cuando llamas a un proxy de API en Apigee con seguridad OAuth, Apigee es responsable de verificar los tokens de acceso. Piensa en Apigee como el equipo selector: ninguna llamada a la API puede pasar por eso y no tiene un token de acceso que se pueda verificar.
Agrega una política VerifyAccessToken
Para configurar la verificación del token, coloca una política de OAuthV2 con la operación VerifyAccessToken al comienzo del flujo del proxy de API (el comienzo del flujo de preprocesamiento de ProxyEndpoint). Si se coloca allí, los tokens de acceso se verificarán antes de que se realice cualquier otro procesamiento, y si se rechaza un token, Apigee deja de procesarlo y muestra un error al cliente.
Para acceder a la página de proxies de API mediante la IU de Apigee, sigue estos pasos:
Selecciona Desarrollar > Proxies de API en la barra de navegación izquierda.
En la lista, selecciona el proxy que deseas proteger.
En la página de descripción general, haz clic en la pestaña Desarrollar.
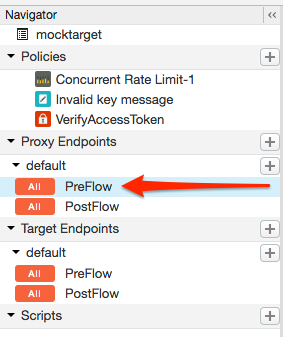
En el navegador, selecciona PreFlow para un extremo que se encuentra en Proxy Endpoints. Por lo general, el extremo que deseas se denomina “predeterminado”, aunque es posible crear múltiples extremos de proxy. Si tienes varios extremos, es recomendable que sigas estos pasos para realizar la verificación de token en cada uno.
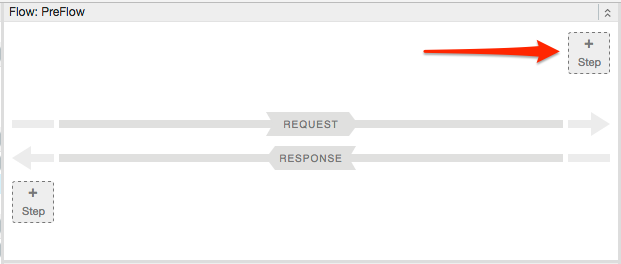
En el editor de flujo del proxy, haz clic en + Paso (+ Step).
Selecciona Nueva instancia de política.
En la lista de políticas, selecciona OAuth v2.0.
Opcionalmente, cambia el nombre de la política y el nombre visible. Por ejemplo, para mejorar la legibilidad, puedes cambiar el nombre visible y el nombre a "VerifyAccessToken".
Haz clic en Agregar.
La política predeterminada ya está configurada con la operación VerifyAccessToken, por lo que no tienes que hacer nada más:
[[["Fácil de comprender","easyToUnderstand","thumb-up"],["Resolvió mi problema","solvedMyProblem","thumb-up"],["Otro","otherUp","thumb-up"]],[["Difícil de entender","hardToUnderstand","thumb-down"],["Información o código de muestra incorrectos","incorrectInformationOrSampleCode","thumb-down"],["Faltan la información o los ejemplos que necesito","missingTheInformationSamplesINeed","thumb-down"],["Problema de traducción","translationIssue","thumb-down"],["Otro","otherDown","thumb-down"]],["Última actualización: 2025-09-03 (UTC)"],[[["\u003cp\u003eThis content focuses on configuring OAuth 2.0 access token verification within Apigee and Apigee hybrid API proxies.\u003c/p\u003e\n"],["\u003cp\u003eApigee acts as a gatekeeper, requiring and verifying access tokens for all API calls to ensure security.\u003c/p\u003e\n"],["\u003cp\u003eTo verify access tokens, an OAuthV2 policy with the VerifyAccessToken operation must be placed at the beginning of the API proxy's flow, specifically the ProxyEndpoint Preflow.\u003c/p\u003e\n"],["\u003cp\u003eThe default setting for the VerifyAccessToken policy expects the access token to be included in the Authorization header as a Bearer token, but it can be configured to support different types of tokens.\u003c/p\u003e\n"],["\u003cp\u003eIf encountering an "Invalid API call as no apiproduct match found" error, an external community article is provided for troubleshooting steps.\u003c/p\u003e\n"]]],[],null,["# Verifying access tokens\n\n*This page\napplies to **Apigee** and **Apigee hybrid**.*\n\n\n*View [Apigee Edge](https://docs.apigee.com/api-platform/get-started/what-apigee-edge) documentation.*\n\nWhen you call an API proxy on Apigee that has OAuth security, Apigee is responsible for\nverifying access tokens. Think of Apigee as the gatekeeper -- no API call can pass through that\ndoes not have an access token that can be verified.\n| **Tip:** When verifying an access token, if you happen to see this error: \"Invalid API call as no apiproduct match found\", go to this [Apigee Community article](https://community.apigee.com/content/kbentry/6831/oauth20-access-token-verification-throws-invalid-a.html) for details on the cause of this error and steps to correct it.\n\nAdding a VerifyAccessToken policy\n---------------------------------\n\nTo configure token verification, place an [OAuthV2 policy](/apigee/docs/api-platform/reference/policies/oauthv2-policy) with the\n**VerifyAccessToken** operation at the very beginning of the API proxy flow (the\nbeginning of the ProxyEndpoint Preflow). If placed there, access tokens will be verified before\nany other processing takes place, and if a token is rejected, Apigee stops processing and returns\nan error back to the client.\n\nTo access the API proxies page using the Apigee UI:\n\n1. Open the [Apigee UI](https://apigee.google.com).\n2. Select **Develop \\\u003e API Proxies** in the left navigation bar.\n3. From the list, select the proxy you wish to protect.\n4. In the overview page, click the **Develop** tab.\n5. In the Navigator, select **PreFlow** for an endpoint listed under Proxy Endpoints. Typically, the endpoint you want is called \"default\", although it is possible to create multiple proxy endpoints. If you do have multiple endpoints, you will probably want to follow these steps to perform token verification on each one. \n\n \u003cbr /\u003e\n\n6. In the proxy flow editor, click **+ Step** . \n\n \u003cbr /\u003e\n\n7. Select **Policy Instance New**.\n8. From the policy list, select **OAuth v2.0**.\n9. Optionally, change the policy name and display name. For example, for better readability, you might change the display name and name both to \"VerifyAccessToken\".\n10. Click **Add**.\n\nThe default policy is already configured with the VerifyAccessToken operation, so you do not\nhave to do anything further: \n\n```text\n\u003c?xml version=\"1.0\" encoding=\"UTF-8\" standalone=\"yes\"?\u003e\n\u003cOAuthV2 async=\"false\" continueOnError=\"false\" enabled=\"true\" name=\"OAuth-v20-1\"\u003e\n \u003cDisplayName\u003eOAuth v2.0 1\u003c/DisplayName\u003e\n \u003cFaultRules/\u003e\n \u003cProperties/\u003e\n \u003cAttributes/\u003e\n \u003cExternalAuthorization\u003efalse\u003c/ExternalAuthorization\u003e\n \u003cOperation\u003eVerifyAccessToken\u003c/Operation\u003e\n \u003cSupportedGrantTypes/\u003e\n \u003cGenerateResponse enabled=\"true\"/\u003e\n \u003cTokens/\u003e\n\u003c/OAuthV2\u003e\n```\n| **Note:** By default, VerifyAccessToken expects the access token to be sent in an Authorization header as a Bearer token. For example: \n|\n| ```text\n| -H \"Authorization: Bearer Rft3dqrs56Blirls56a\"\n| ```\n|\n| You can change this default in the `\u003cAccessToken\u003e ` element in the\n| OAuthV2 policy, as explained in the [OAuthV2 policy\n| documentation](/apigee/docs/api-platform/reference/policies/oauthv2-policy#accesstokenelement)."]]