Autorizzazioni CRUD complete per i portali integrati.
Nota: il ruolo Amministratore del portale non è attualmente visibile nell'interfaccia utente. Per assegnare il ruolo a un utente, utilizza il seguente comando gcloud:
Inserisci le seguenti informazioni in Crea un portale:
Campo
Descrizione
Nome
Nome del portale. Il nome può contenere solo lettere, numeri, spazi e i seguenti caratteri speciali: punto (.), virgola (,), trattino (-) o trattino basso (_). Deve essere univoco in tutte le organizzazioni.
Nota: se elimini un portale, non puoi crearne immediatamente uno con lo stesso nome, perché il portale eliminato verrà archiviato temporaneamente nella cartella Cestino.
Dominio
(Sola lettura) Man mano che inserisci il nome del portale, viene visualizzato il dominio predefinito per il portale. Ad esempio: "orgname-portalname.apigee.io", dove "orgname" è il nome dell'organizzazione e "portalname" è definito utilizzando il nome del portale convertito in minuscolo e senza spazi.
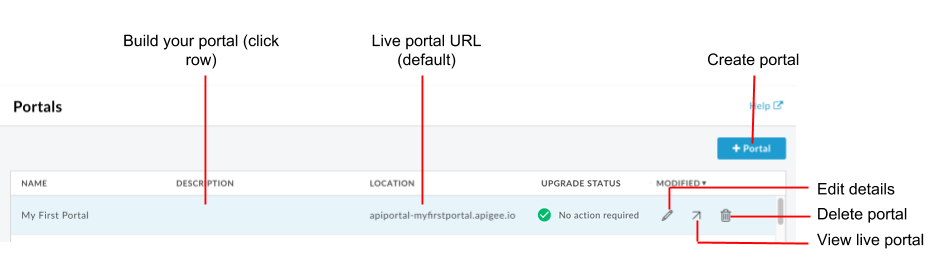
Posiziona il cursore su un portale esistente per visualizzare il menu delle azioni.
Fai clic su .
Il portale live si apre in una nuova scheda del browser.
Eliminazione di un portale
A volte potrebbe essere necessario eliminare un portale. Ad esempio, se hai
creato un portale di test per provare le funzionalità nel tuo ambiente locale, puoi
eliminarlo al termine della fase di test.
[[["Facile da capire","easyToUnderstand","thumb-up"],["Il problema è stato risolto","solvedMyProblem","thumb-up"],["Altra","otherUp","thumb-up"]],[["Difficile da capire","hardToUnderstand","thumb-down"],["Informazioni o codice di esempio errati","incorrectInformationOrSampleCode","thumb-down"],["Mancano le informazioni o gli esempi di cui ho bisogno","missingTheInformationSamplesINeed","thumb-down"],["Problema di traduzione","translationIssue","thumb-down"],["Altra","otherDown","thumb-down"]],["Ultimo aggiornamento 2025-09-05 UTC."],[[["\u003cp\u003eThis page provides instructions for managing portals in Apigee and Apigee hybrid environments, including creation, editing, viewing, and deletion of portals.\u003c/p\u003e\n"],["\u003cp\u003eManaging portals requires specific roles, such as Portal Administrator, Organization Administrator, or Read-only Organization Administrator, which can be assigned via the \u003ccode\u003egcloud\u003c/code\u003e command or the Apigee UI.\u003c/p\u003e\n"],["\u003cp\u003eThe Portals page can be accessed through the side navigation bar or the top navigation bar and it provides quick actions to create, build, view live, edit and delete portals.\u003c/p\u003e\n"],["\u003cp\u003eWhen creating a portal, users must provide a unique name and can optionally add a description; however, the default domain is generated automatically based on the organization and portal names, with the possibility to set up a custom domain.\u003c/p\u003e\n"],["\u003cp\u003eA maximum of 10 portals can be created per organization, and deleting a portal requires confirmation by typing "DELETE"; note that deleting a portal does not affect individual app registrations and API keys but will delete team-related ones.\u003c/p\u003e\n"]]],[],null,["# Managing your portals\n\n*This page\napplies to **Apigee** and **Apigee hybrid**.*\n\n\n*View [Apigee Edge](https://docs.apigee.com/api-platform/get-started/what-apigee-edge) documentation.*\n\n\u003cbr /\u003e\n\nCreate and manage your portals, as described in the following sections.\n\nAbout the portal roles\n----------------------\n\nYou need one of the following roles to manage your portals. To assign roles to a user, see [Change user roles in the UI](/apigee/docs/api-platform/system-administration/manage-users#change-user-roles-in-the-ui).\n\nExploring the Portals page\n--------------------------\n\nTo access the Portals page: \n\n### Cloud Console UI\n\nIn the Apigee in Cloud console, go to the **Distribution \\\u003e Portals** page.\n\n[Go to Portals](https://console.cloud.google.com/apigee/portals)\n\nThe portals page opens and lists the current portals.\n\nThe Portals page enables you to:\n\n- [Create a portal](#create-portal)\n- [Build your portal and its contents](#build)\n- [View the live portal](/apigee/docs/api-platform/publish/portal/view-live-portal)\n- [Edit portal details](#edit-portal-details)\n- [Delete a portal](#delete-portal)\n\n### Classic UI\n\nUse one of the following methods:\n\n- Select **Publish \\\u003e Portals** in the side navigation bar.\n- When editing a portal, click **Portals** in the top navigation bar.\n\nThe portals page opens and lists the current portals.\n\nAs highlighted in the previous figure, the Portals page enables you to:\n\n- Quickly determine which portals are using the new portal front-end\n- [Create a portal](#create-portal)\n- [Build your portal and its contents](#build)\n- [View the live portal](/apigee/docs/api-platform/publish/portal/view-live-portal)\n- [Edit portal details](#edit-portal-details)\n- [Delete a portal](#delete-portal)\n\nCreating a portal\n-----------------\n\nCreate multiple portals for your organization, as required.\n\nWhen you create a new portal, a set of starter pages is provided for you to use as a jump-off point. See [About the sample portal](/apigee/docs/api-platform/publish/portal/build-integrated-portal#sample-portal) and [Quick tips for customizing the sample portal](/apigee/docs/api-platform/publish/portal/portal-quick-tips).\n| **Note** : You can create a **maximum of 10 portals** in your organization.\n\nTo create a new portal:\n\n1. [Access the Portals page](#view-portals).\n2. Open **Create a portal** :\n\n ### Cloud Console UI\n\n Click **+ Create**.\n\n ### Classic UI\n\n Click **+ Portal**.\n3. Enter the following information in **Create a portal**:\n\n4. Click **Create**.\n\n\u003cbr /\u003e\n\nBuilding your portal\n--------------------\n\nTo build your portal and its contents:\n\n1. [Access the Portals page](#view-portals).\n2. Click the name of the portal you want to build. The portal landing page is displayed.\n3. Build the portal and its contents, as described in [steps to build your portal](/apigee/docs/api-platform/publish/portal/portal-steps).\n\nEditing the portal name and description\n---------------------------------------\n\nTo edit portal details, including name and description:\n**Note:** You cannot modify the default URL once the portal is created. However, you can create a [custom domain](/apigee/docs/api-platform/publish/portal/custom-domain). \n\n### Cloud Console UI\n\n1. [Access the Portals page](#view-portals).\n2. On the portal row you want to edit, click more_vert **More** \\\u003e edit **Edit**\n3. Edit the portal name and description.\n4. Click **Save**.\n\n### Classic UI\n\n1. [Access the Portals page](#view-portals).\n2. Position your cursor over an existing portal to display the actions menu.\n3. Click .\n4. Edit the portal name and description.\n5. Click **Update**.\n\nViewing the live portal\n-----------------------\n\nTo view the live portal: \n\n### Cloud Console UI\n\n1. [Access the Portals page](#view-portals).\n2. On the portal row you want to view, click more_vert **More** \\\u003e **View live portal**.\n\n### Classic UI\n\n1. [Access the Portals page](#view-portals).\n2. Position your cursor over an existing portal to display the actions menu.\n3. Click .\n\nThe live portal opens in a new browser tab.\n\nDeleting a portal\n-----------------\n\nThere are times when you may need to delete a portal. For example, if you have\ncreated a test portal to try out features in your local environment, you may\ndelete it after the testing phase is complete.\n| **Note:** Existing app registrations and API keys of individual developers won't be impacted when you delete a portal, but all Team related app registrations and API Keys will be deleted. See [Where app registration and API keys are stored](/apigee/docs/api-platform/publish/portal/build-integrated-portal#app-keys).\n\nTo delete a portal: \n\n### Cloud Console UI\n\n1. [Access the Portals page](#view-portals).\n2. On the portal row you want to delete, click more_vert **More** \\\u003e delete **Delete**\n3. To confirm the delete operation:\n 1. Type **DELETE** in the text field.\n 2. Click **Confirm**.\n\n### Classic UI\n\n1. [Access the Portals page](#view-portals).\n2. Position your cursor over an existing portal to display the actions menu.\n3. Click .\n4. To confirm the delete operation:\n 1. Type **DELETE** in the text field.\n 2. Click **Delete**."]]

 .
. .
. .
.